Your archive: search, filter, scan, import files and open documents. Almost everything starts here.
Chapter 1 SMART ARCHIVE
The detailed guide
Every screen, every button, every setting—explained in order. Read the guide from the beginning or jump straight to your question using the table of contents.
BEFORE YOU START
How the app is organised
On iPhone, Smart Archive consists of three areas that you can reach at any time from the bar at the bottom. The top always shows which archive is currently open.
View the folder structure of the open archive and open, rename, create and delete folders.
Chapter 2Tags, subscription, help, archives, AI, scanning, text recognition and privacy.
Chapter 3The archive button at the top right shows the open archive: a house for Private, a building for Business. Tap it to switch archives.
Section 3.48 languages—automatically matched to the operating system
The app and archive templates are fully available in German, English, Russian, Ukrainian, French, Italian, Spanish and Portuguese. Smart Archive uses the language set on your device—there is nothing to select.
CHAPTER 1
Main screen – Documents
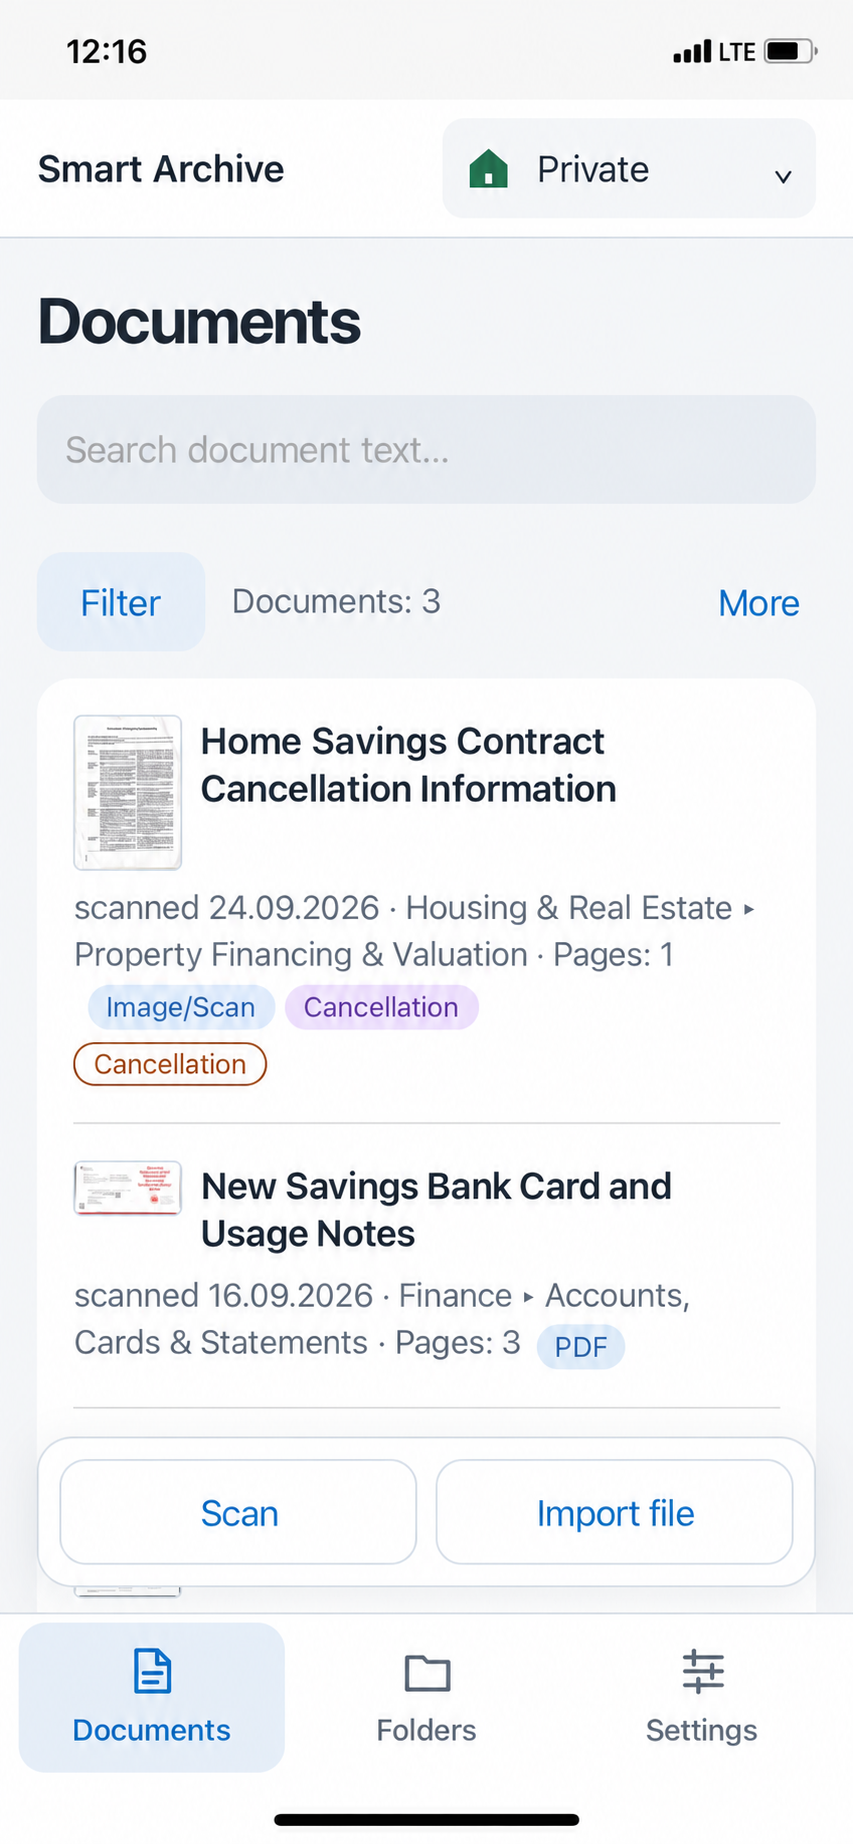
When it starts, Smart Archive opens the Documents area. It lists every document in the open archive, newest first.
What you see on the screen
- Search field
- “Search the text of all documents…” searches not only titles but every recognised word on every page. Enter a company name, contract number or keyword, for example—the list immediately shows only matching documents.
- Filters
- Shows the filters for folders, document types and tags. Section 1.4 explains how they work.
- Documents: 3
- How many documents are currently shown—with an active search or filter, this is the number of matches.
- More
- Opens Refresh and Check duplicates (section 1.5).
- Document entry
- On the left, a thumbnail of the first page, next to it the name. Below it: capture date, folder ▸ subfolder and page count. The coloured labels show the format (Image/scan, PDF, Word, Excel), the detected document type (e.g. Cancellation) and—outlined—the assigned tags.
- Scan · Import file
- The two most important buttons float above the list: capture paper with the camera (1.1) or add an existing file (1.3).
Tip: swipe to share or delete
Swipe an entry in the list to the left to reveal Share and Delete—so you can do both without opening the document. The app asks for confirmation before deleting.
1.1Scan
Scan turns a sheet of paper into a searchable PDF within seconds. The camera detects the edges of the page, straightens angled shots and removes the background.
Open the scanner
Tap Scan in the Documents area. The very first time, your iPhone asks whether Smart Archive may use the camera—confirm with OK.
Choose “Auto”
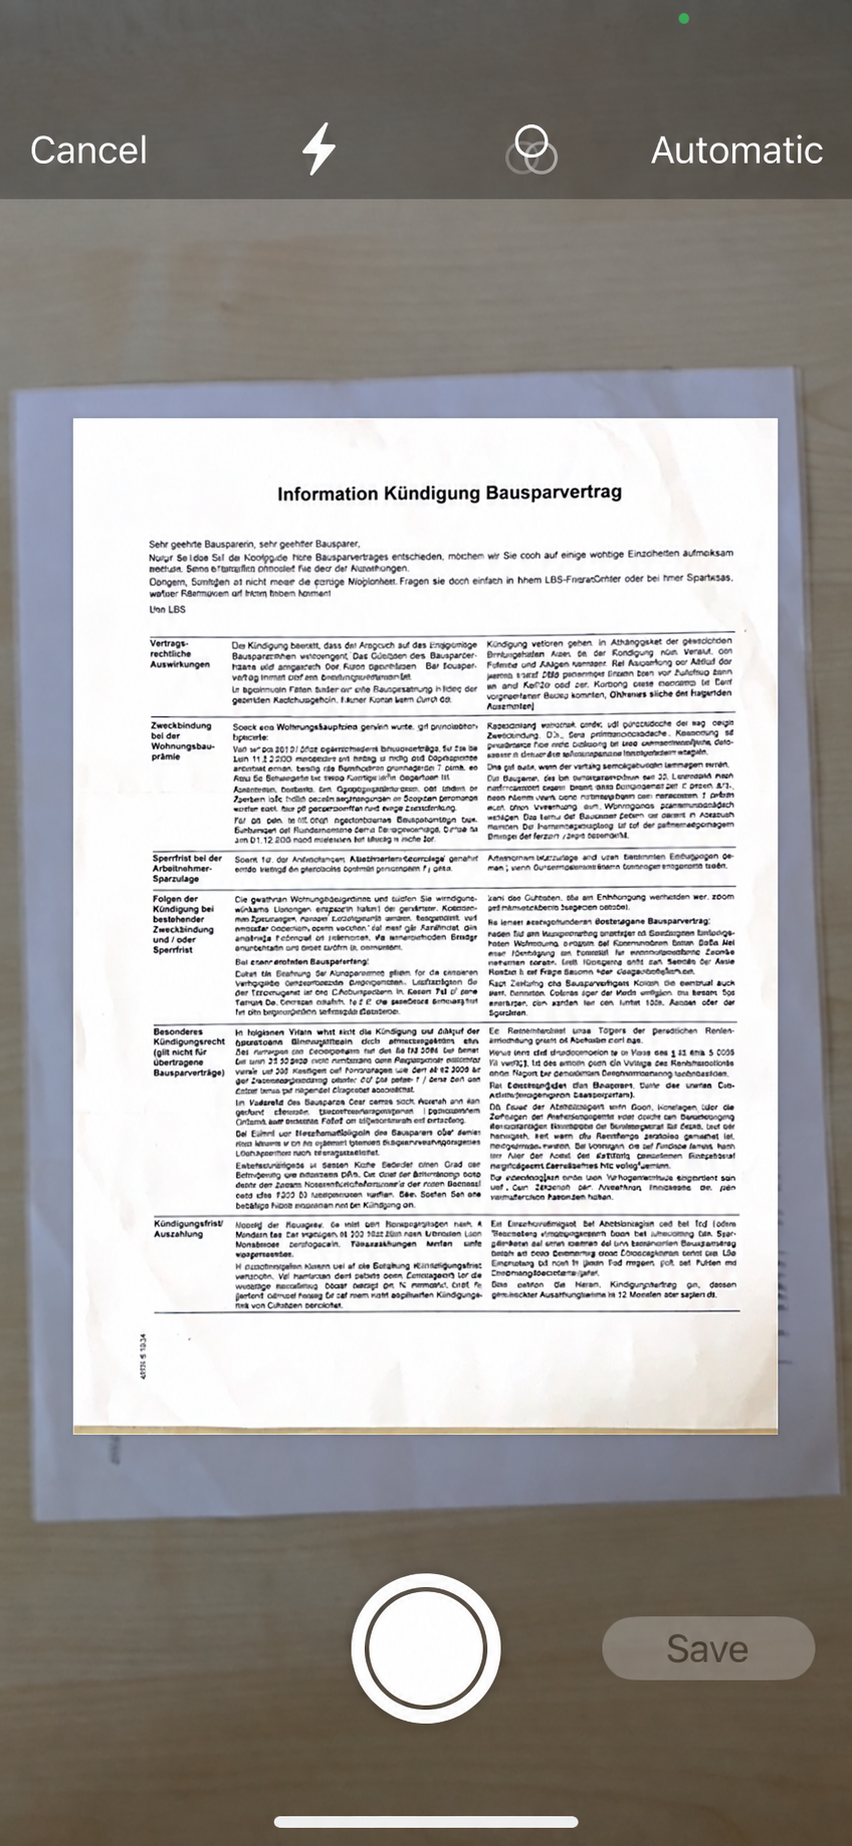
The capture mode is shown at the top right. Tap it until Auto is displayed. The camera then captures by itself as soon as the page is steady and fully in view. If it shows Manual, you have to tap the round shutter button yourself.
Position the page
Place the document on a steady, preferably dark and well-lit surface. Hold the iPhone parallel above it until all four corners are visible. The detected edge is highlighted; shortly afterwards the page is captured.
More pages, then “Save”
For multi-page documents, simply put down the next sheet—the camera captures it too. The thumbnail at the bottom left shows how many pages have been captured. Finally, tap Save at the bottom right.
The icons at the top of the camera
Cancel leaves the scanner without saving. The flash turns the light on or off—better off for glossy paper. The circles icon chooses the colour filter (colour, greyscale, black and white or photo).
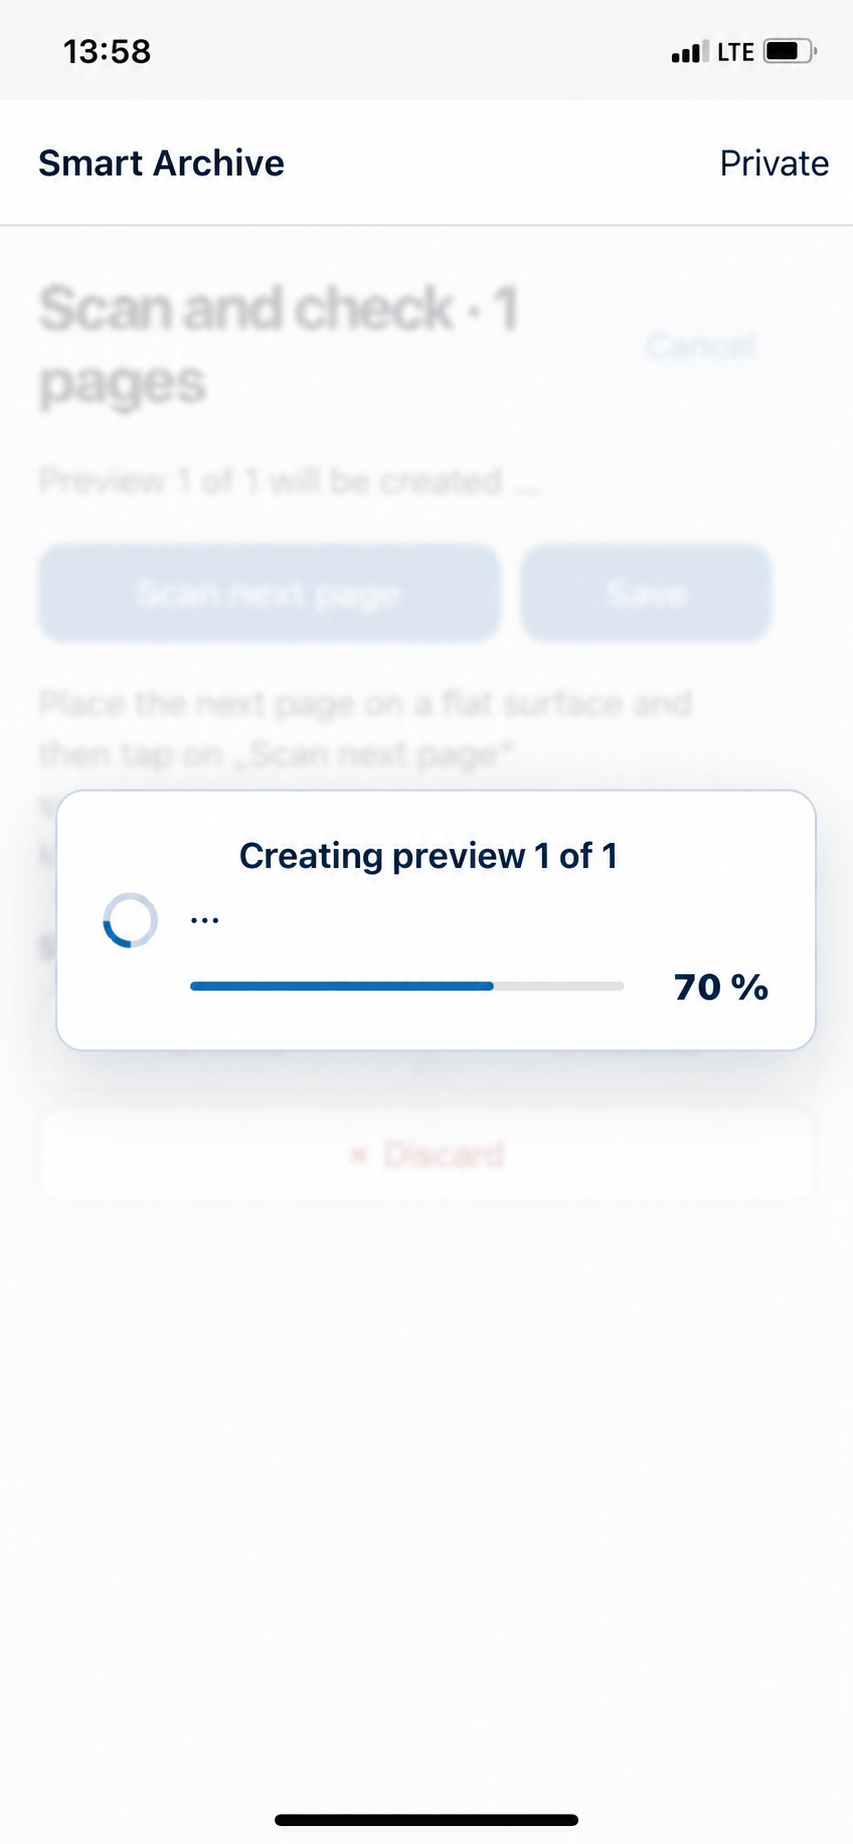
After Save, Smart Archive prepares the pages. A progress bar shows how the previews are being created; then Review scan opens.
1.1.1Review scan
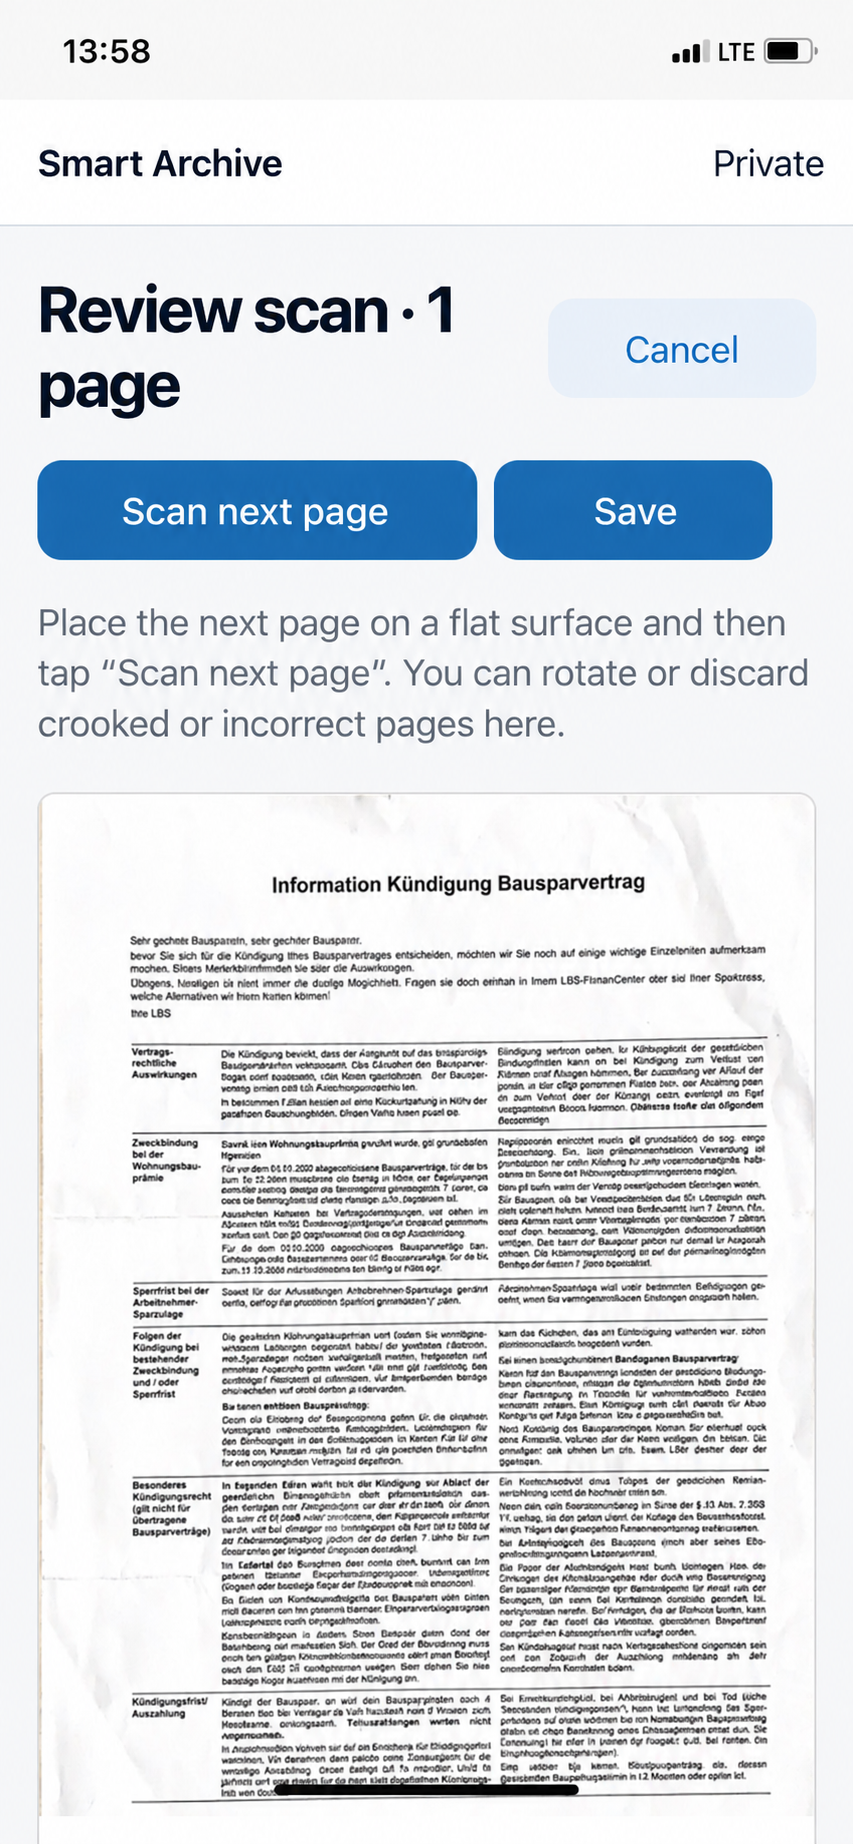
Before anything goes into the archive, you see every captured page. The heading “Review scan · 1 pages” shows the count. Take a moment here—whatever you fix now won’t need fixing later.
Check the pages
Scroll through the pages and check that the text is complete and sharp. Below each page you can rotate it with Left or Right, change the order with Up and Down, or remove it with Discard.
Forgot a page?
Tap Scan next page. The camera opens again and the new pages are added at the end. Position the next sheet calmly beforehand.
Save
When all pages are fine, tap Save. The next section describes what happens then.
“Save” or “Continue to filing”?
By default, Smart Archive puts the document straight into the archive and leaves the name, folder and tags to AI. If you have turned off “Put in the archive immediately after Done” under Scanning (3.6), the button is called Continue to filing: you first see File document with name, document date, folder and tags and confirm with Put in archive.
Cancel at the top right asks whether you really want to discard the scan. Continue scanning takes you back; Discard scan deletes the unsaved pages.
1.1.2Save
After Save, Smart Archive works through two steps on its own. You don’t have to do anything—just wait a moment.
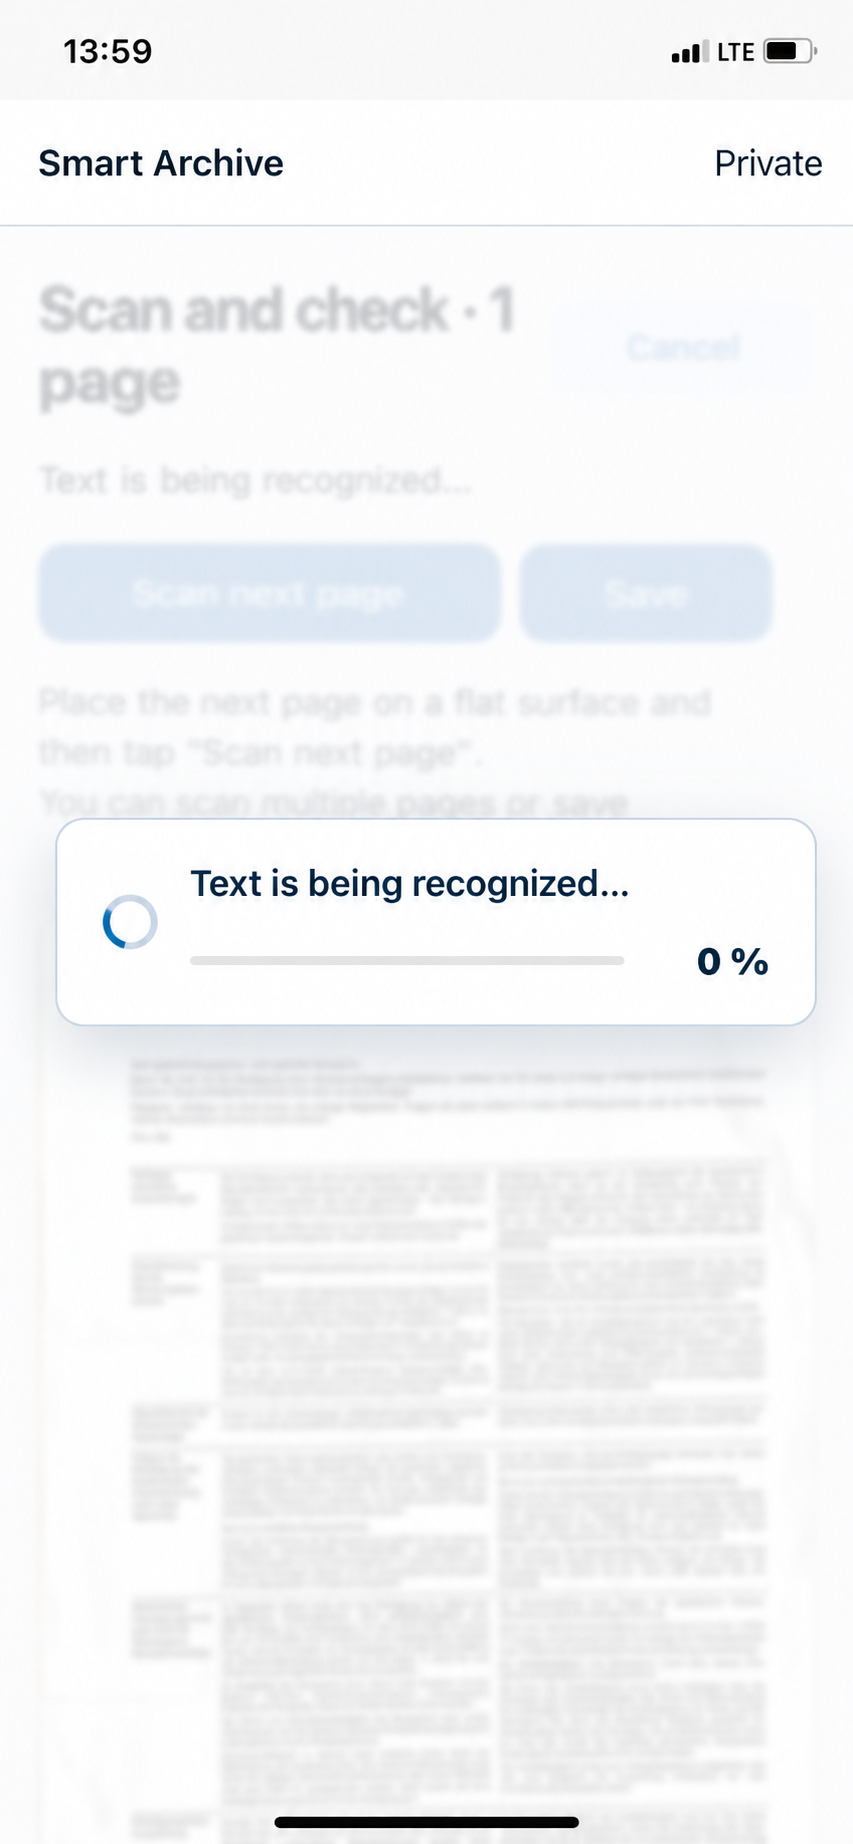 1Recognizing text…Text recognition (OCR) reads every word—directly on the iPhone, even offline. The bar shows the progress in percent.
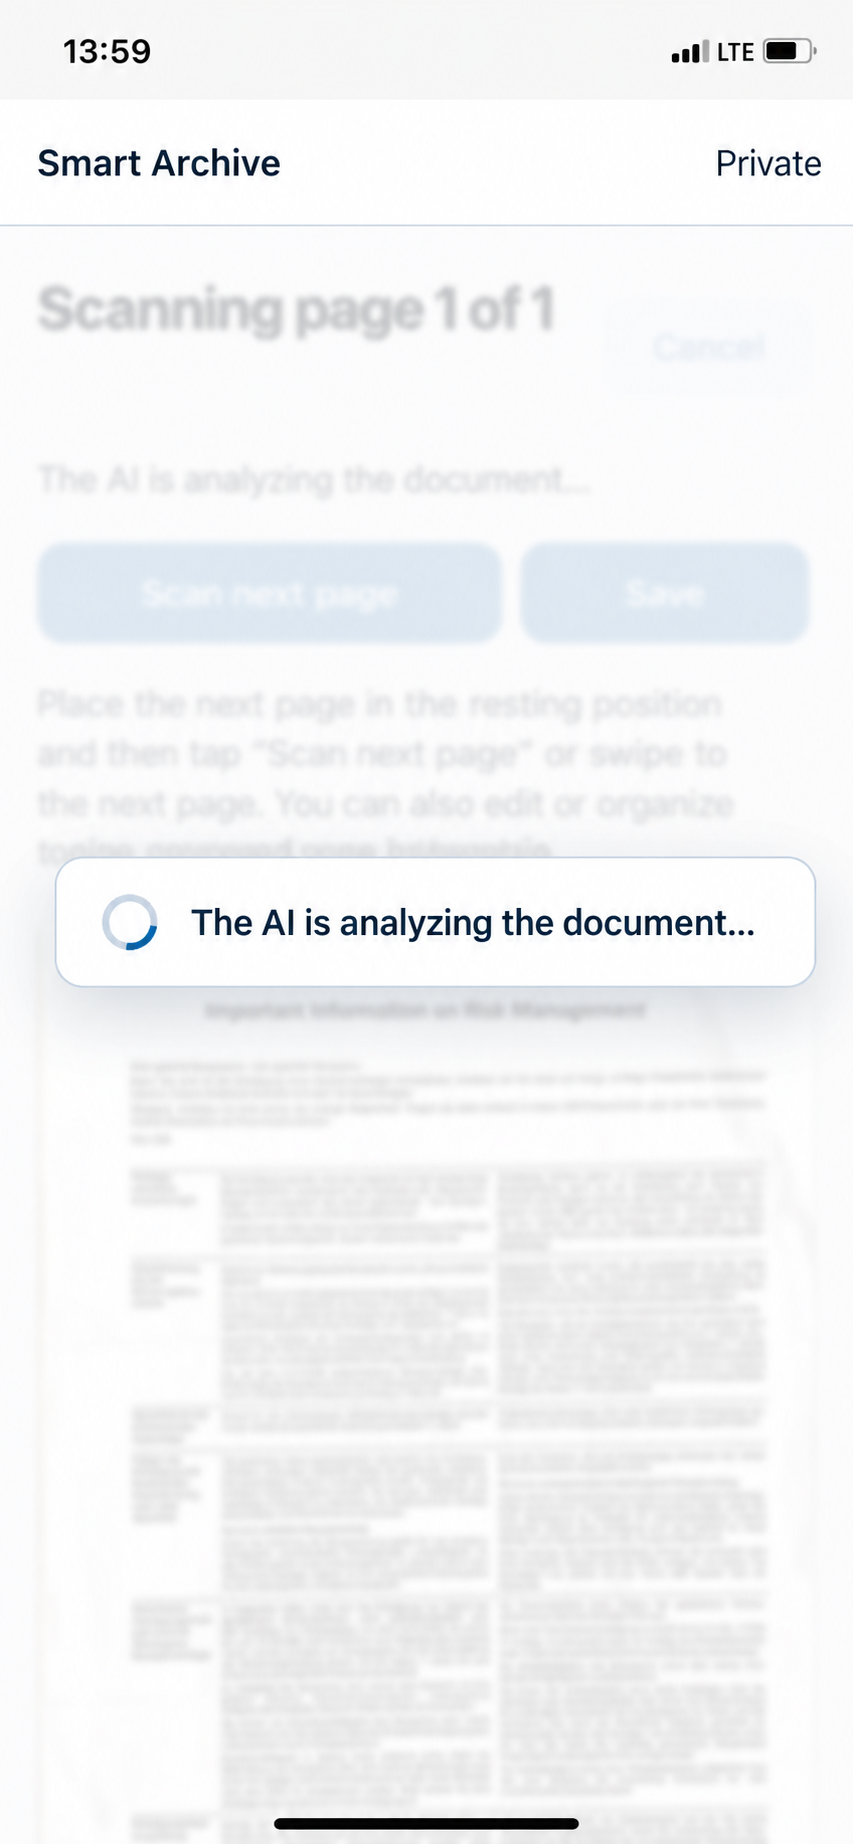 2AI is analyzing the document…AI assigns a meaningful name, detects the document type, sender, date and amount and chooses the folder and tags.
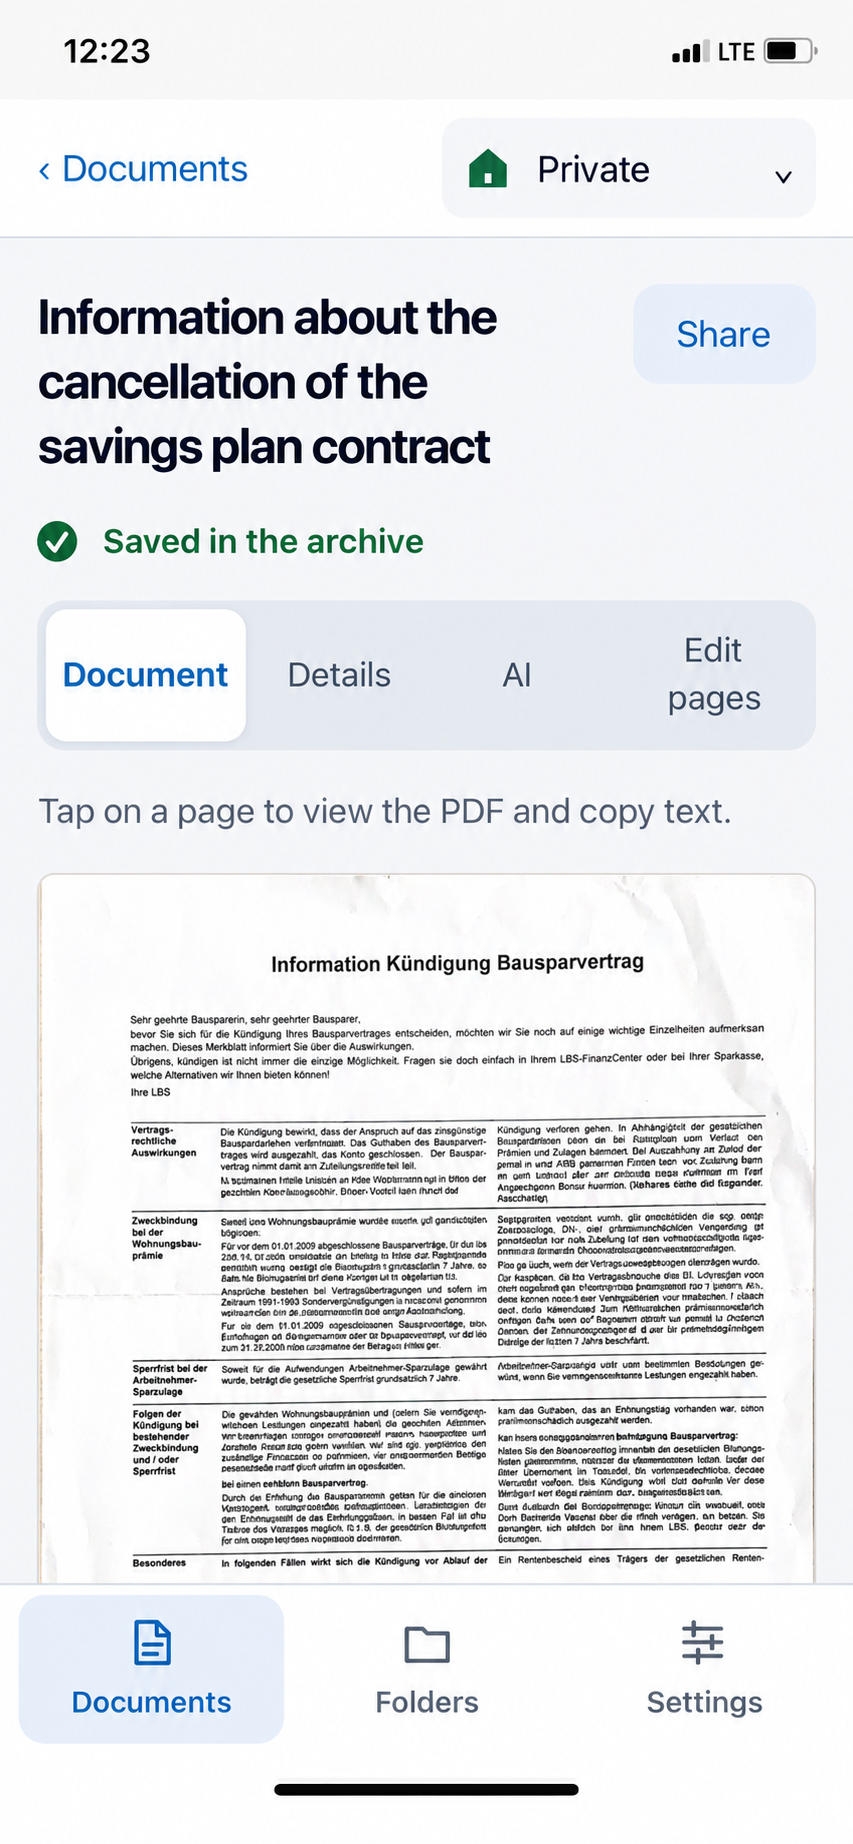 3Saved in the archiveThe finished document opens in the detail view. The green tick confirms it has been filed.
Automatic duplicate check
When saving, Smart Archive compares the new document with the archive. If an identical or very similar one exists, “Possible duplicate” appears with both documents side by side and the match in percent. Then choose Discard new scan, Append to existing document, Replace existing document or Keep both.
Without internet or without AI
Text recognition and saving always work. If no AI is reachable right now, the document first gets a simple name made of “Scan” plus date and time. You can analyse it later in the AI tab with Analyze with AI or enter the details yourself.
1.2Document details
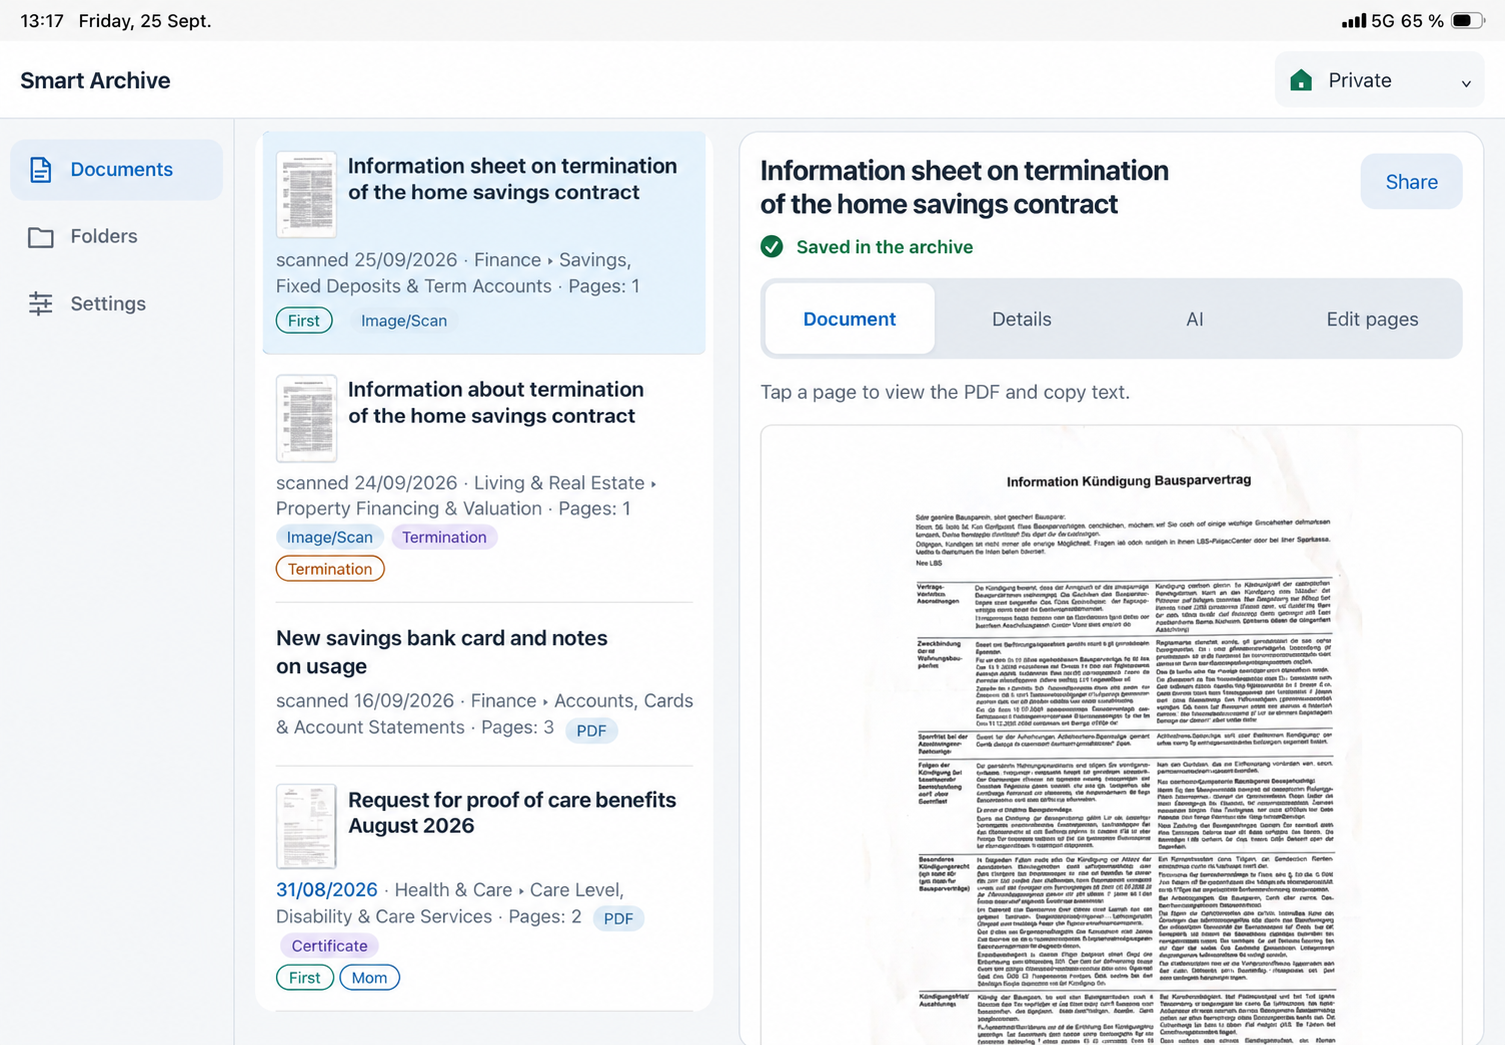
Tap a document in the list to open it. The detail view is divided into four tabs. At the top are the document name and the Share button, which sends the PDF by mail, Messages, AirDrop or to the Files app.
DocumentView pages, open the PDF, copy text
DetailsName, folder, tags and recognised details
AIAnalyse, summarise, ask questions
Edit pagesAdd, rotate, reorder, delete pages
Everything is saved automatically
There is no save button: every change is applied immediately. “Saved in the archive” with a green tick confirms this. Tap ‹ Documents at the top left to return to the list.
1.2.1Document
The first tab shows all pages one below the other. Here you read the document without changing anything.
Tap a page
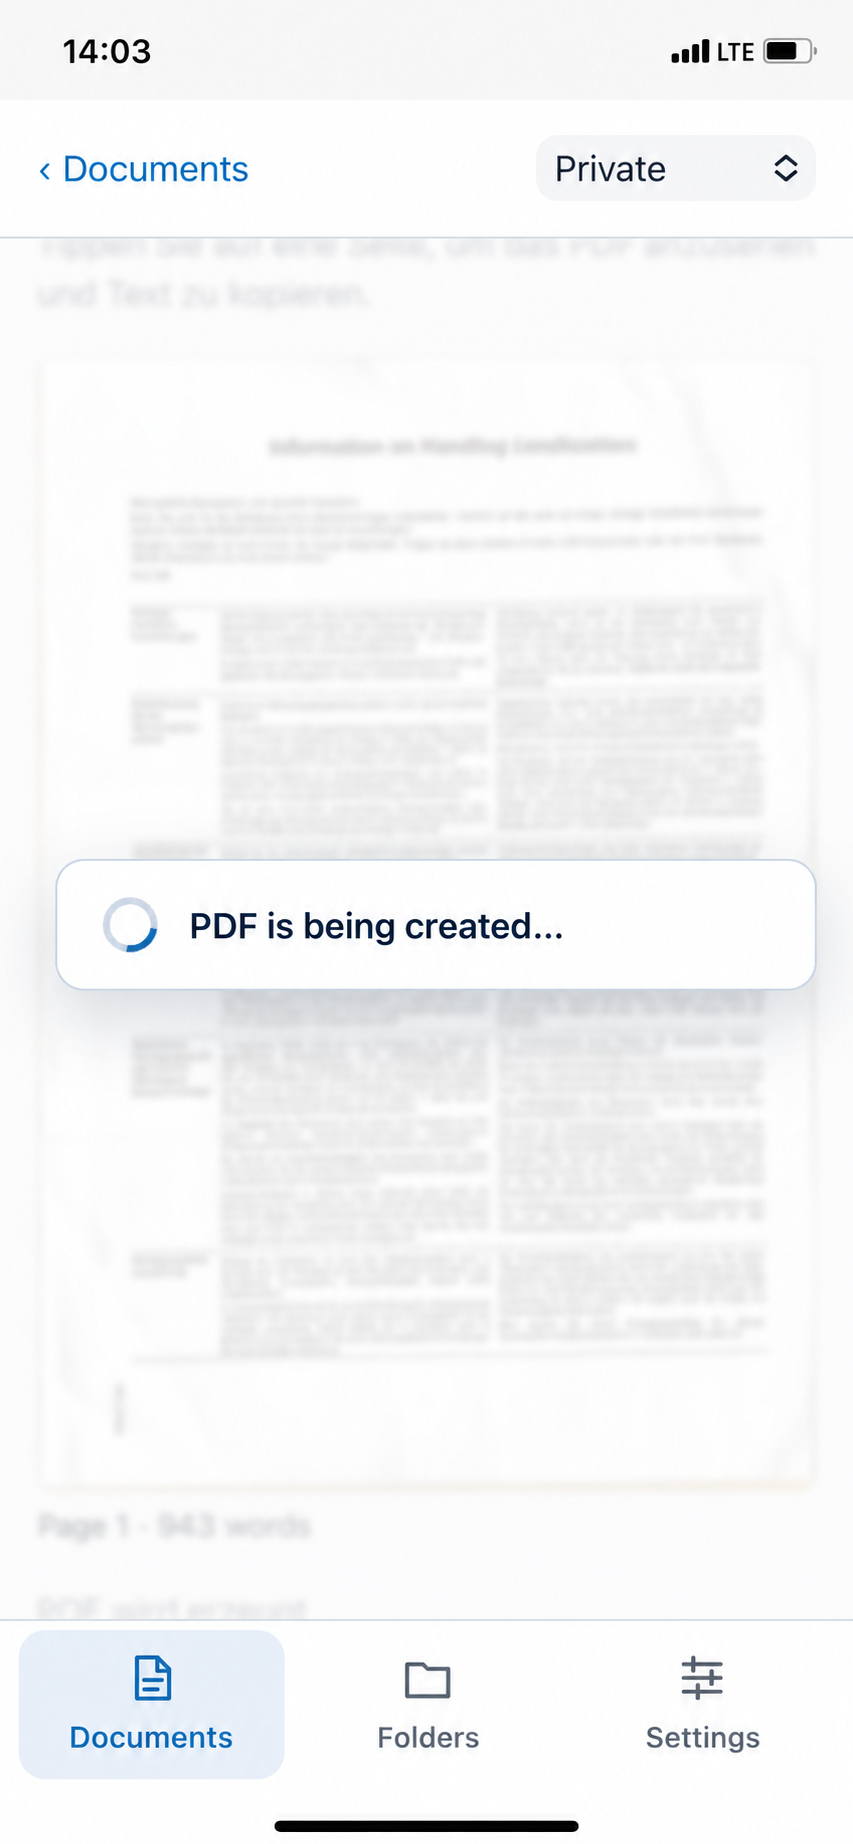
Tap a page. “Creating PDF…” appears briefly—Smart Archive assembles the pages into a PDF with an invisible text layer.
Read and copy in the PDF
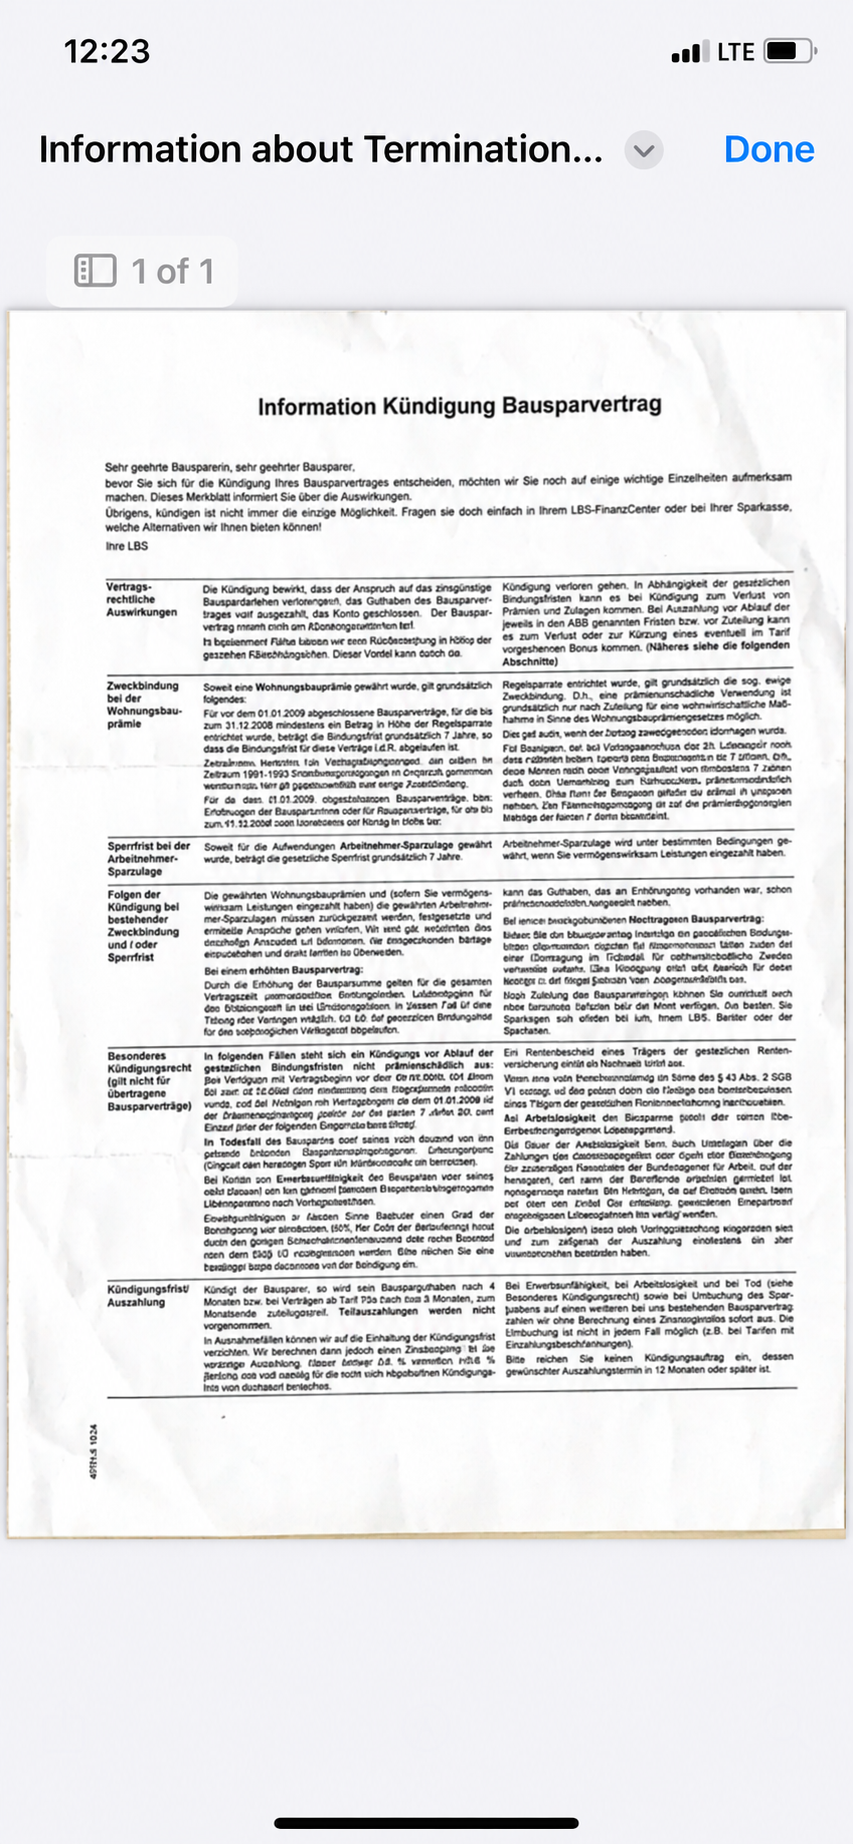
The PDF opens full-screen. At the top you see “1 of 1” for the current page. You can zoom, scroll and—thanks to the text layer—select and copy words, such as an IBAN or contract number.
Close
Done at the top right closes the PDF and returns you to the detail view.
Imported files remain unchanged
If the document comes from an imported PDF, Word or Excel file, Smart Archive keeps the original file unchanged and shares exactly that file. The pages in the app are then only a preview.
1.2.2Details
In the Details tab you review and change everything AI suggested. It has three parts.
Name and folder
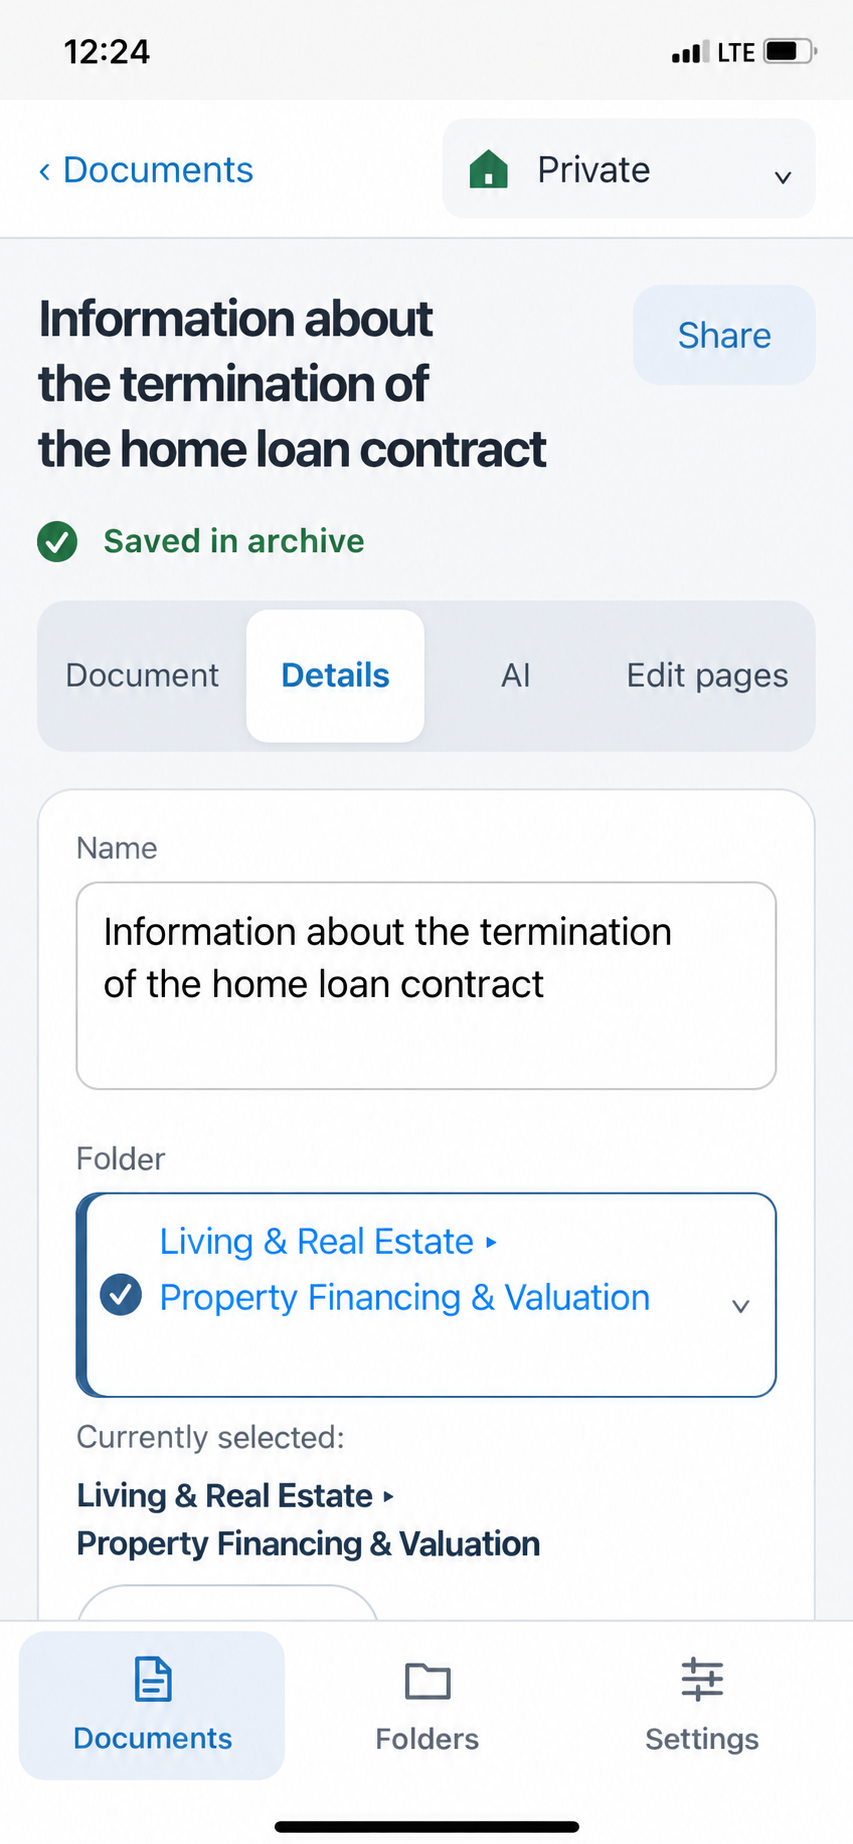
Tap the Name field to change the title. Under Folder, a tap opens the list of all folders—subfolders are indented below their top-level folder. “Currently selected” shows the full path, such as “Housing & property ▸ Property financing & valuation”. If no suitable folder exists, create one right here with + New folder.
Tags
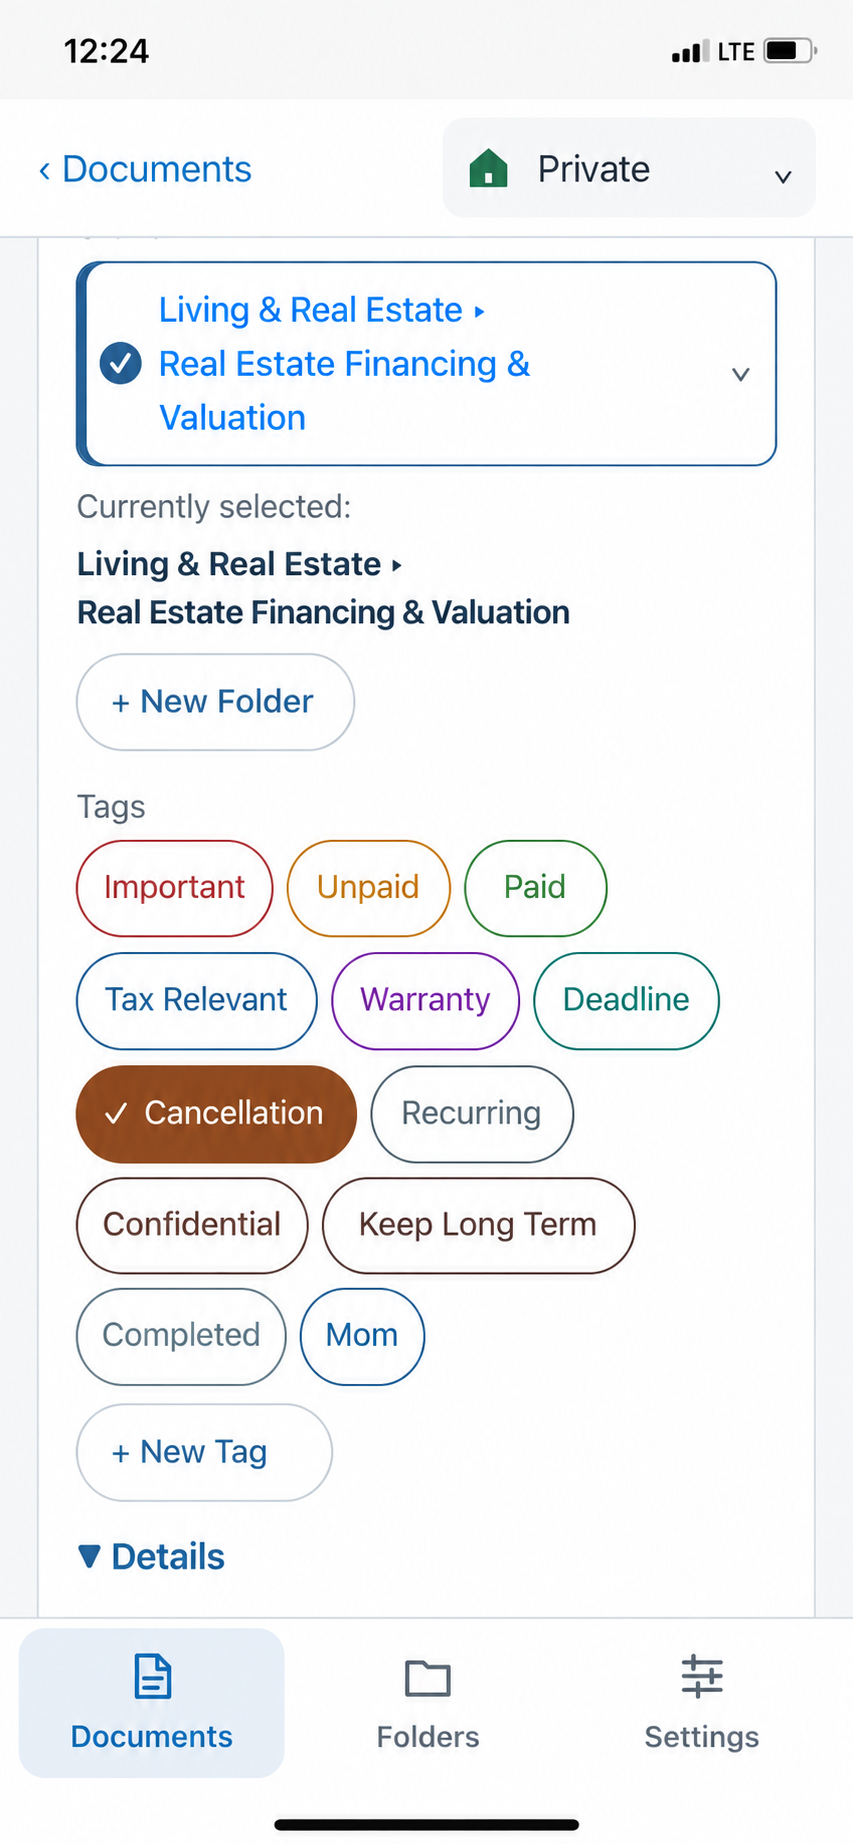
All tags of the archive are available as coloured buttons. One tap turns a tag on—it is then filled and shown with a tick—another tap turns it off. A document can have as many tags as you like, such as Important, Deadline and Tax-relevant at once. Use + New tag to add your own.
Recognized details
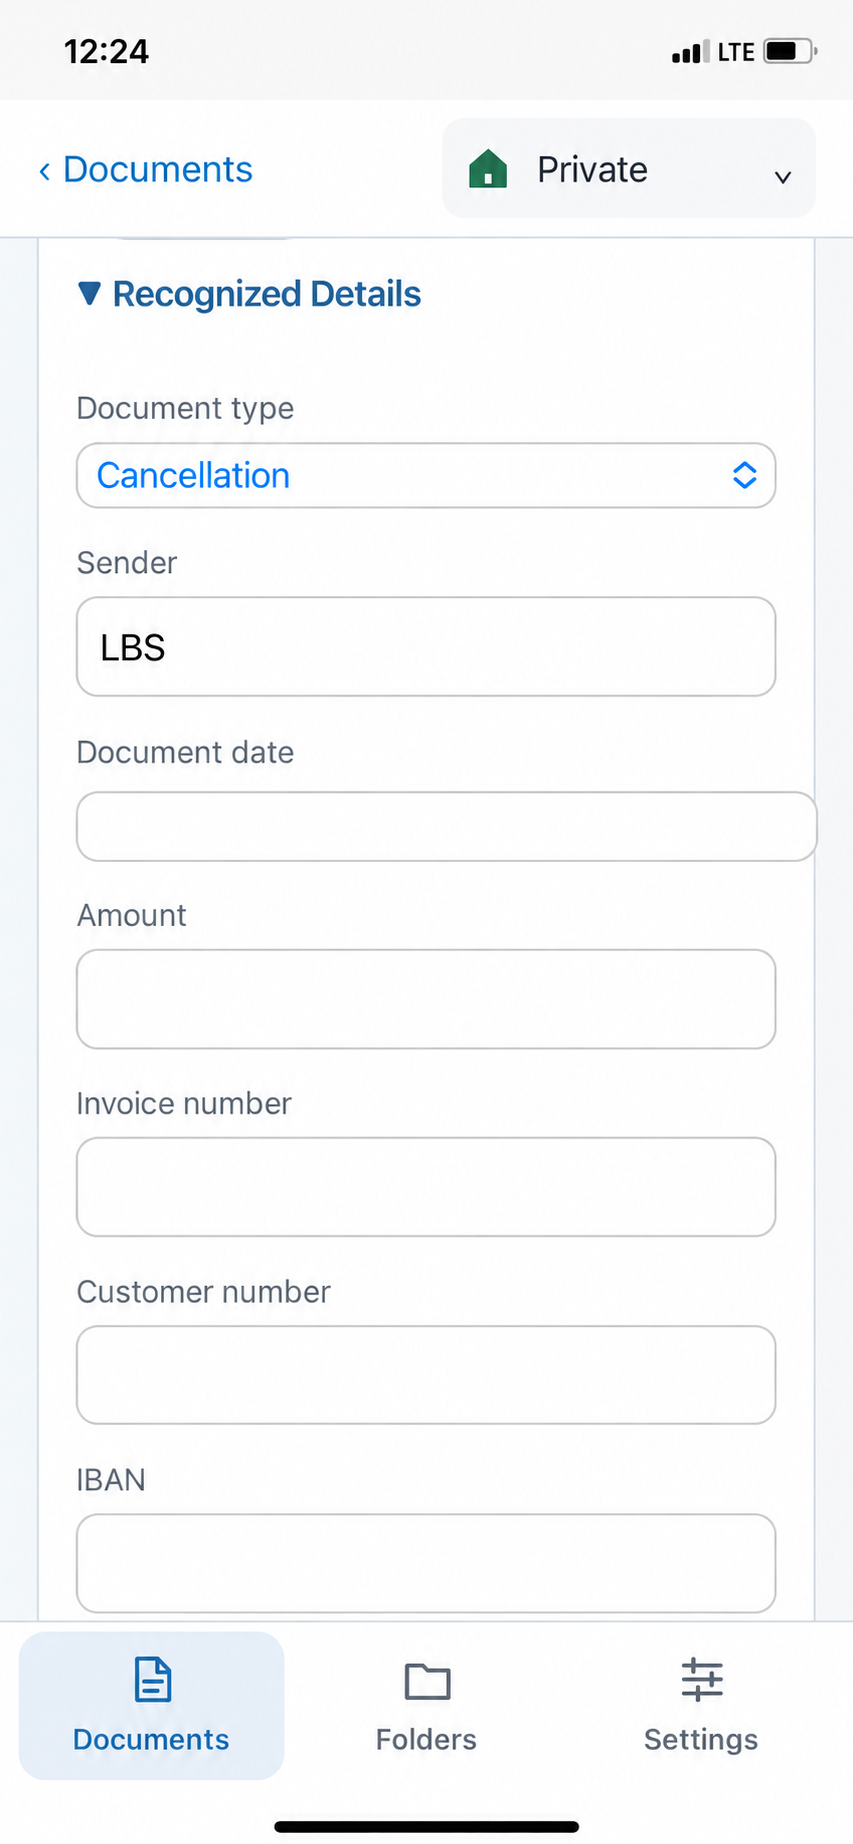
Here you find the data AI read from the text: document type, sender, document date, amount, invoice number, customer number, IBAN and more. Empty fields were not found in the document. You can fill in or correct any field; the document type is chosen from a list.
AI suggests a new folder or tag?
New folders and tags are never created without you. If AI finds no suitable entry, “AI suggests extending the archive” appears with its proposal. You decide whether it is created and assigned to the document or discarded.
1.2.3AI
The AI tab brings together everything artificial intelligence can do with this particular document.
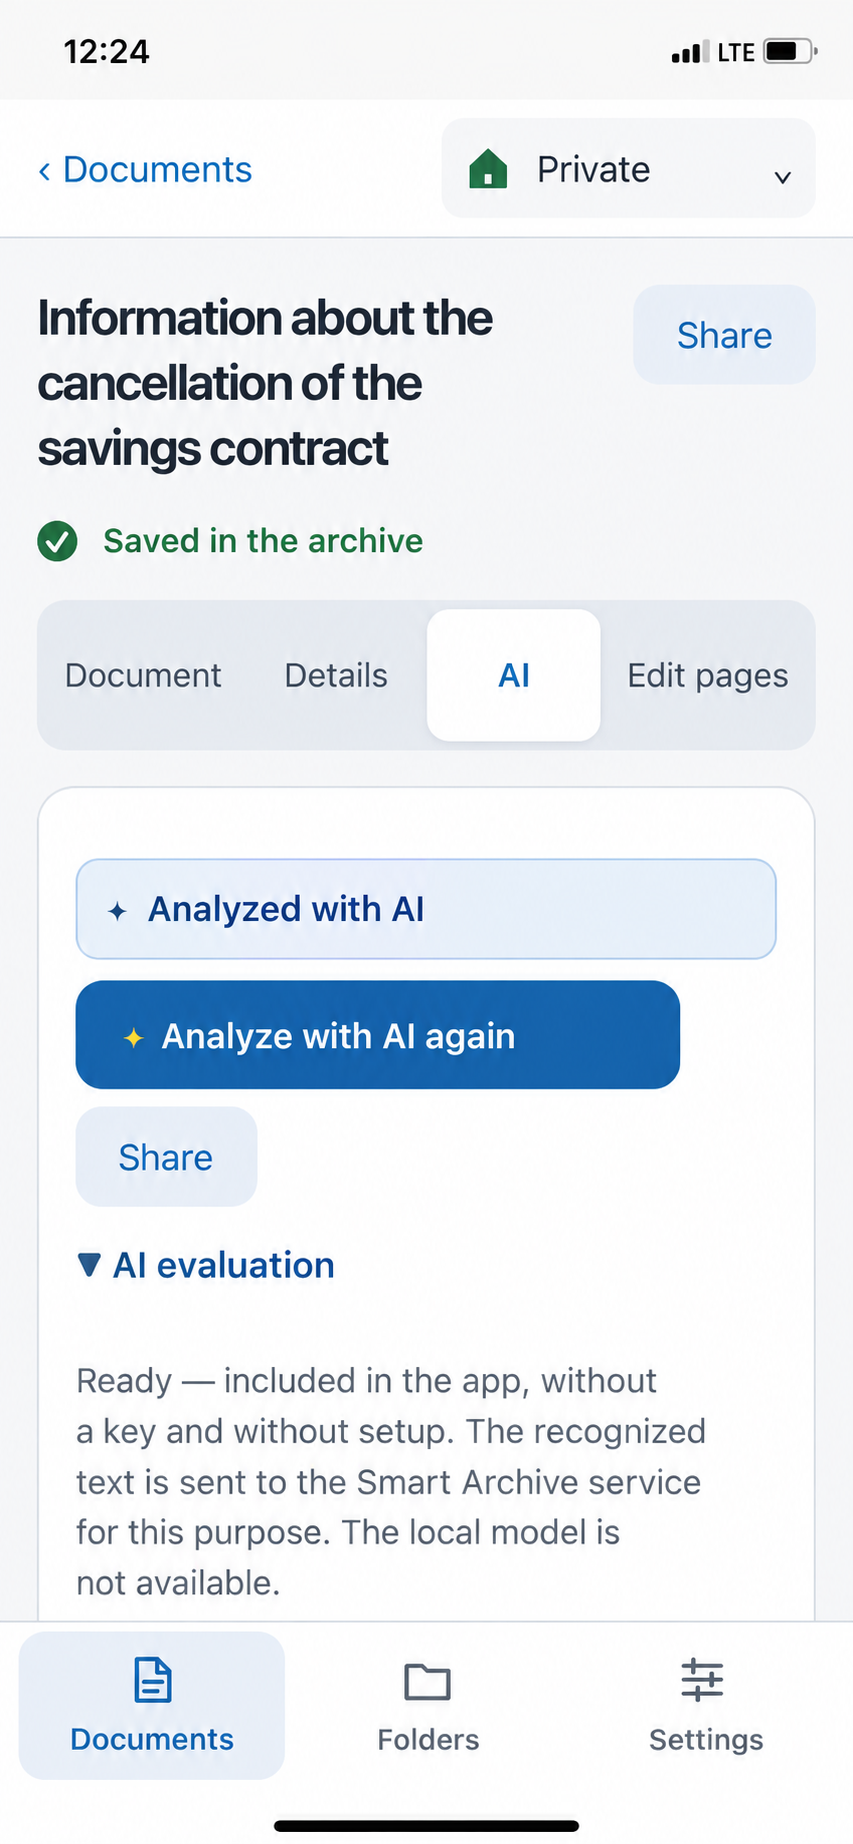
- Analyzed with AI
- Shows that the analysis has already taken place. If it says “Not yet analyzed with AI”, start it with Analyze with AI.
- Analyze again with AI
- Analyses the document again and updates the name, details, folder and tags—useful after adding pages or changing the AI settings.
- AI evaluation
- States which AI is currently in use—for example “Ready — included in the app, without a key and without setup” for the app AI.
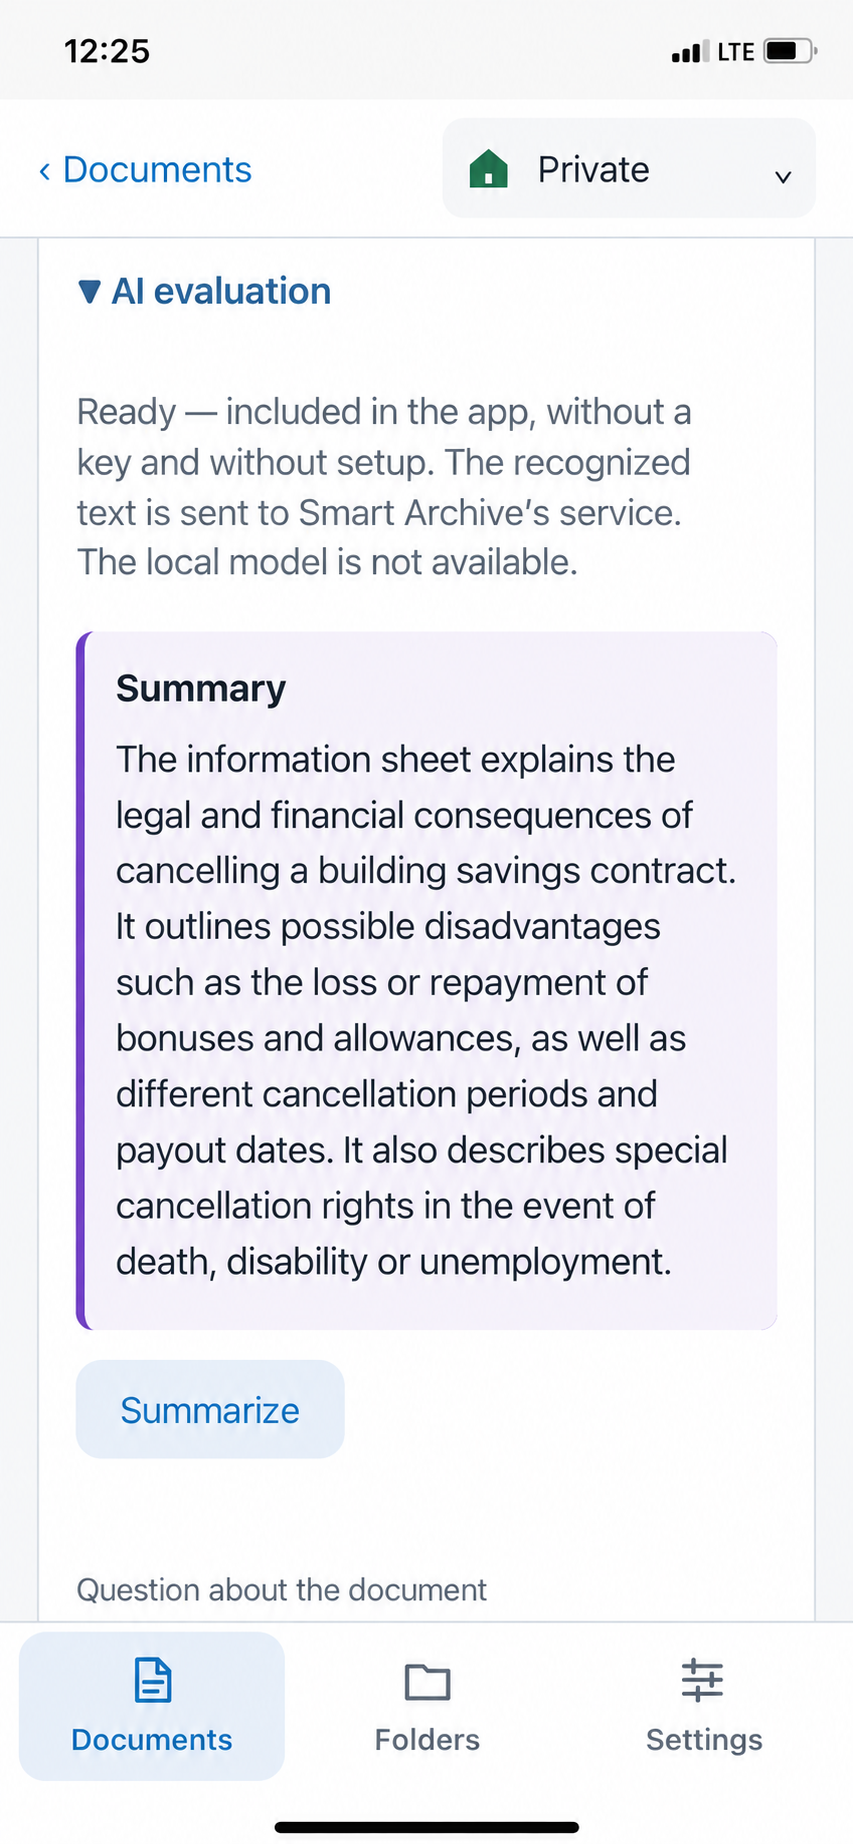
- Summary
- Summarize makes AI explain in a few sentences what the letter is about. Especially with long information sheets, notices or contracts, this saves you reading it all.
- Question about the document
- Type your own question in the field—for example “When is payment due?” or “What notice period applies?”—and tap Answer question. The answer refers only to this document.
Which AI is used here?
On an iPhone with Apple Intelligence, the analysis runs entirely on the device—without internet. Without Apple Intelligence, Smart Archive automatically uses its own app AI; this requires internet. Only the recognised text is sent, never page images or files. You can change this under 3.5.
1.2.4Edit pages
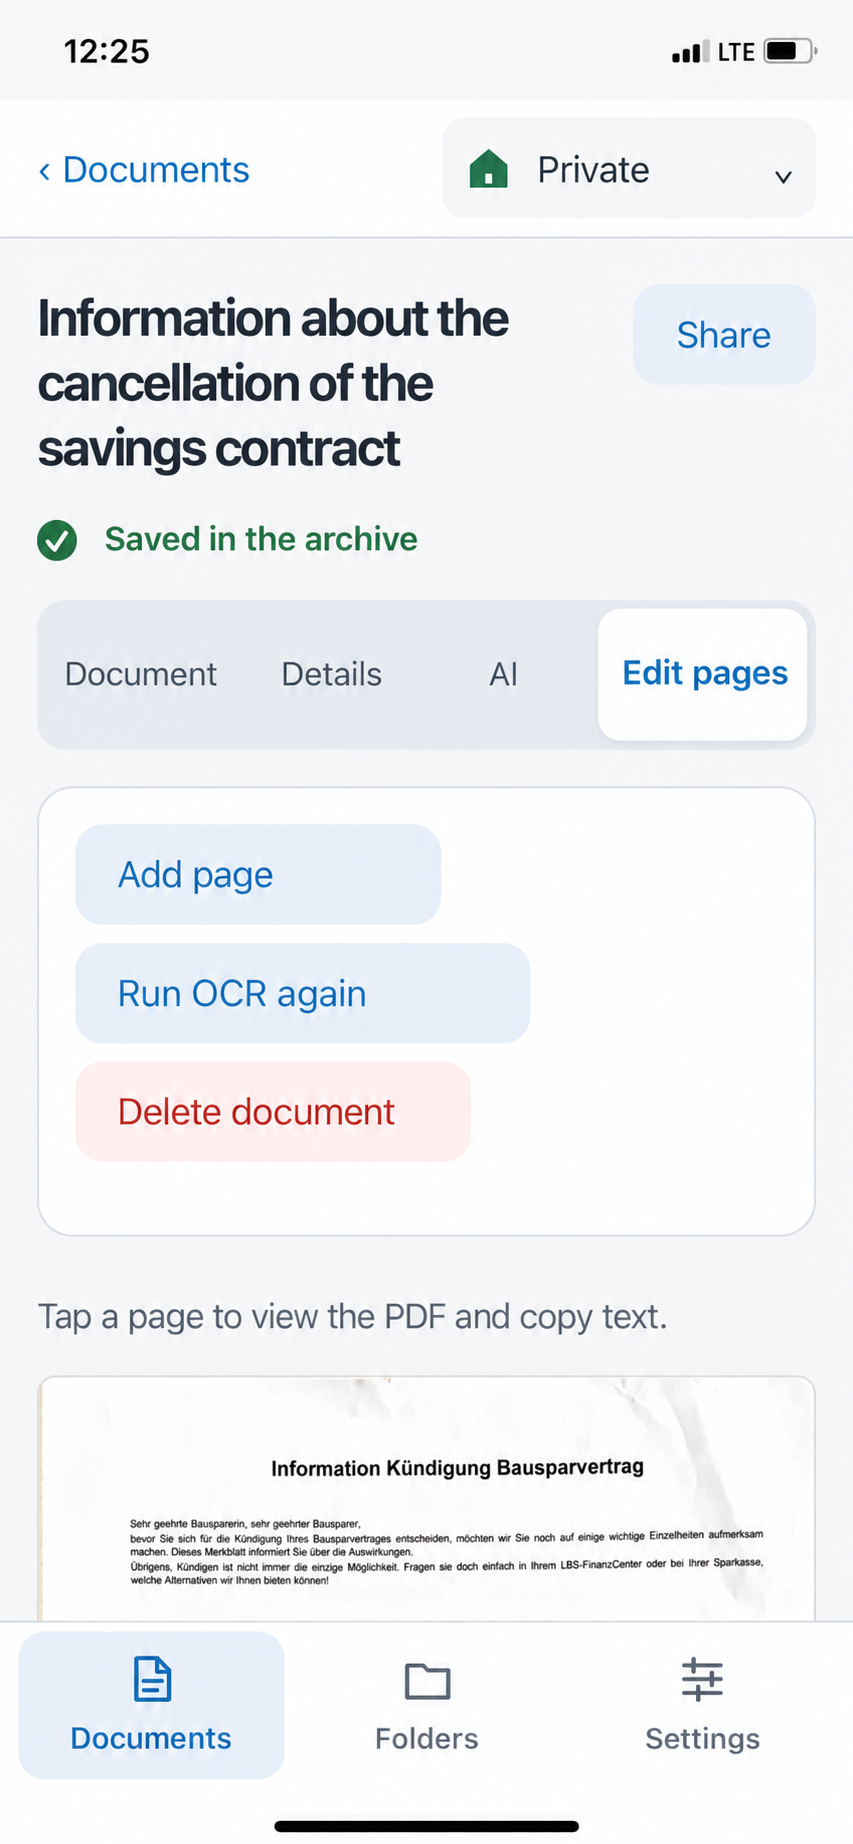
Every scanned document can still be changed after saving. At the top are three actions for the whole document:
Add page
Opens the camera. Newly scanned pages are appended to the end of the document—handy when the back page or an enclosure arrives later.
Run OCR again
Reads the text of all pages again—for example after you have turned on another recognition language in Settings. If automatic AI analysis is on, the document is also analysed again afterwards.
Delete document
Removes the whole document from the archive (see 1.2.4.1).
The individual pages follow below. Each page has its own buttons: Left and Right rotate it by 90 degrees, Up and Down move it in the order, Rescan replaces a blurred page with a new capture and Delete page removes just that one page.
Note on imported files
With imported PDF, Word and Excel files, the original stays unchanged. The page tools for rotating, moving and deleting are therefore only available for scanned documents.
1.2.4.1Delete document
Tap “Delete document”
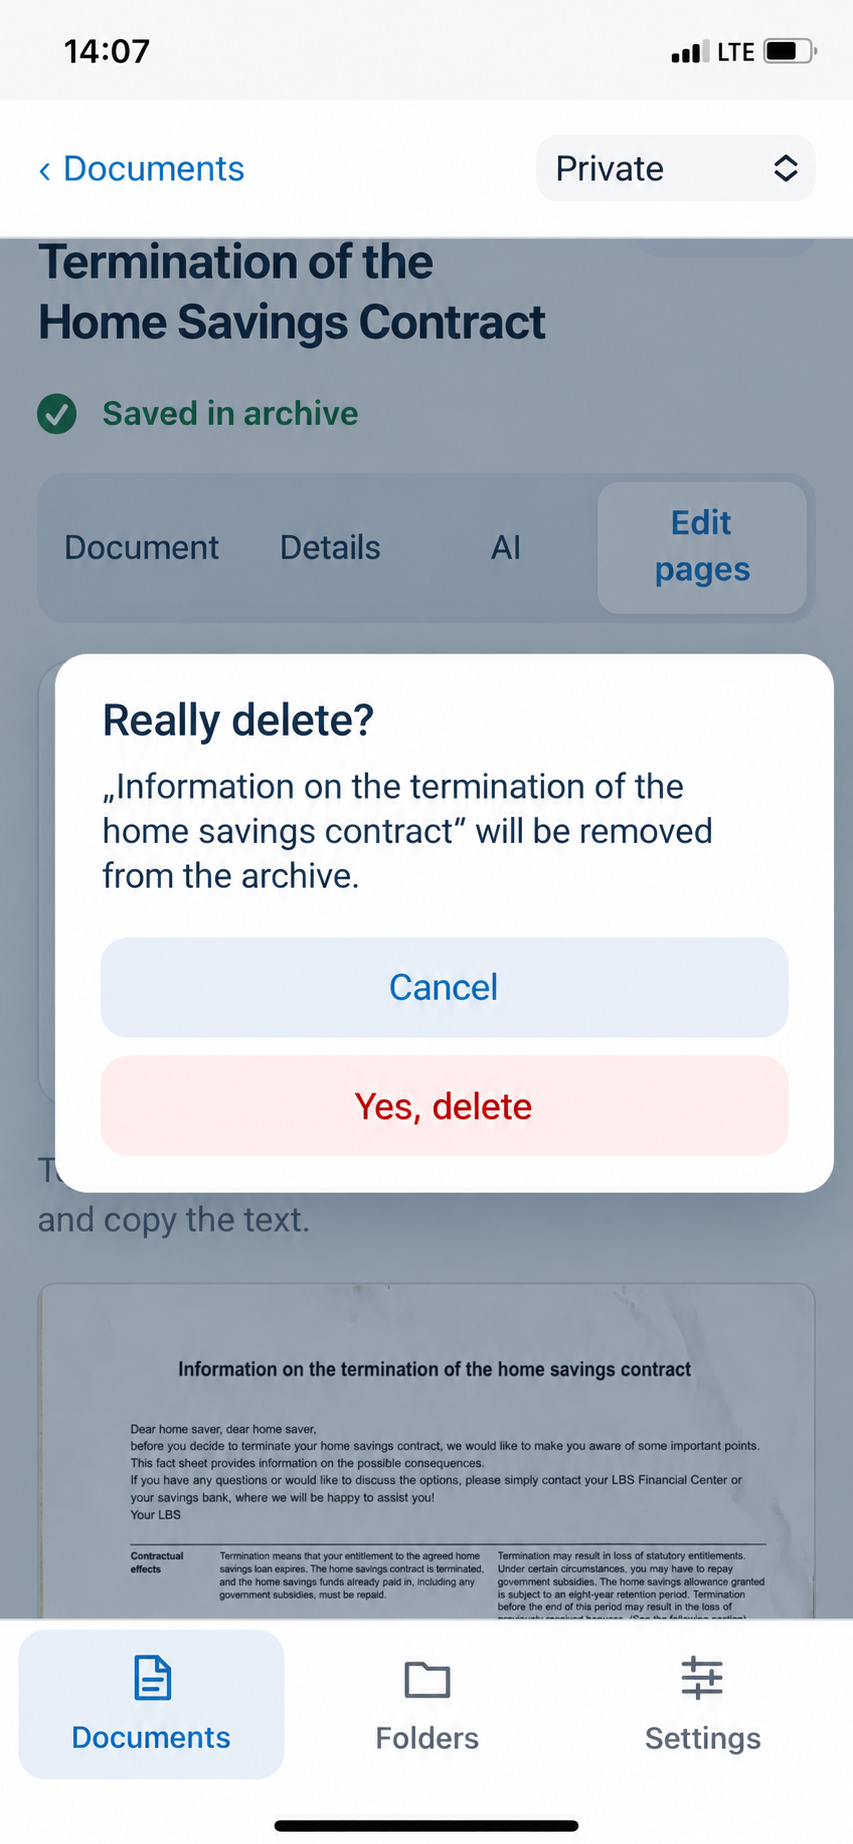
In the Edit pages tab, tap the red Delete document button.
Read the confirmation
Smart Archive asks “Delete permanently?” and shows the document name so you don’t accidentally delete the wrong one.
Confirm or cancel
Yes, delete removes the document from the archive—on all your devices. Cancel leaves everything as it is.
Share first?
If you want to remove a document from the archive but still keep it, share it before deleting—for example to the Files app.
1.3Import file
Many documents no longer arrive on paper: invoices as email attachments, bank statements from online banking, contracts as PDFs. Import file adds them to the archive just like a scan.
Tap “Import file”
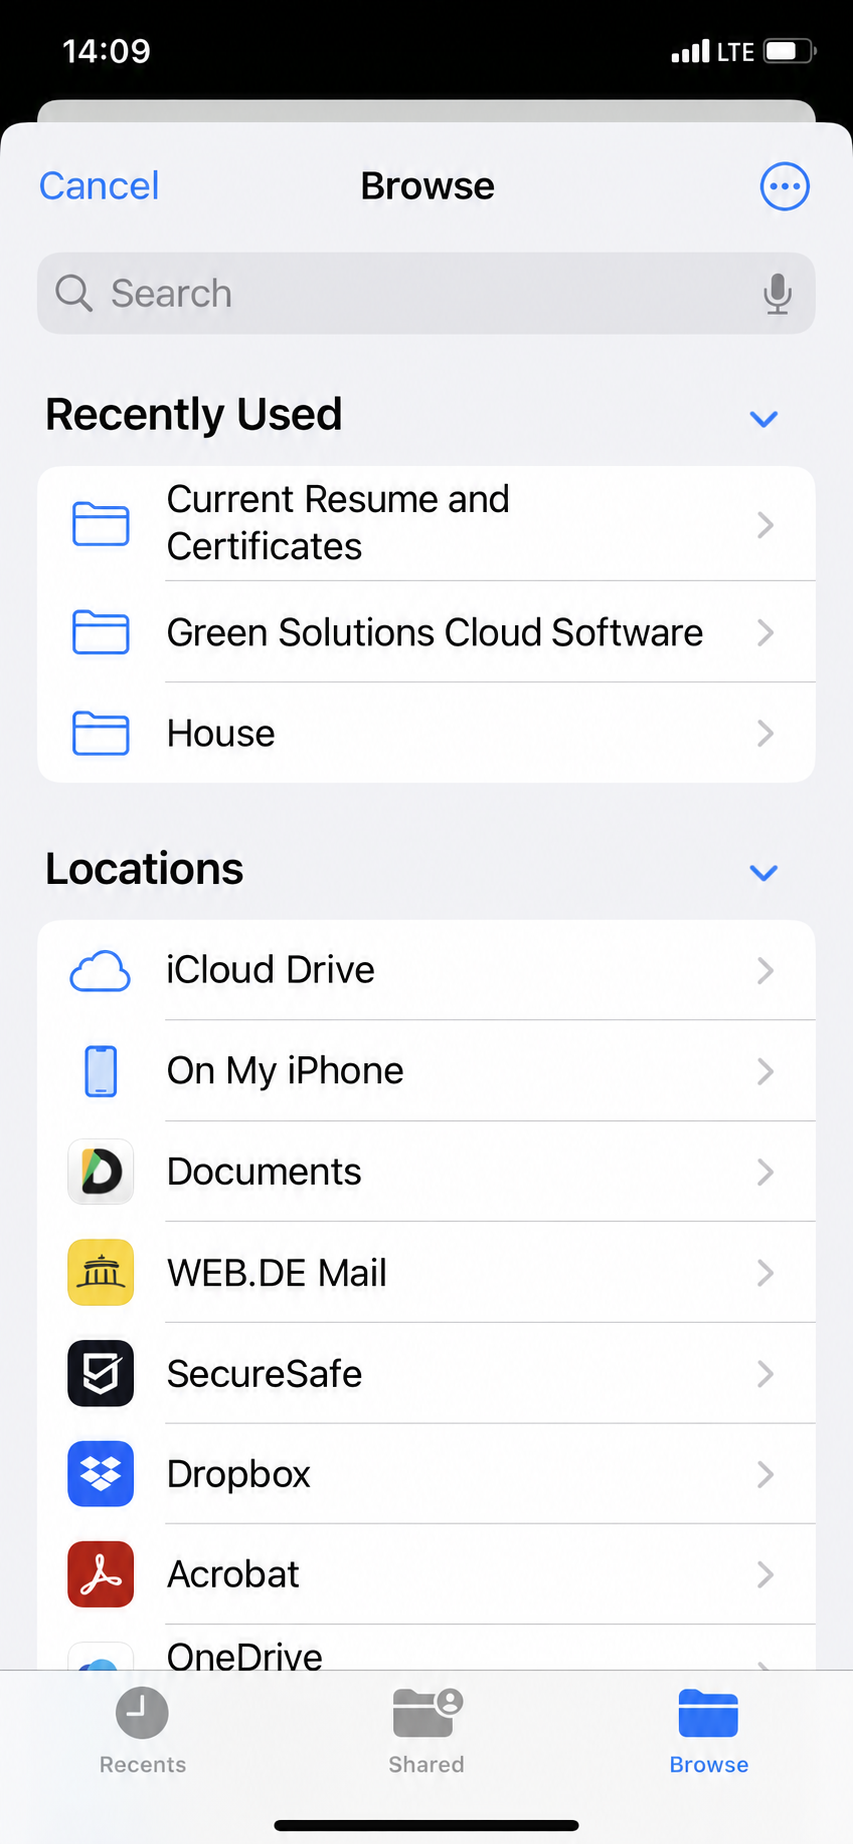
Tap Import file at the bottom of the Documents area. The iPhone file picker opens.
Choose a location
Recently used folders appear under Recents. Locations lists iCloud Drive, On My iPhone and apps such as Dropbox, OneDrive or your mail app. The search field finds a file by name as well.
Tap the file
Smart Archive imports the file, recognises the text, checks for duplicates and lets AI assign the name, folder and tags—exactly as when scanning (1.1.2).
Straight from another app
For example, open the PDF attachment in your mail app, tap the share icon and choose Save to Files. You can then find the file in Smart Archive under Import file.
1.4Filters
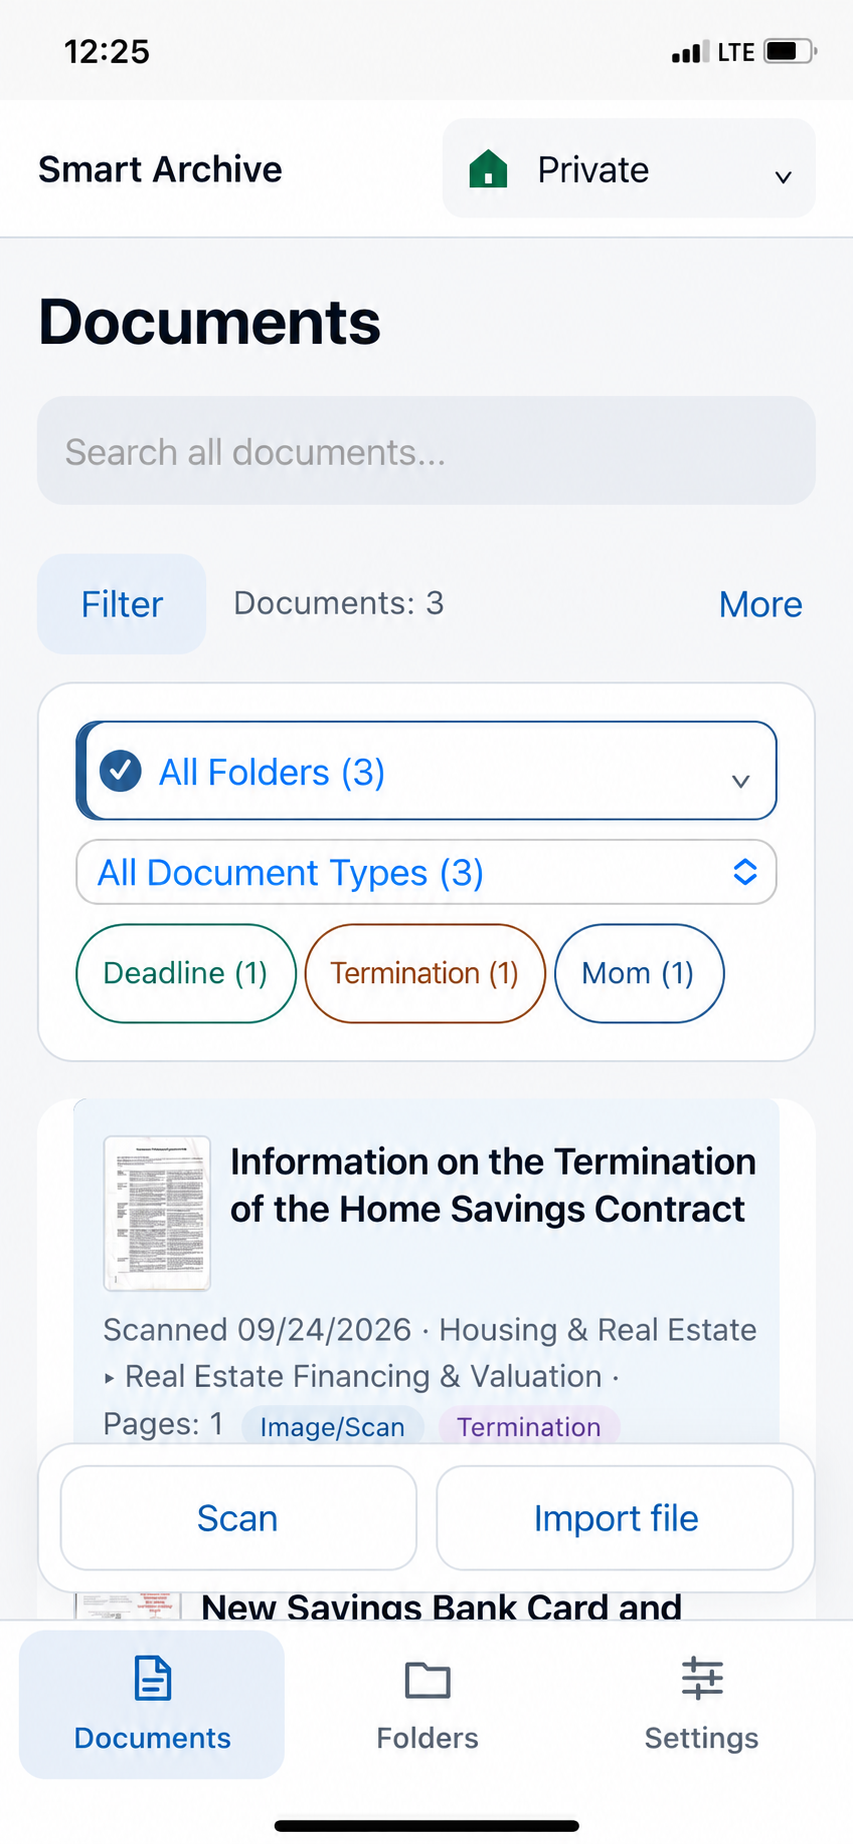
As your archive grows, filters help you quickly see the right group of documents. Tap Filters—three filters open below, which you can combine freely, including with the search field.
- All folders (3)
- Shows only documents in one folder (1.4.1).
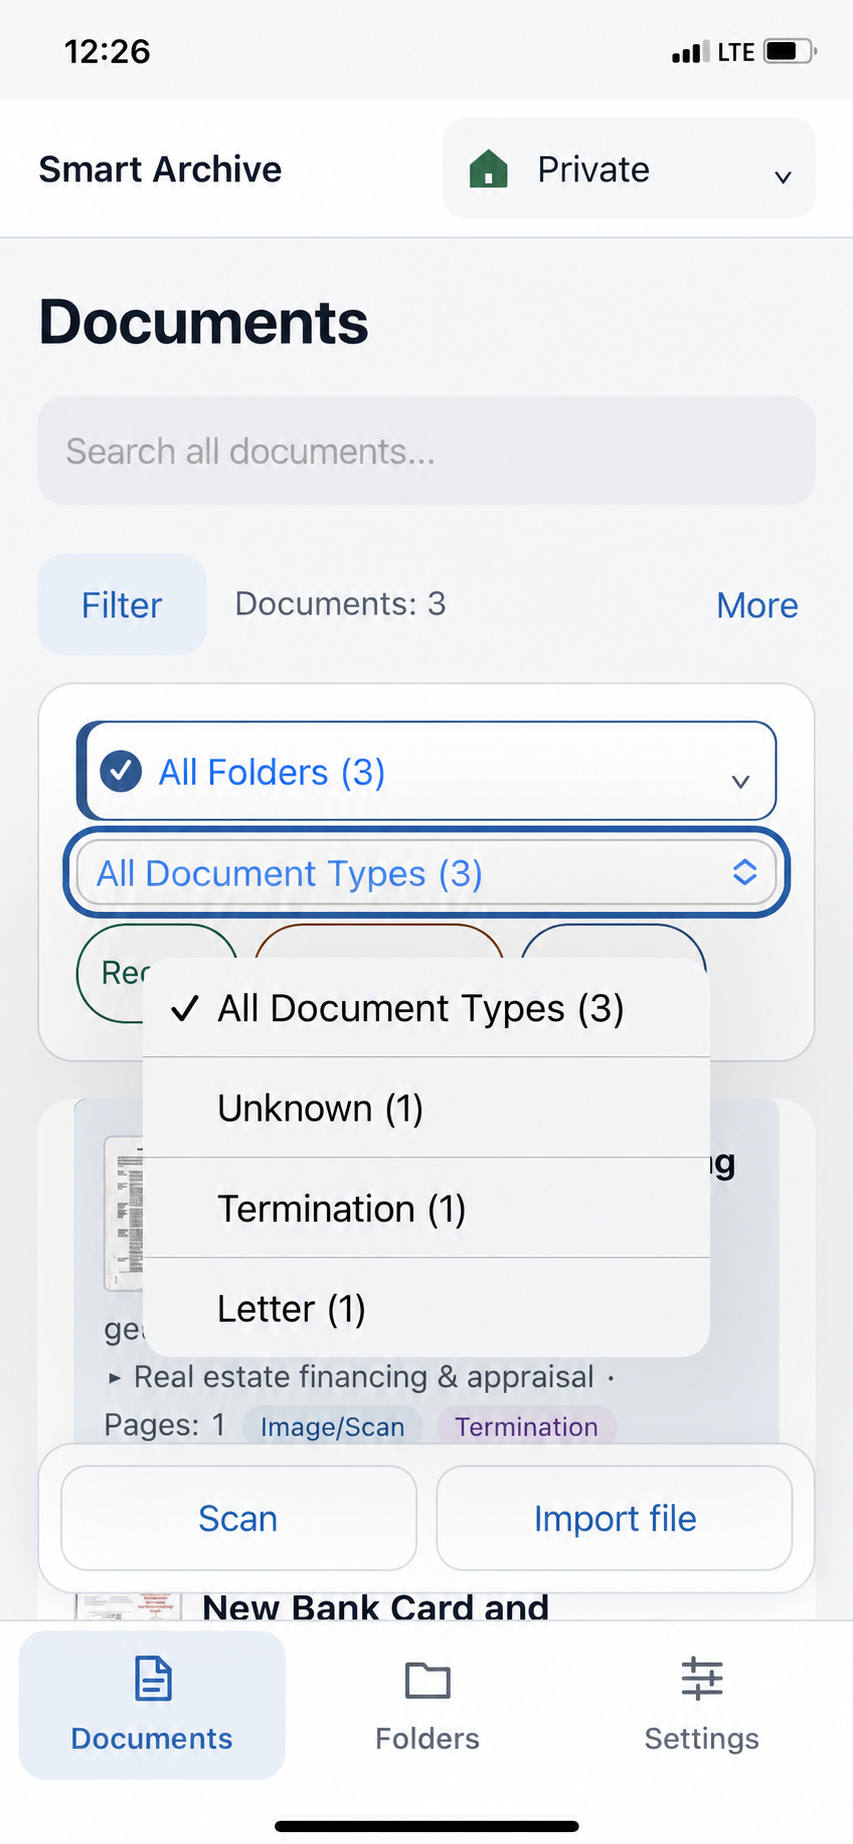
- All document types (3)
- Shows only invoices, contracts, notices and so on (1.4.2).
- Tags
- The outlined buttons below, e.g. “Deadline (1)”. Tap a tag to see only documents with that tag. You can select several tags at once.
Only what is actually in use
The filters only list folders, document types and tags that actually contain documents—the number in brackets shows how many. You don’t have to work through empty template entries. When a filter is active, the button shows “Filters (1)”; Reset filters shows everything again.
1.4.1Folders
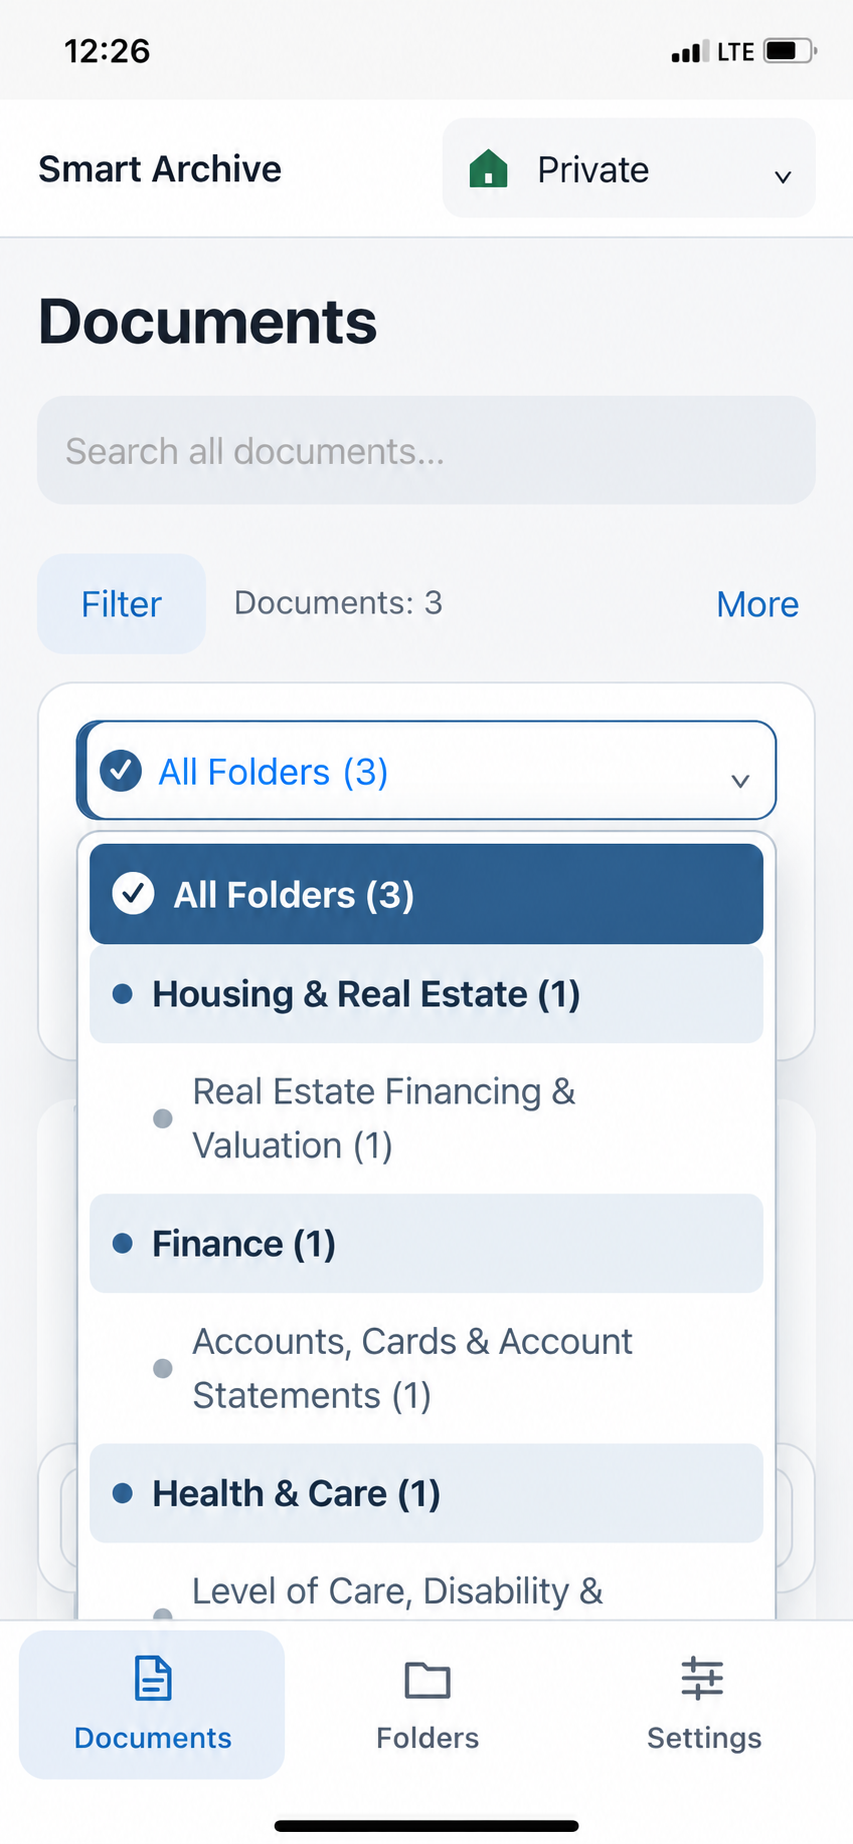
Tap All folders. The list shows top-level folders in bold with a dot and their subfolders indented below, each with the number of documents.
Choose a top-level folder
A top-level folder such as “Finances (1)” shows every document in it—including all subfolders.
Choose a subfolder
A subfolder such as “Accounts, cards & bank statements (1)” narrows it down further.
Back to all
All folders at the very top removes the folder filter again.
1.4.2Document types
AI detects the document type automatically when saving. Tap All document types and choose a type—the list then shows only matching documents.
Smart Archive recognises these types, among others:
- Invoice
- Payment reminder
- Receipt
- Contract
- Cancellation
- Quote
- Delivery note
- Bank statement
- Payslip
- Tax notice
- Official notice
- Insurance policy
- Medical report
- Prescription
- Certificate
- Warranty
- Payment order
Make use of “Unknown”
Unknown lists every document that has no type yet—for example because it was saved without AI. This lets you rework them specifically.
1.5More
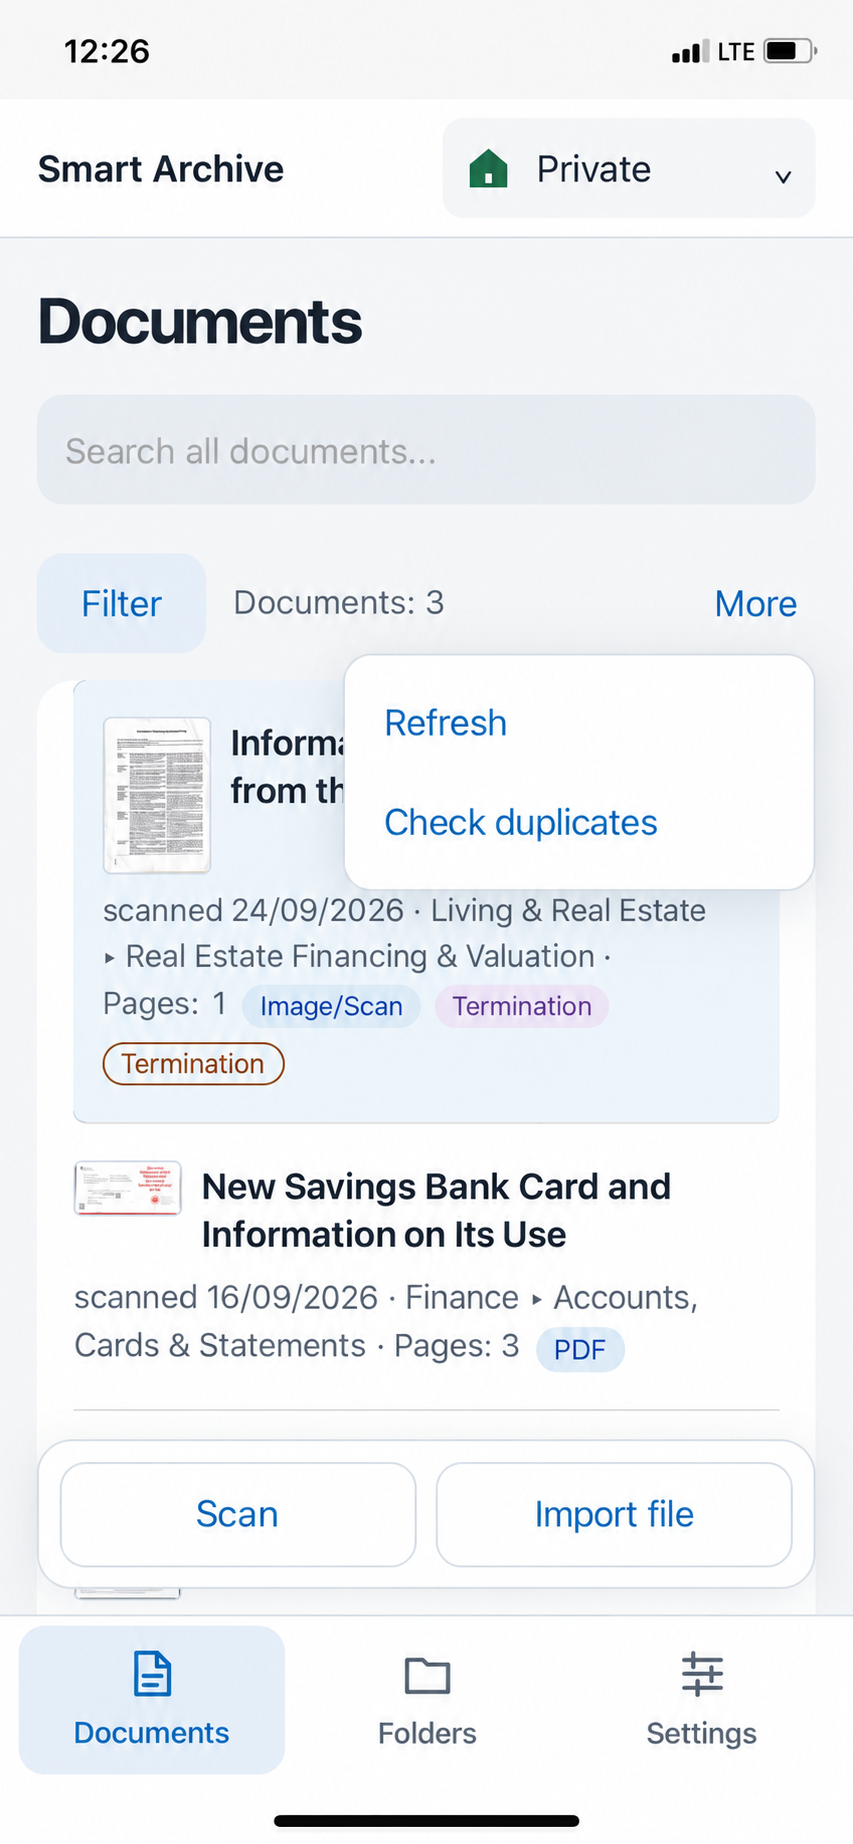
More, to the right of the document count, opens a small menu with two actions for the whole archive.
Refresh
Reloads the archive. iPhone, iPad and Mac normally sync by themselves through iCloud. If you have just scanned on another device and the document is still missing, this fetches it immediately.
Check duplicates
Opens the duplicate search for the whole archive (1.5.1).
1.5.1Check duplicates
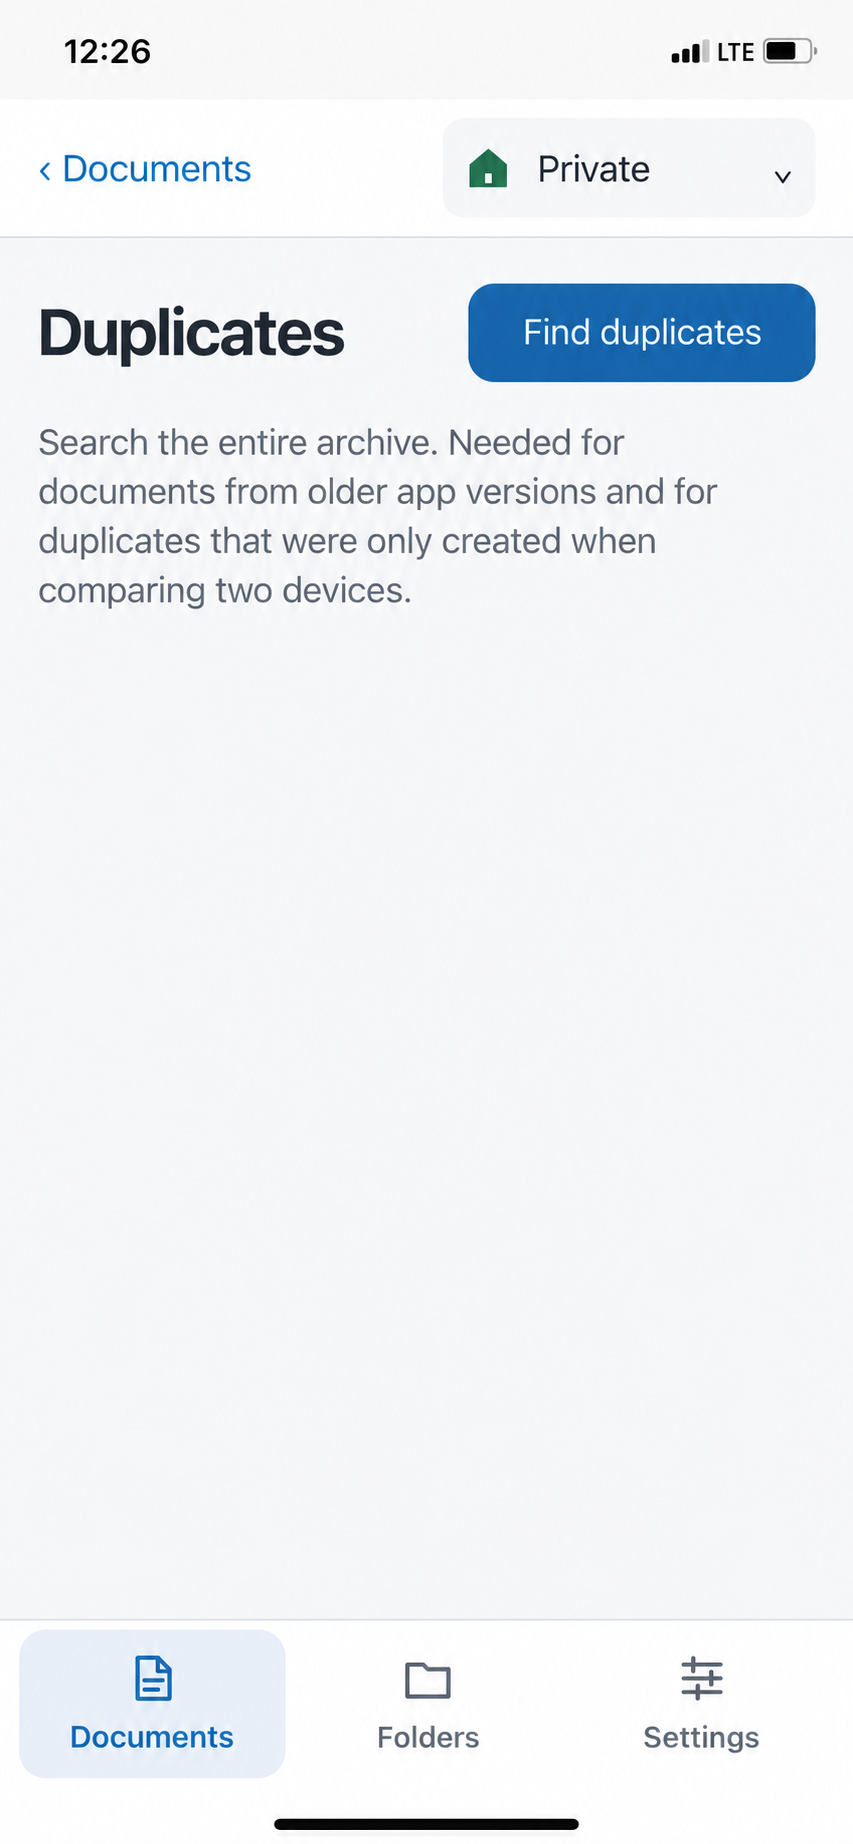
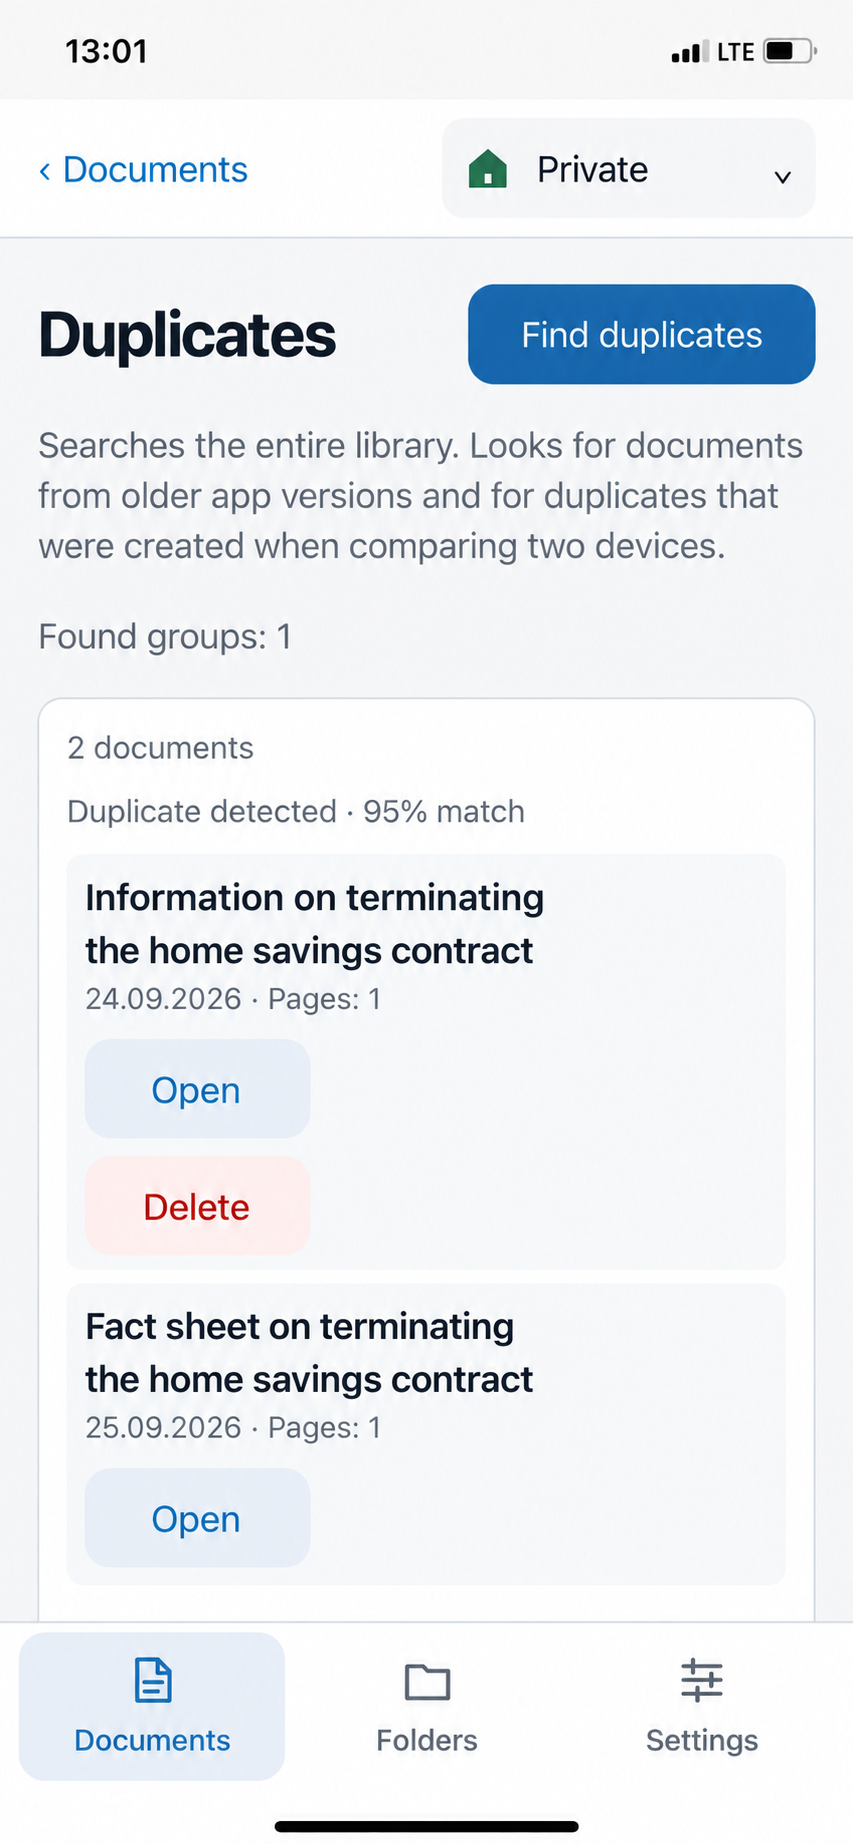
New documents are already checked for duplicates when saving (1.1.2). The duplicate search also scans the whole archive—important for older documents and for duplicates that only appear when two devices sync, for example when the same sheet was scanned on iPhone and iPad.
Start the search
Tap Find duplicates. Smart Archive compares the files, page images and text of all documents.
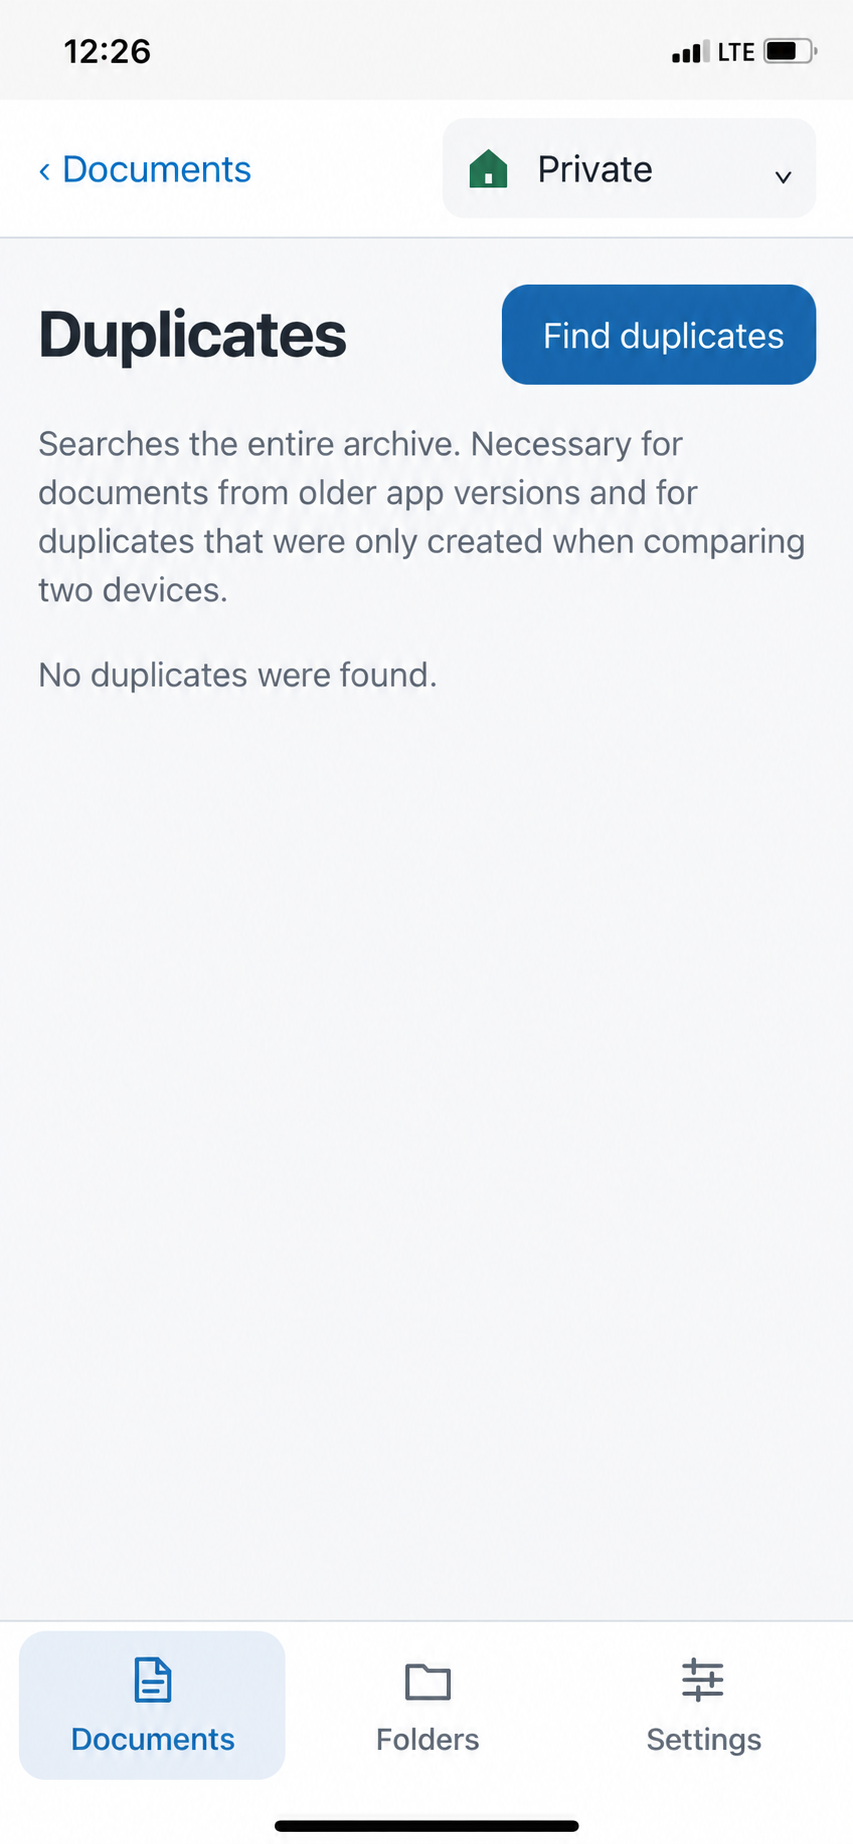
Read the result
Either “No duplicates were found.” appears—or “Groups found: 1”. Each group states how many documents it contains and how closely they match, e.g. “95 % match”.
Compare and clean up
Use Open to look at each document. Remove the superfluous one with Delete—the one you keep stays unchanged.
Caution: no confirmation here
So you can clean up many duplicates quickly, Delete on this page removes the document immediately without asking again. Check with Open beforehand which document you want to keep.
CHAPTER 2
Folders
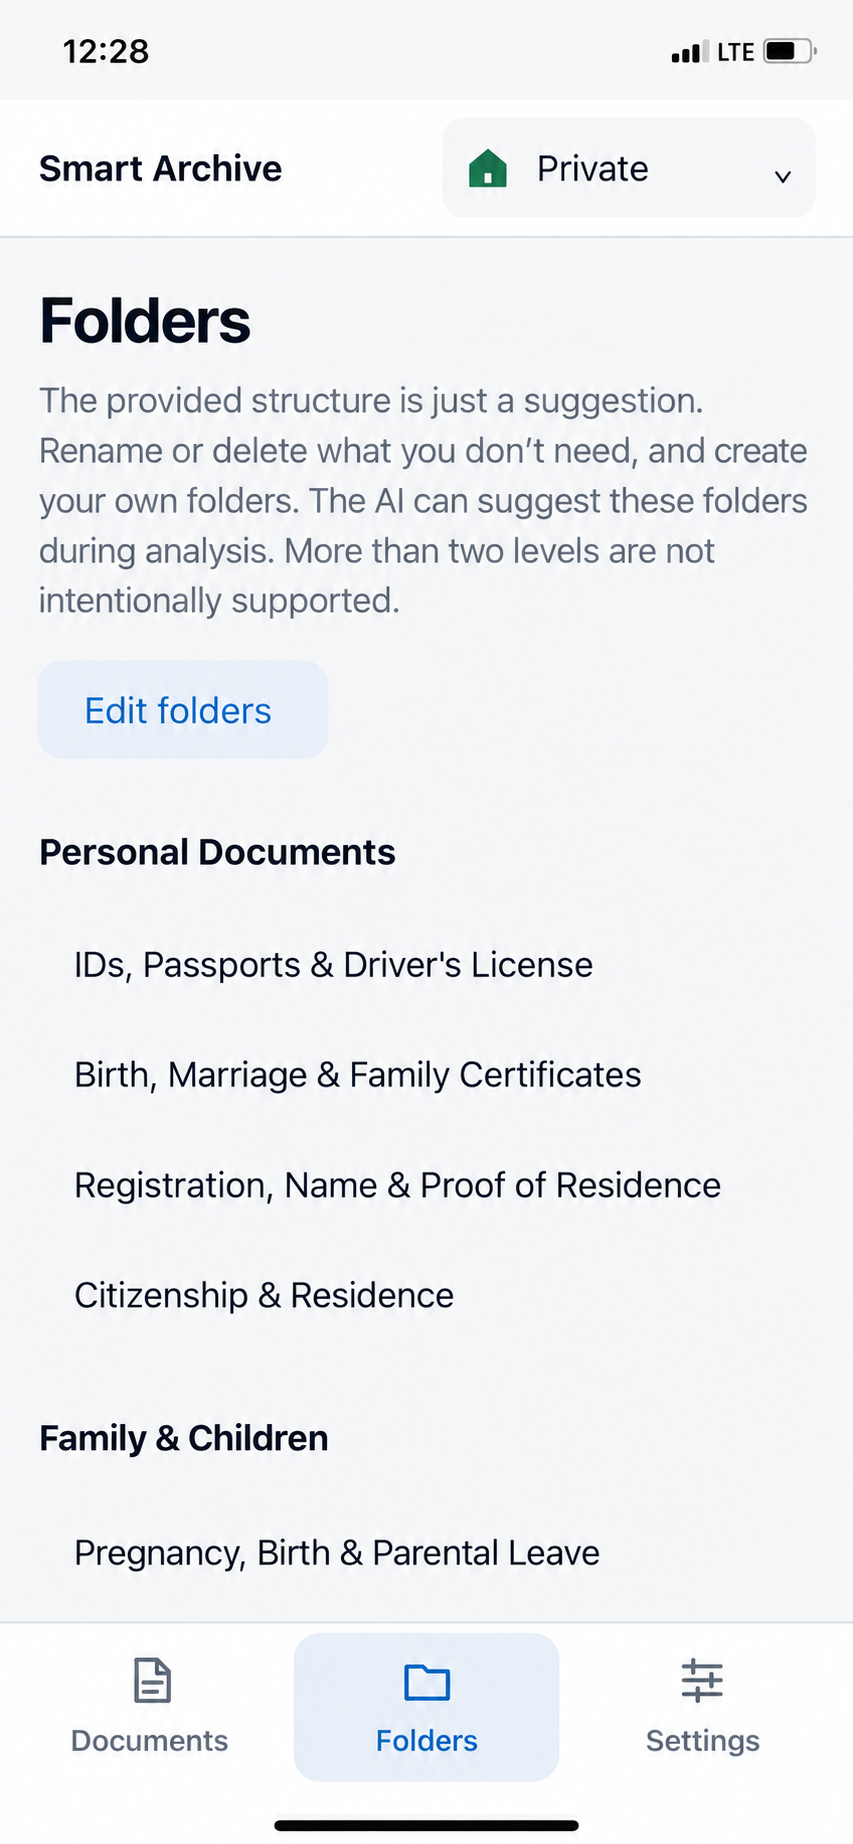
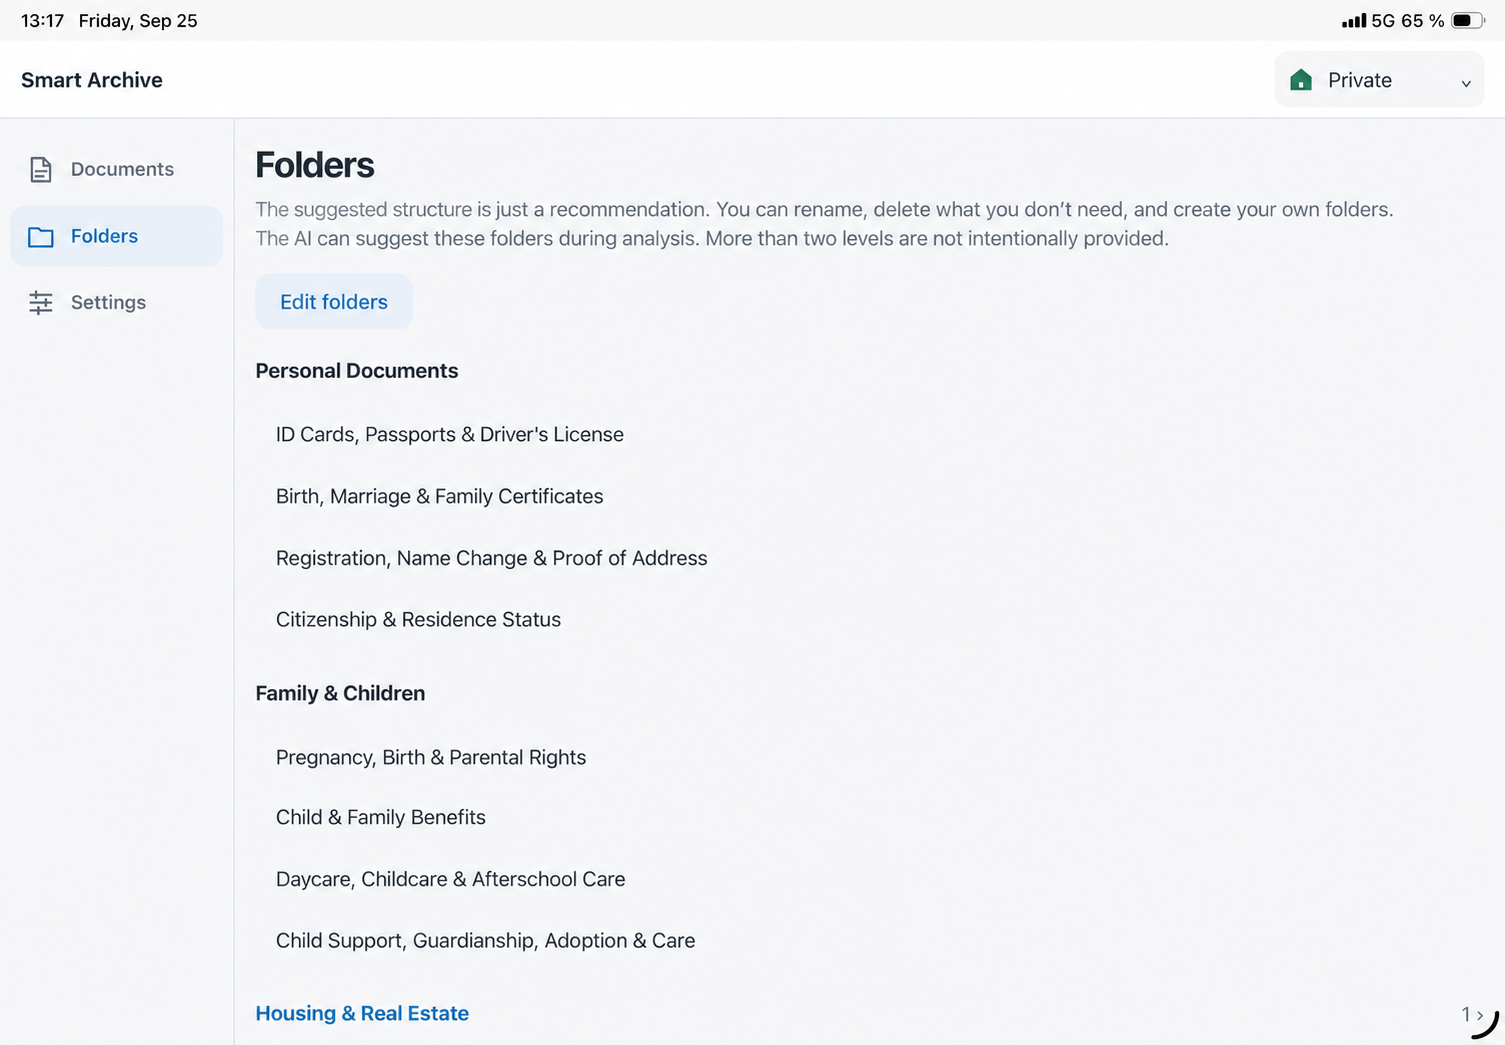
Tap Folders at the bottom. Here you see the complete folder structure of the open archive.
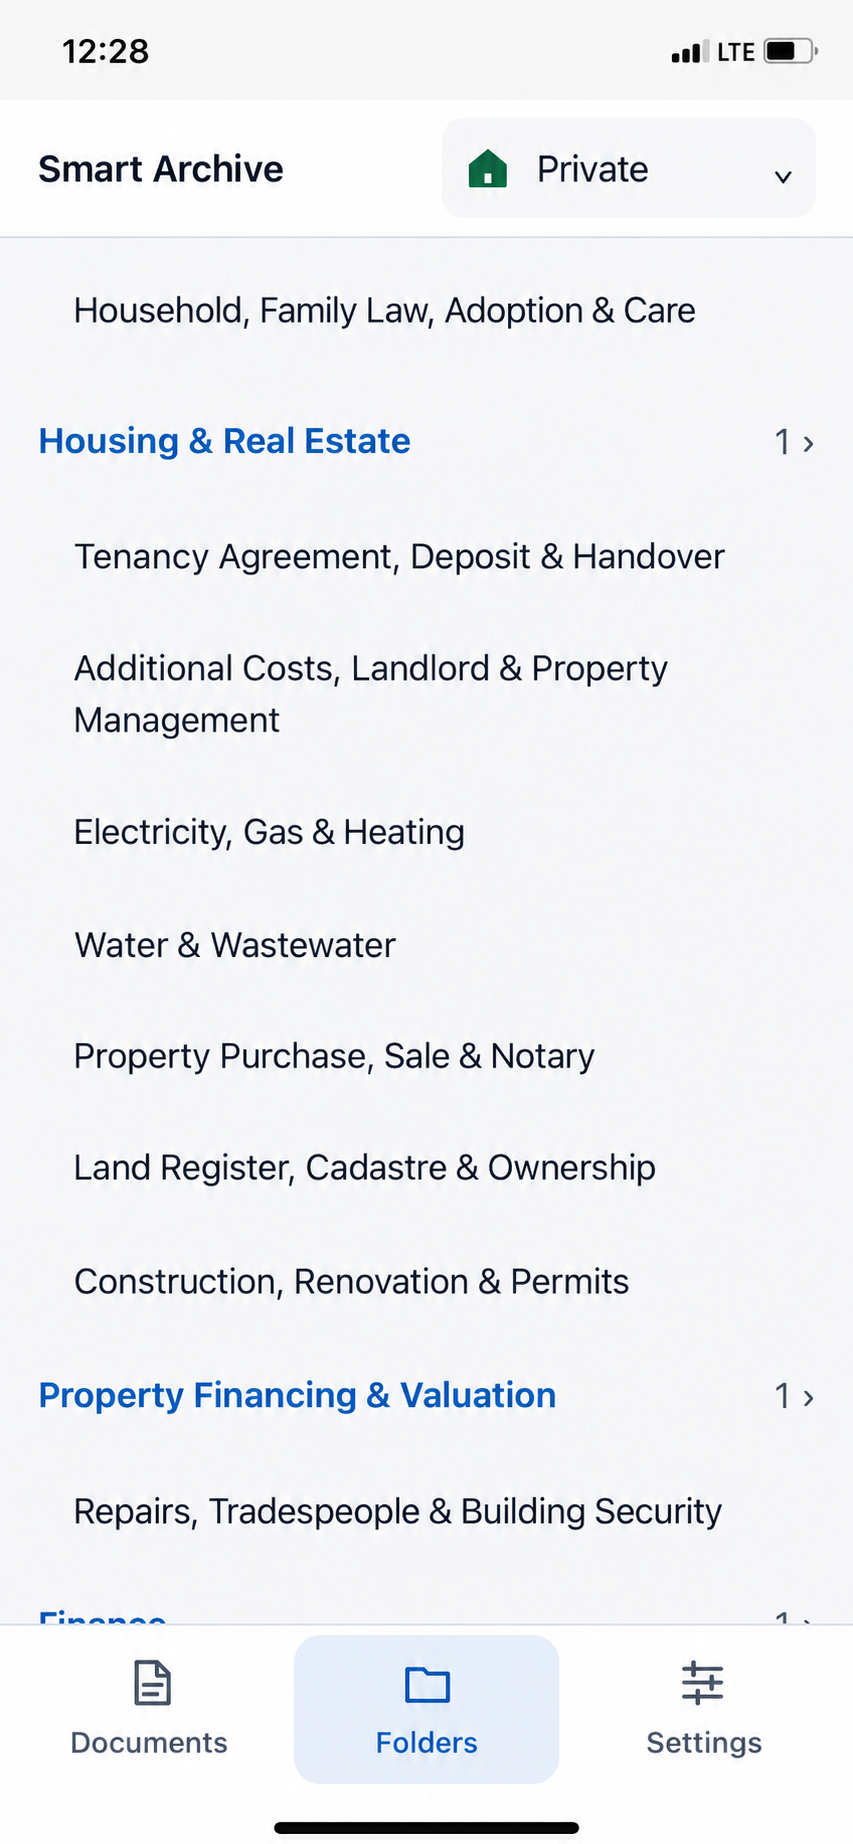
Every archive starts with a carefully prepared template: in the private archive, for example, Personal documents, Family & children, Housing & property, Finances, Taxes, Insurance or Health & care, each with suitable subfolders. The business archive has its own template—from Accounting & closing through Sales & customers to Personnel & payroll.
- Two levels
- There are top-level folders (bold) and subfolders (indented). More than two levels are intentionally not provided—this keeps filing clear and helps AI choose the right folder more reliably.
- Blue with a number
- Folders that contain documents are highlighted in blue; the count and an arrow appear on the right, e.g. “1 ›”. Tap it to open the document list already filtered by that folder.
- Edit folders
- Switches to edit mode (2.1).
2.1Edit folders
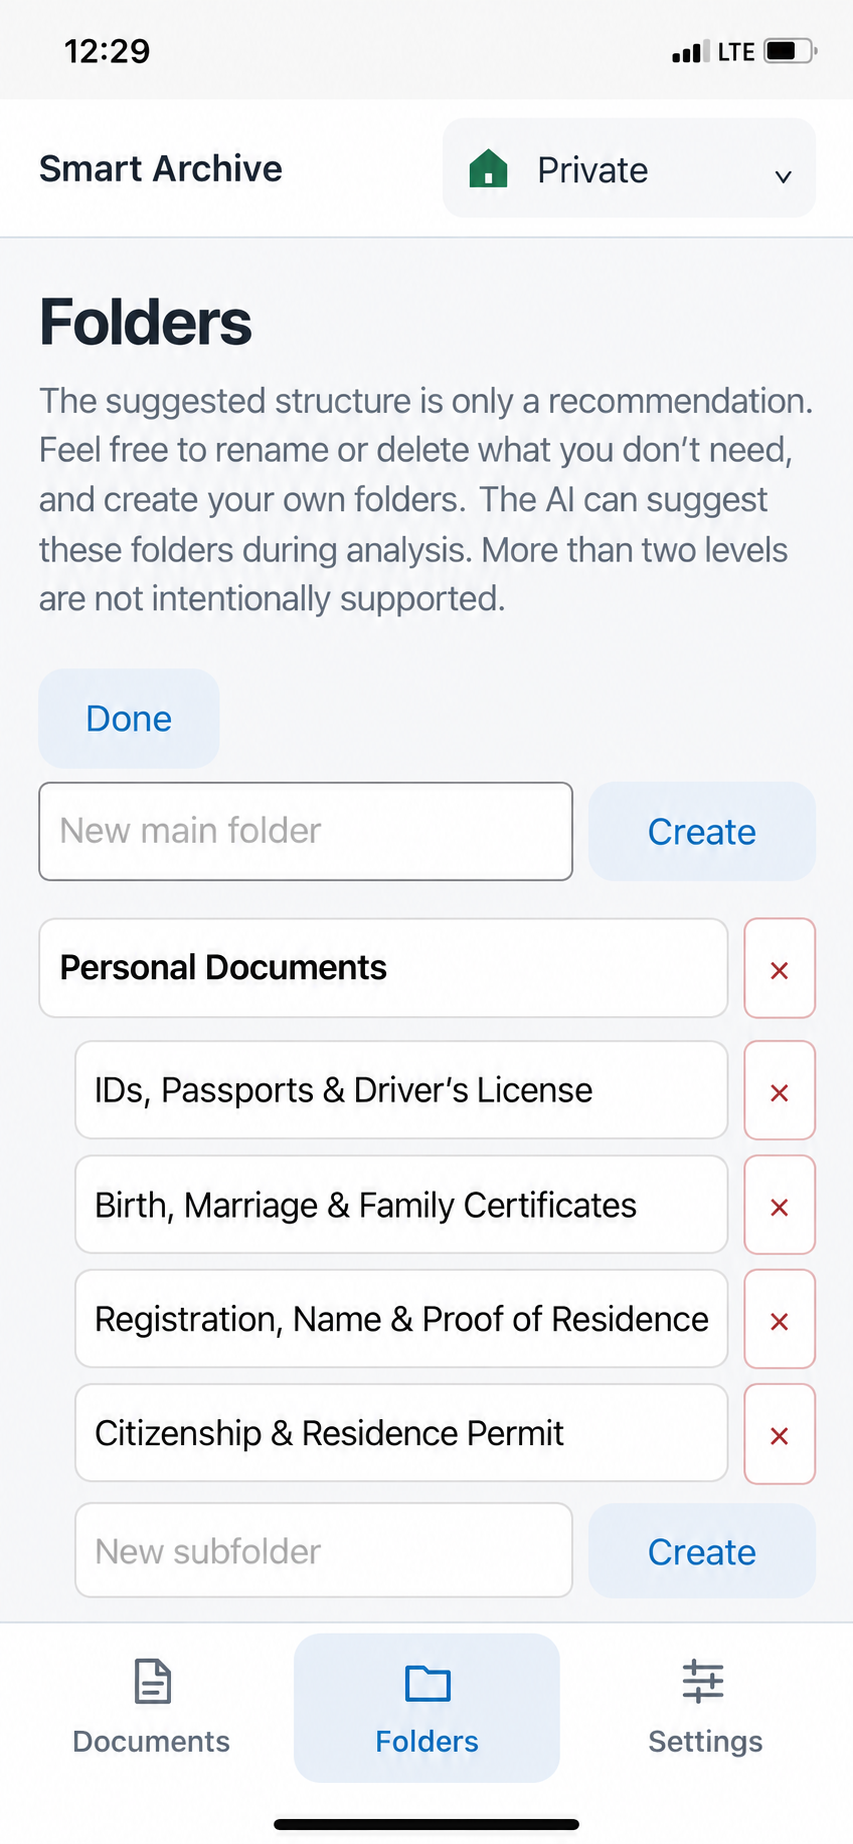
Tap Edit folders. Every folder becomes an input field with a red × button next to it. The button now says Done.
Rename
Tap a field and change the name. The change is saved automatically as soon as you leave the field. Documents already filed remain in the renamed folder.
Delete
The red × button removes a folder (2.1.1).
Create
At the very top you create a new top-level folder, at the end of each group a new subfolder (2.1.2).
Done
Done ends edit mode.
Reset to template
At the very bottom of edit mode, Reset to template restores the original structure. Your own and renamed folders and tags are replaced, but documents are never deleted. Documents from folders that no longer exist then appear as “Without folder”. The app asks for confirmation first.
2.1.1Delete
Tap the × button
Tap the red × button next to the folder you no longer need.
Check the confirmation
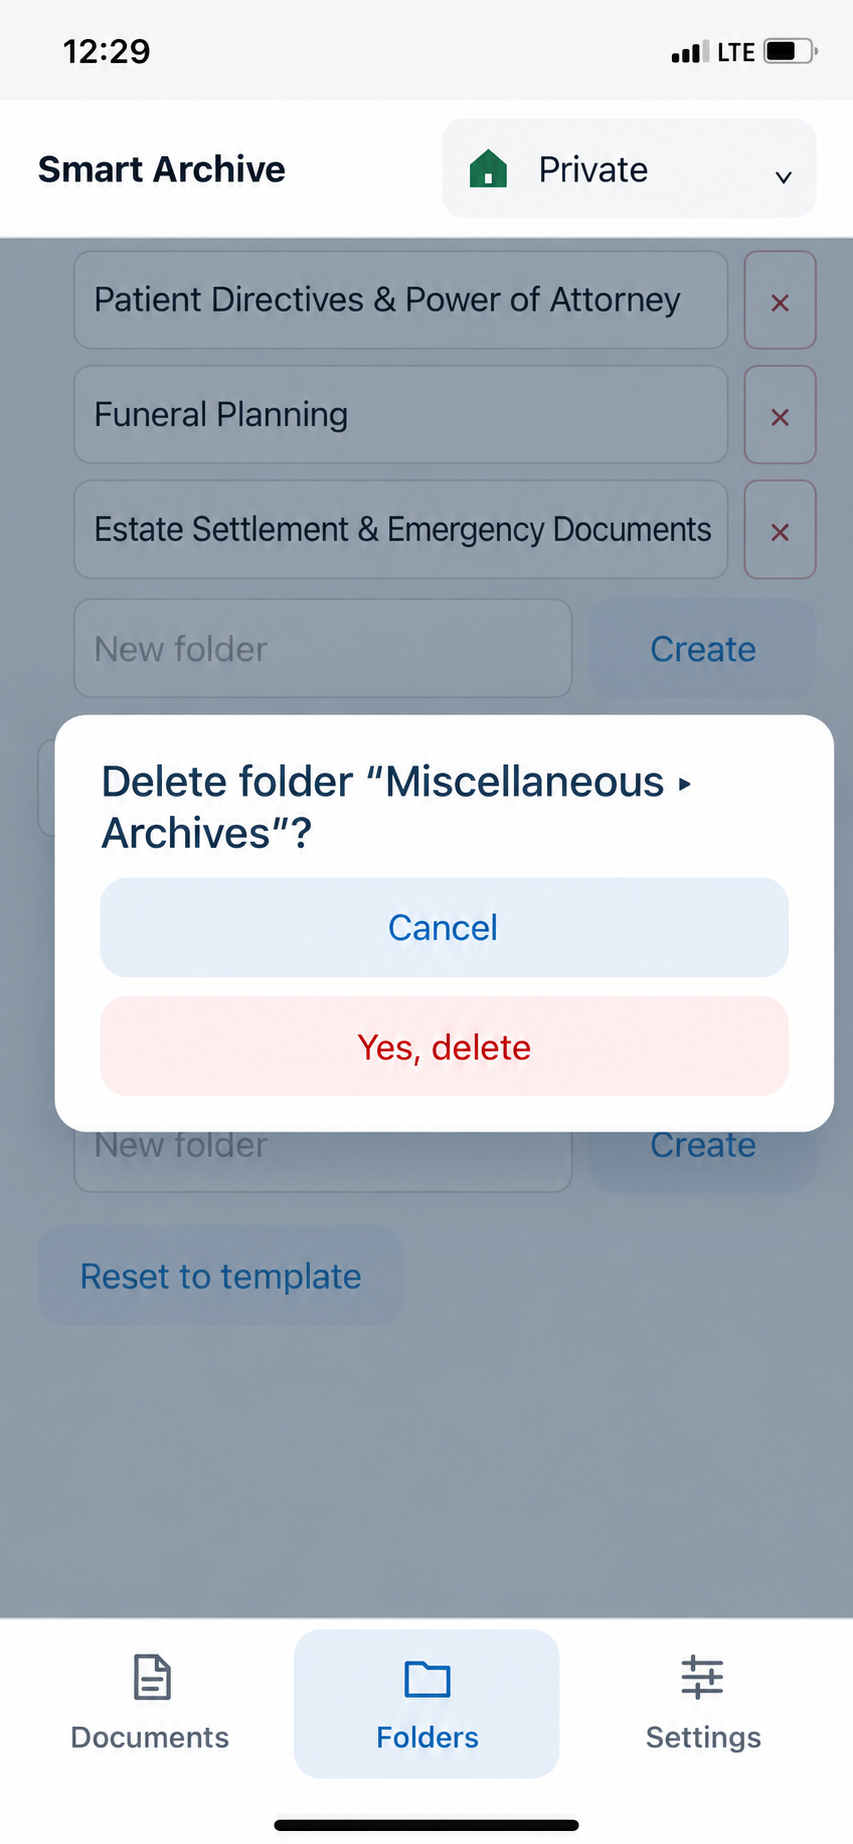
The confirmation names the full path, e.g. “Delete folder “Other ▸ Archive”?”, and—where relevant—what else will happen.
Confirm
Yes, delete removes the folder; Cancel keeps it.
Your documents are not lost
If you delete a top-level folder, its subfolders are deleted too. Documents in it are never deleted, though—they move to the Other folder, from where you can reassign them at your leisure.
2.1.2Create
Create a top-level folder
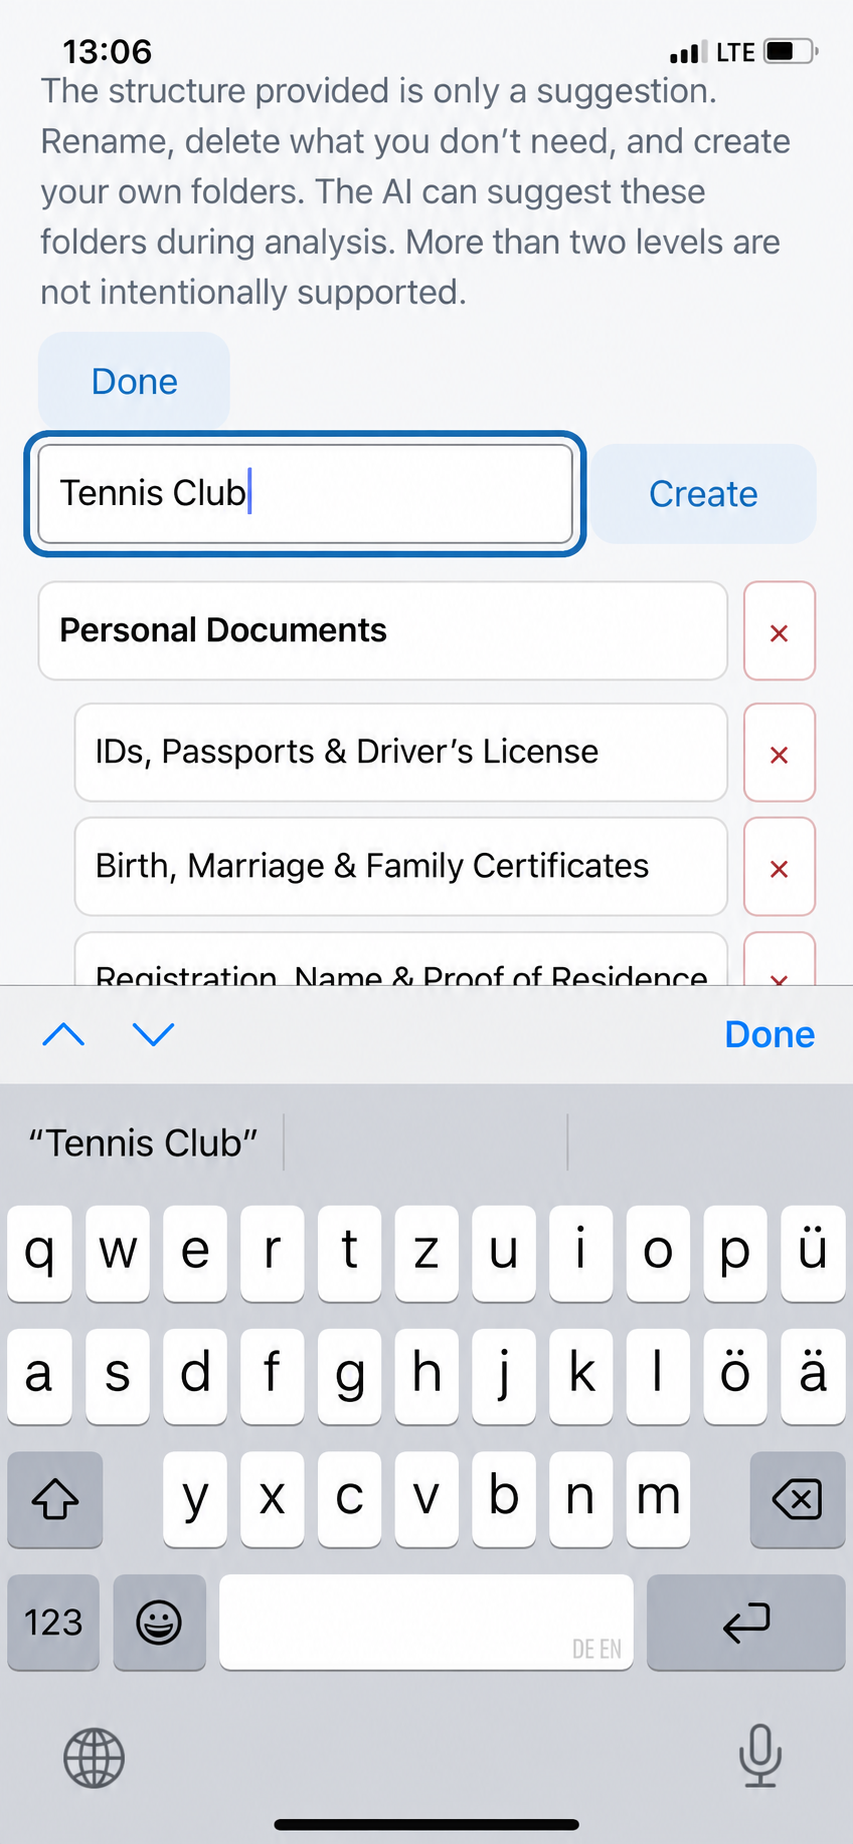
Tap the New top-level folder field at the top, enter the name—for example “Tennis club”—and tap Create.
Create a subfolder
At the end of each group there is a New subfolder field. Enter the name there and tap the Create next to it—the subfolder is created under exactly that top-level folder.
Let AI use it
New folders are available immediately: AI can suggest them in the next analysis, and they appear in every folder selection.
Tip for clear names
AI is guided by folder names. The more clearly a name describes what belongs in it (“Car insurance” rather than “Miscellaneous”), the more accurately it files documents.
CHAPTER 3
Settings
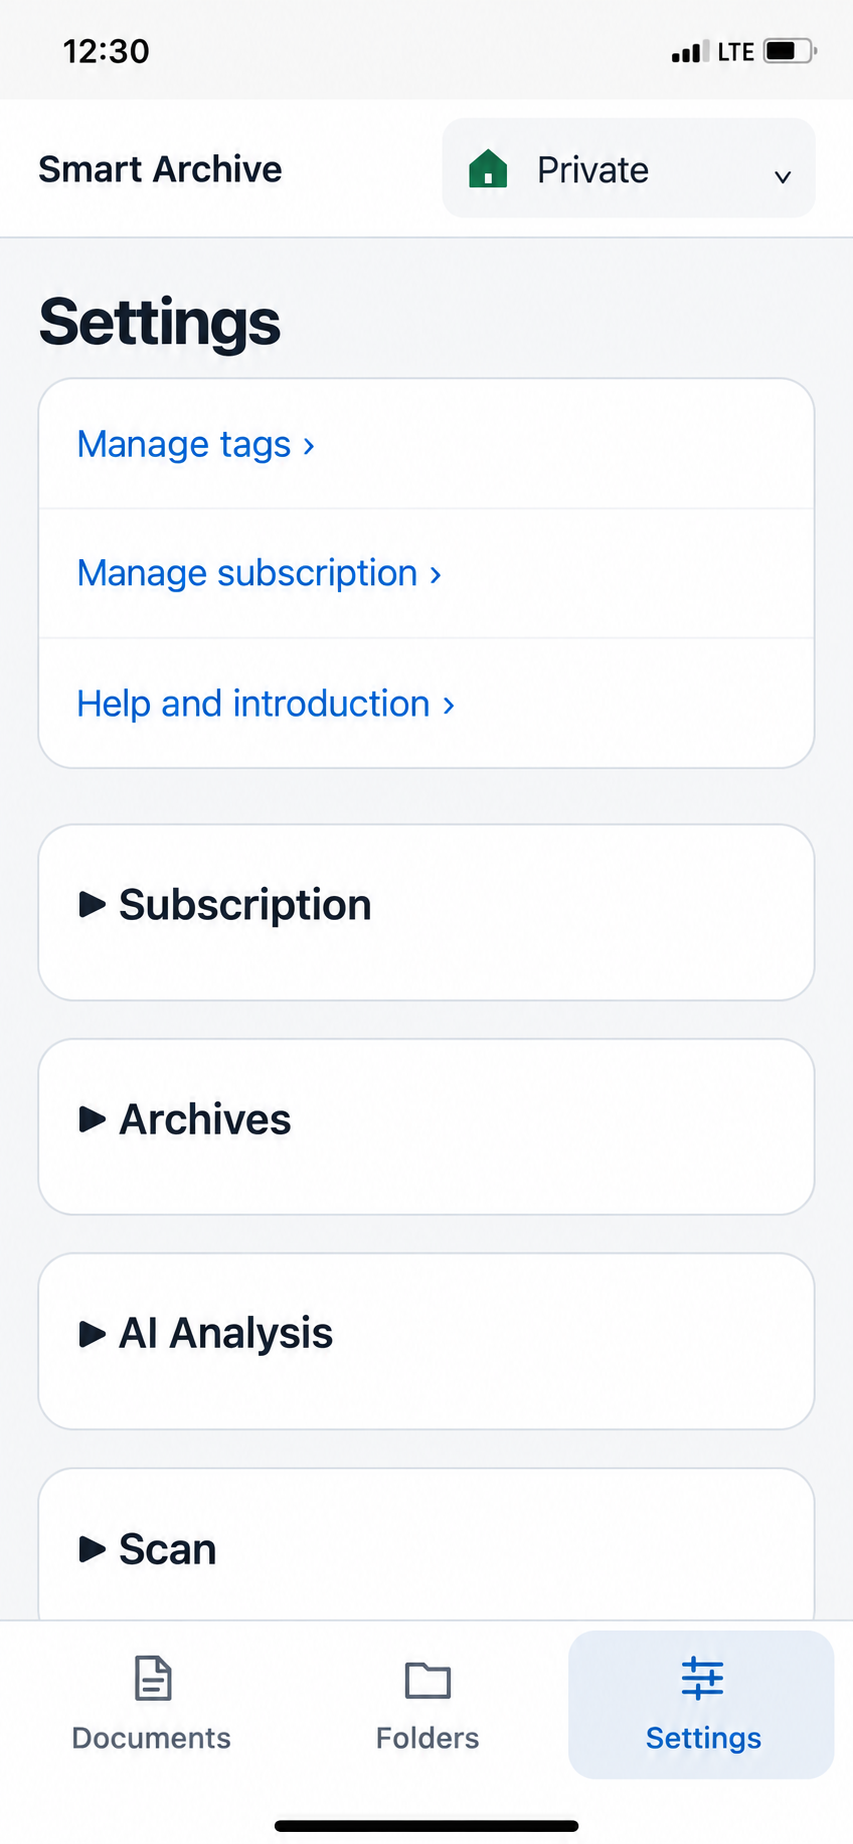
Tap Settings at the bottom. At the top are three links to separate pages, below them expandable sections: tap a heading with the triangle to expand or collapse it.
3.1Manage tags ›
3.2Manage subscription ›
3.3Help and introduction ›
▸Subscription
3.4Archives
3.5AI evaluation
3.6Scanning
3.7Text recognition
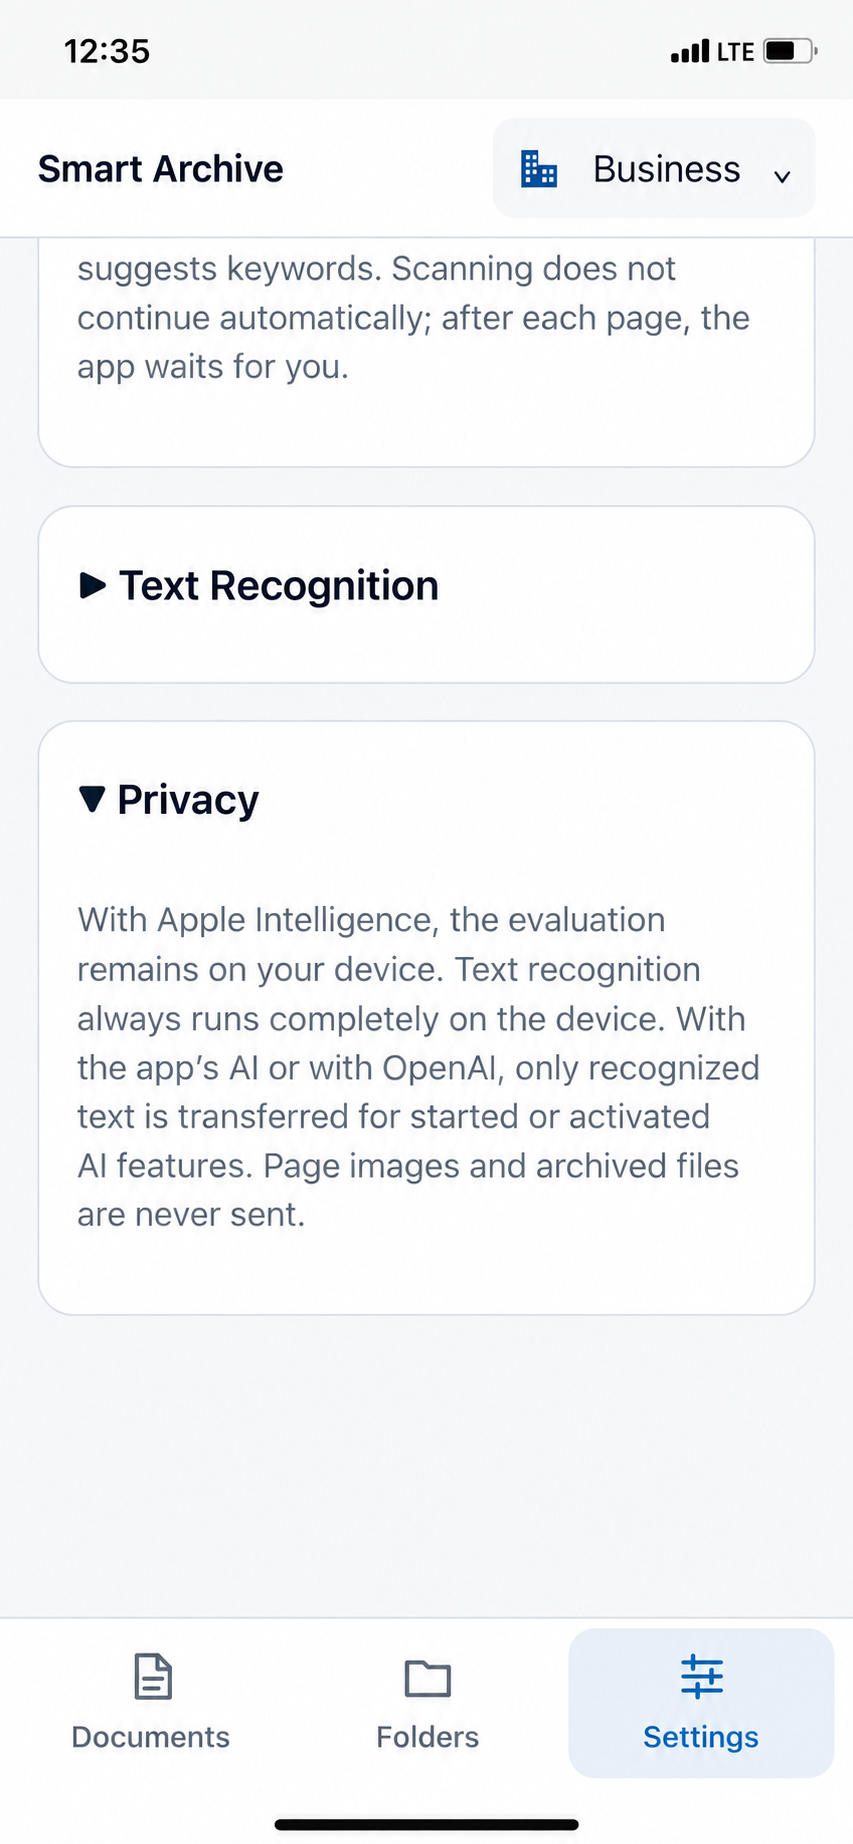
3.8Privacy
Some settings apply per archive
Folders, tags and AI preferences always belong to the currently open archive. So check at the top right whether Private or Business is open before changing anything.
3.1Manage tags
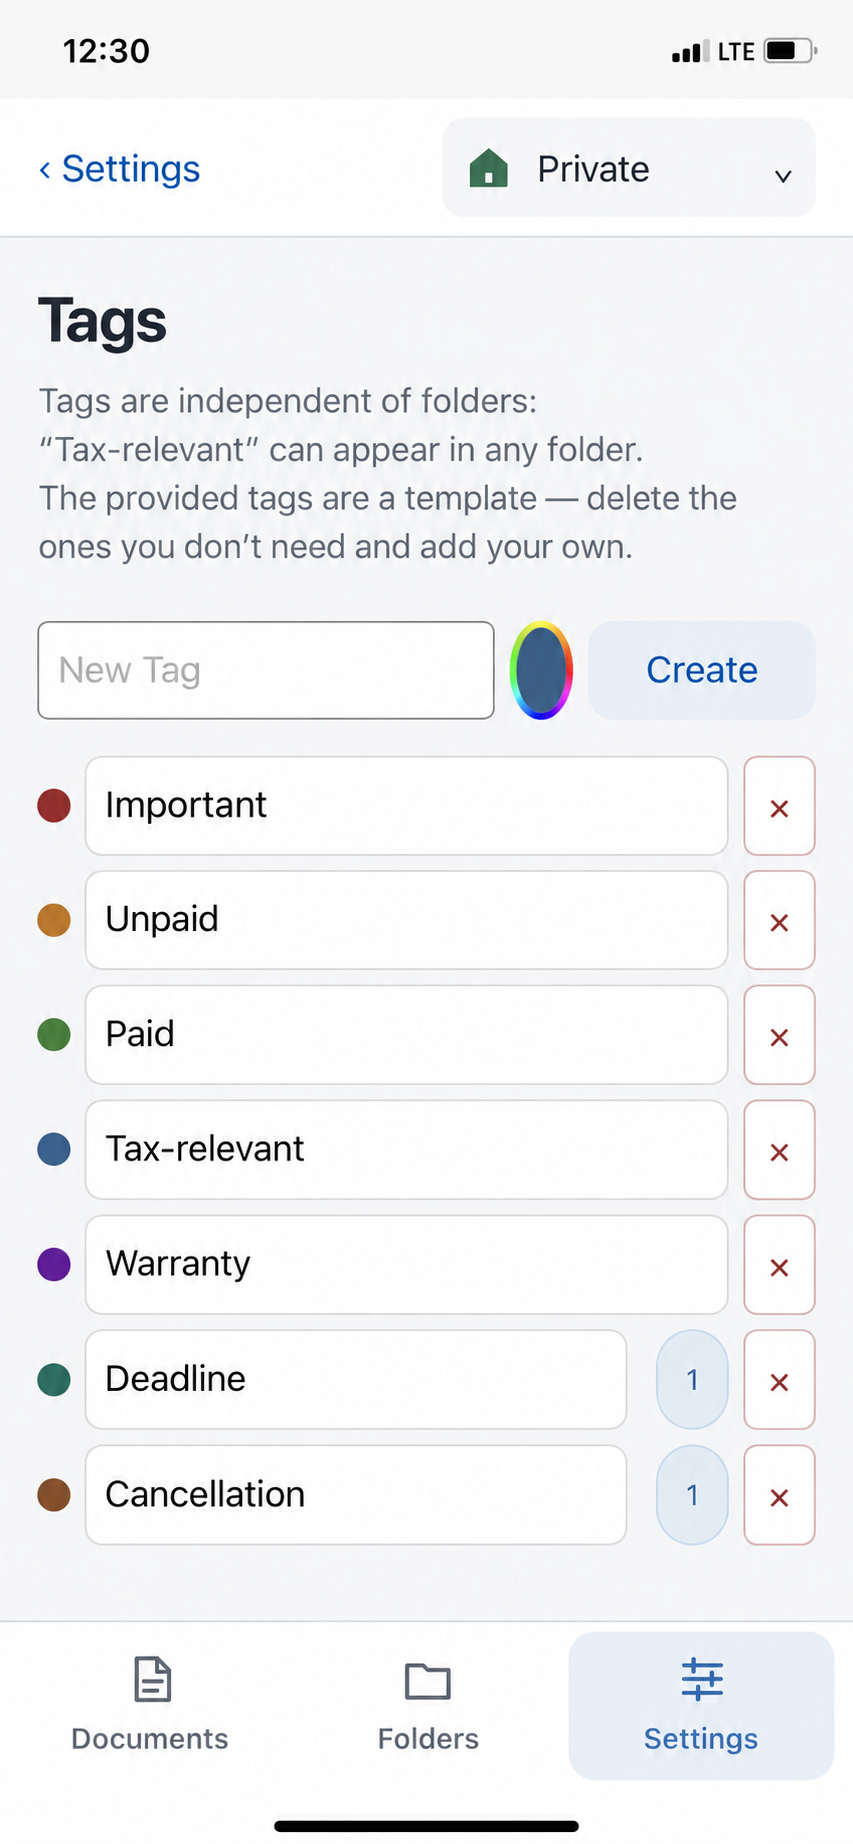
Tags work across folders: a document is always in exactly one folder but can carry any number of tags. Tax-relevant can therefore appear in any folder—and at the end of the year the tag filter shows all tax-relevant documents at a glance.
Create a new tag
Enter the name in the New tag field at the top. Tap the colourful circle next to it and choose a colour. Then tap Create.
Rename
Tap the name of a tag and change it. The change is saved automatically and appears immediately on every document with this tag. The colour dot on the left shows the colour used to display the tag everywhere.
See where it is used
The blue number next to a tag shows how many documents have it. Tap it to open exactly those documents.
Delete
The red × button deletes a tag after confirmation. It is removed from all documents—the documents themselves remain.
Included by default are Important, Unpaid, Paid, Tax-relevant, Warranty, Deadline, Cancellation, Follow up, Confidential, Keep permanently and Completed, among others.
3.2Manage subscription
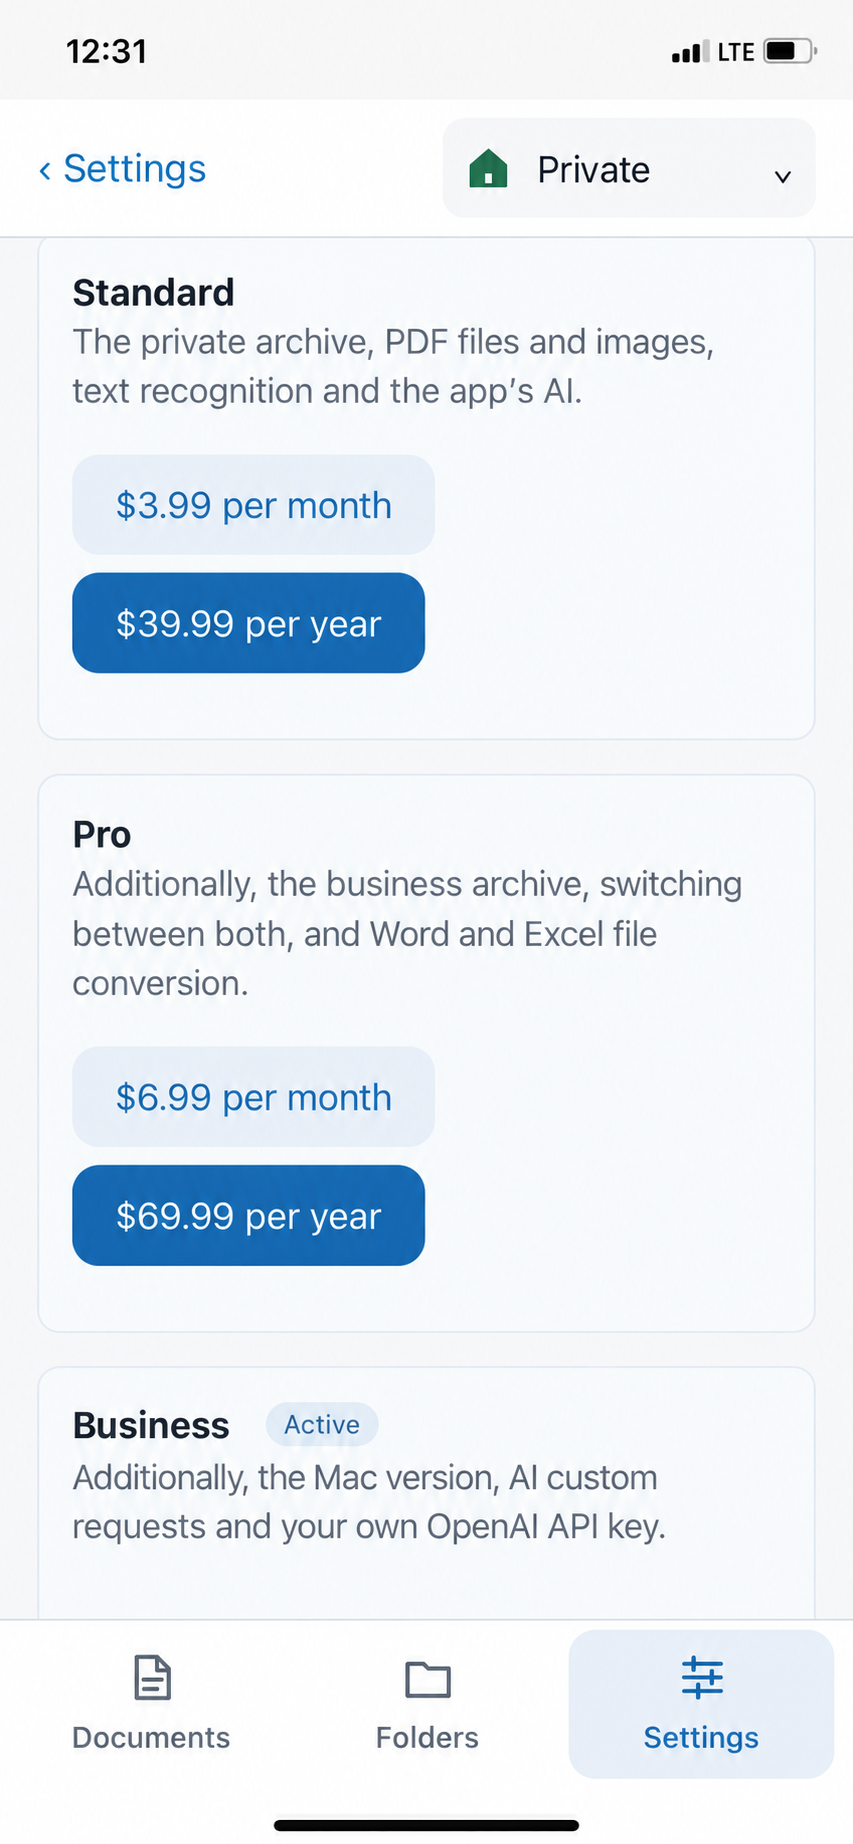
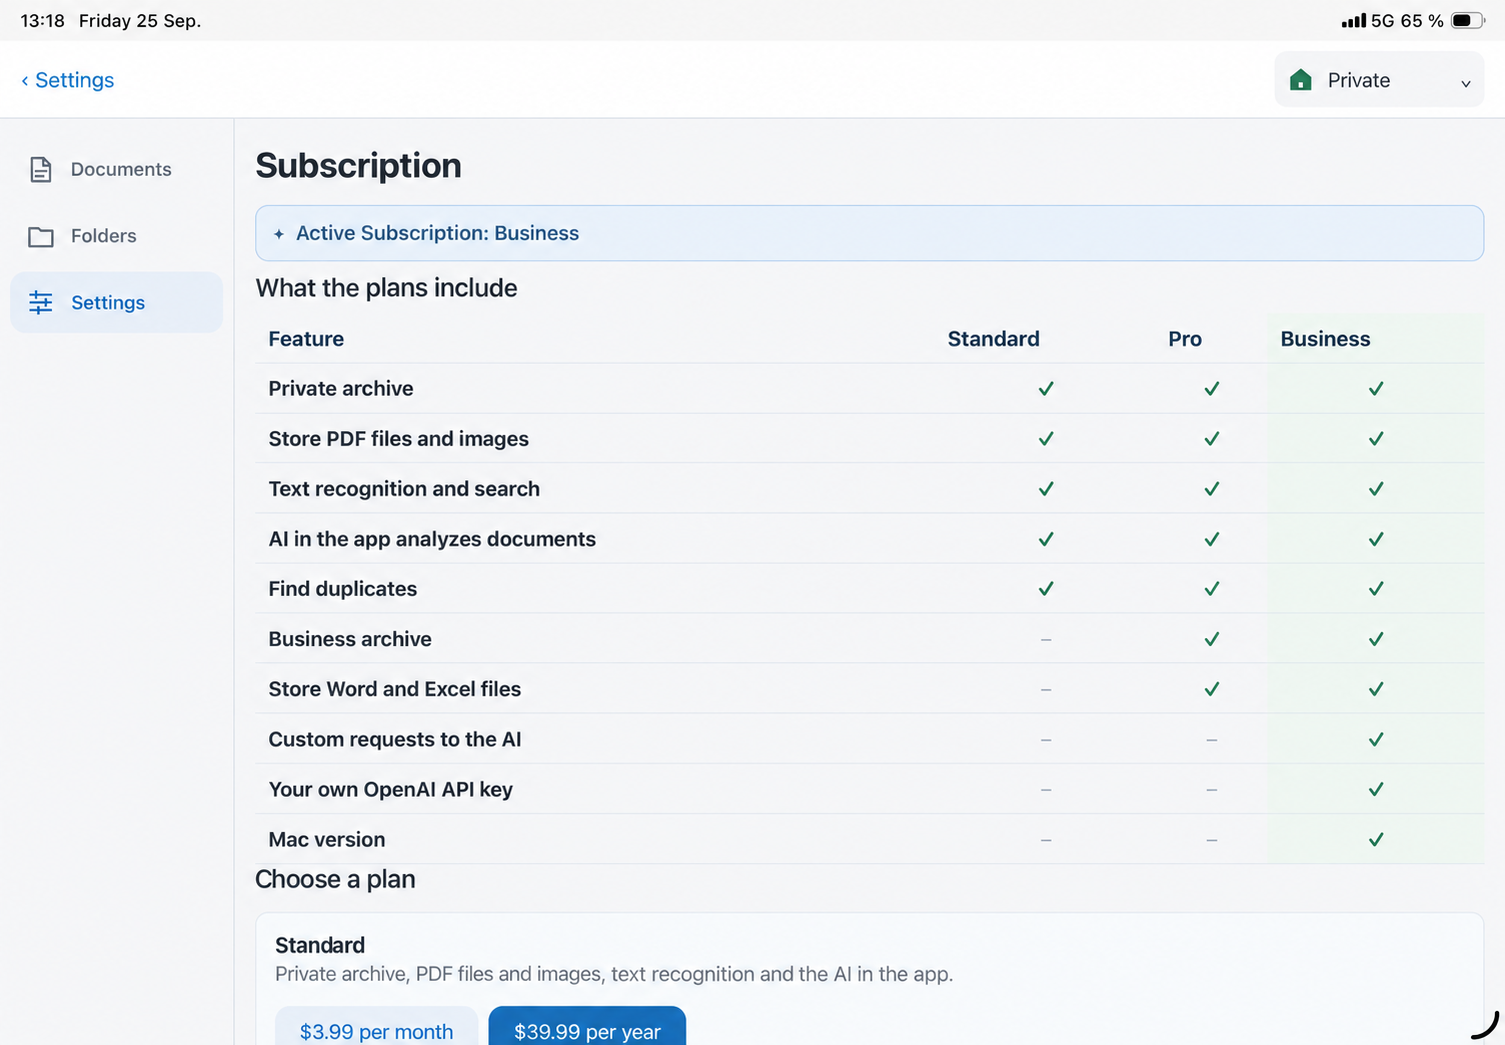
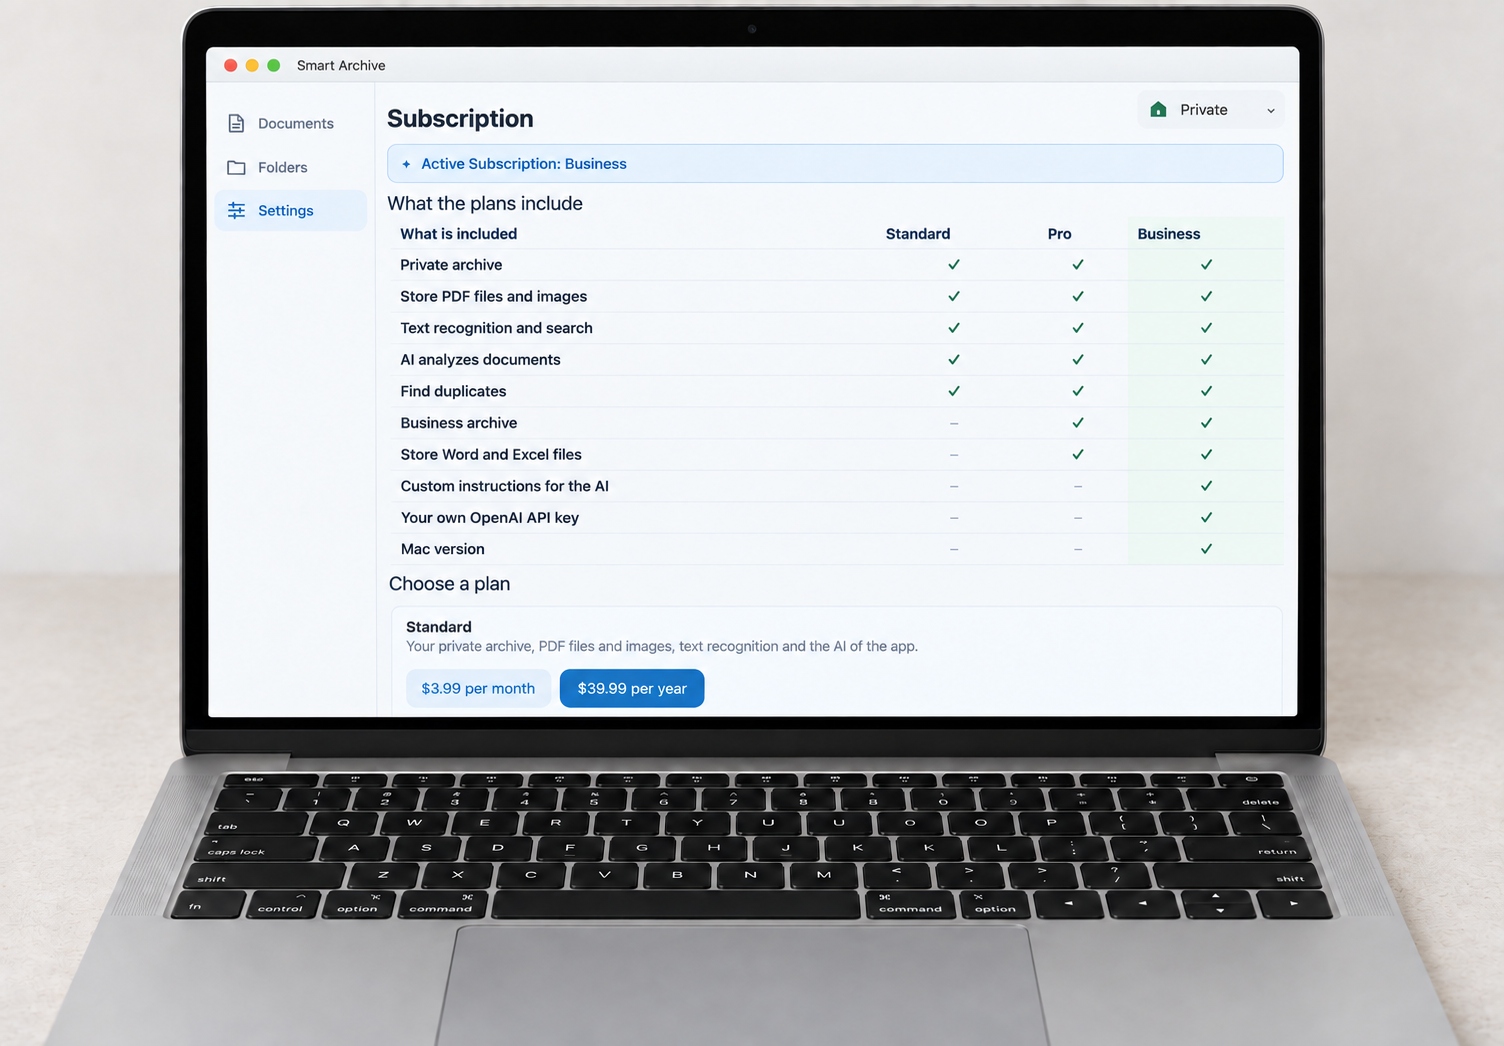
Manage subscription (or the expandable Subscription section) shows your active plan at the top, e.g. “Active subscription: Business”. Below, the table “What each plan includes” compares the three plans, and under Choose a plan you will find the prices—monthly or yearly, in your local currency.
Try it free for 7 days
After setup you can try Smart Archive for 7 days with the Standard features—without a subscription. When the trial or a subscription ends, your archive stays fully readable, searchable and shareable. Only new documents then require a subscription again.
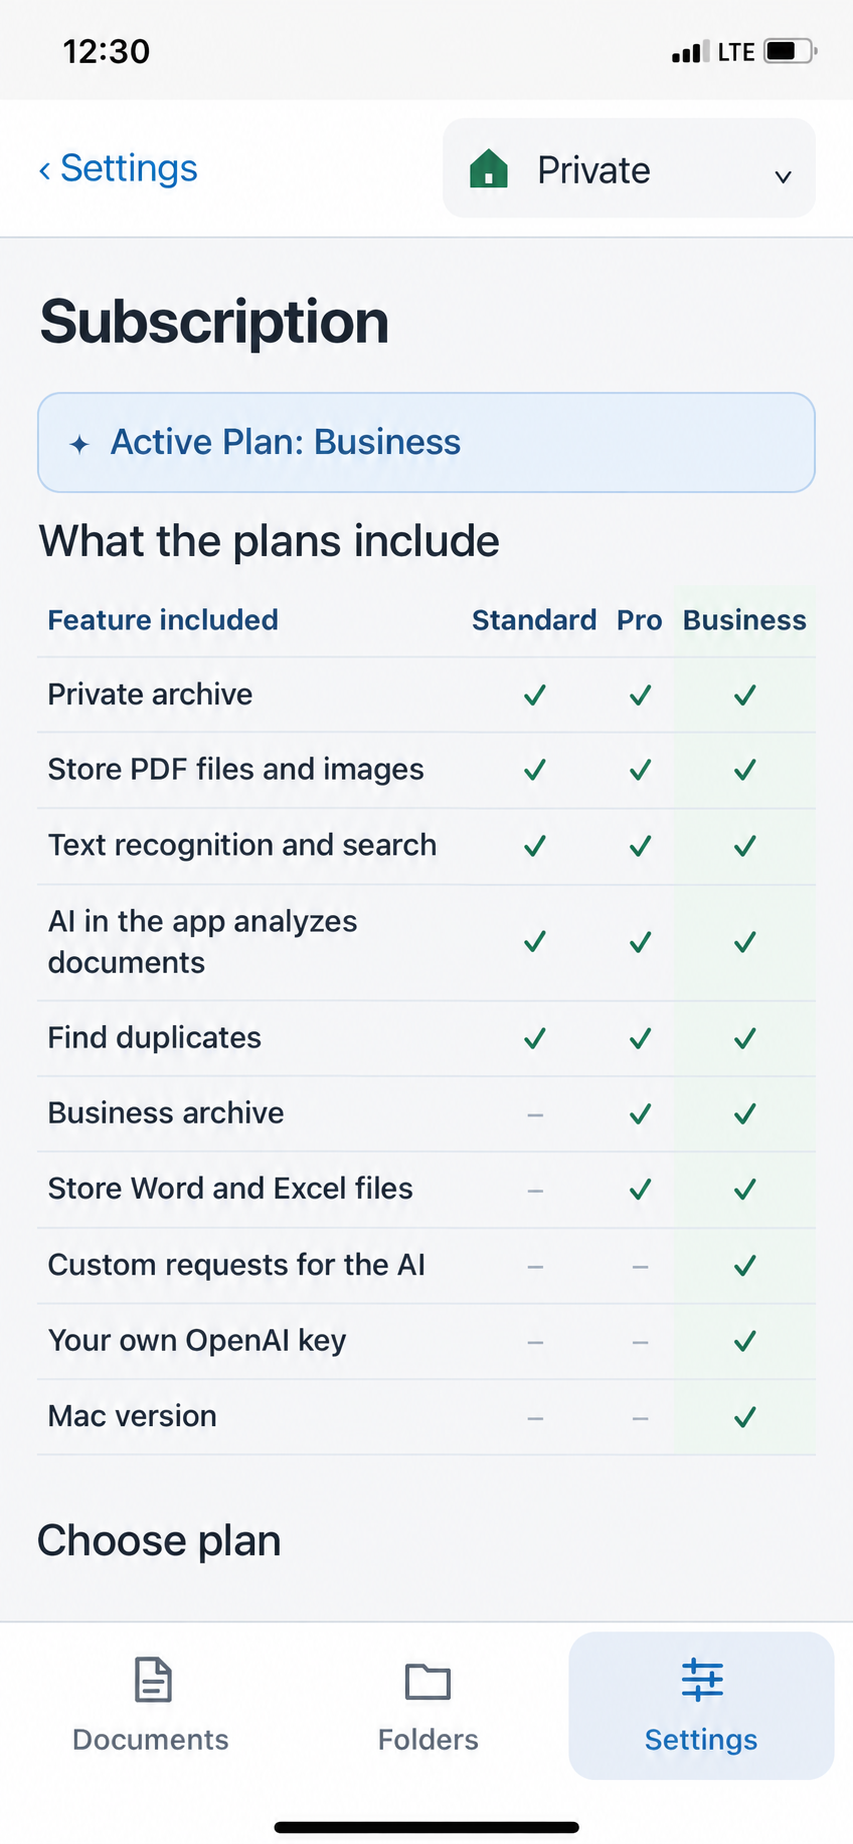
| What you get | Standard | Pro | Business |
|---|---|---|---|
| Private archive | ✓ | ✓ | ✓ |
| Store PDF files and images | ✓ | ✓ | ✓ |
| Text recognition and search | ✓ | ✓ | ✓ |
| The app’s AI reads your documents | ✓ | ✓ | ✓ |
| Apple Intelligence on compatible devices | ✓ | ✓ | ✓ |
| Find duplicates | ✓ | ✓ | ✓ |
| Business archive | — | ✓ | ✓ |
| Store Word and Excel files | — | ✓ | ✓ |
| Your own instructions for the AI | — | — | ✓ |
| Your own OpenAI key | — | — | ✓ |
| Mac version | — | — | ✓ |
3.2.1Restore purchases
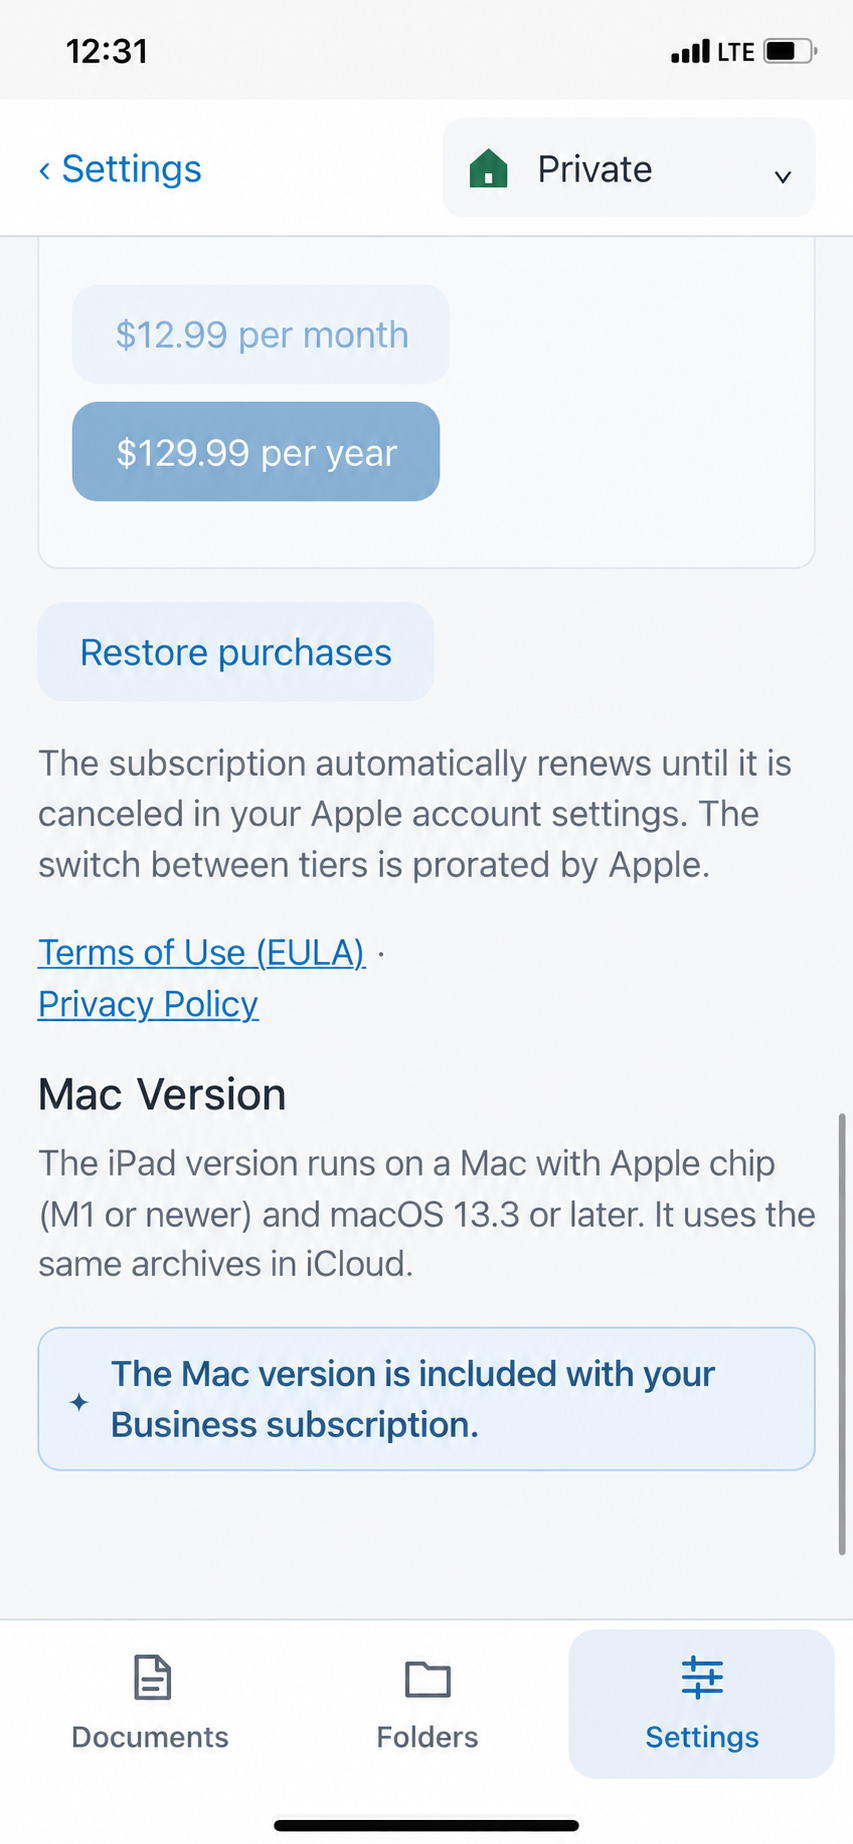
Your subscription is linked to your Apple account, not to a specific device. If you have a new iPhone, reinstalled the app or opened Smart Archive on iPad or Mac for the first time, Restore purchases brings back your existing subscription—you never pay twice.
Scroll down
Restore purchases is below the prices.
Tap and sign in
Apple may ask for your Apple ID. Smart Archive then recognises your subscription automatically.
Cancel and change plans
The subscription renews automatically until you cancel it in your Apple account settings (Settings › your name › Subscriptions). If you switch plans, Apple prorates the charge. Below you will find the Terms of Use (EULA), the Privacy Policy and the Mac version section with its requirements.
3.2.2Buy a subscription
Choose a plan
Use the table to decide which plan you need: Standard for a private archive with PDFs and images, Pro additionally for the business archive and Word/Excel, Business additionally for Mac, AI preferences and your own OpenAI key.
Tap a price
Tap per month or per year for the plan you want. The yearly plan costs less than twelve months.
Confirm with Apple
Apple’s purchase sheet appears. Confirm with Face ID, Touch ID or your password. Payment is made through your Apple account.
Done
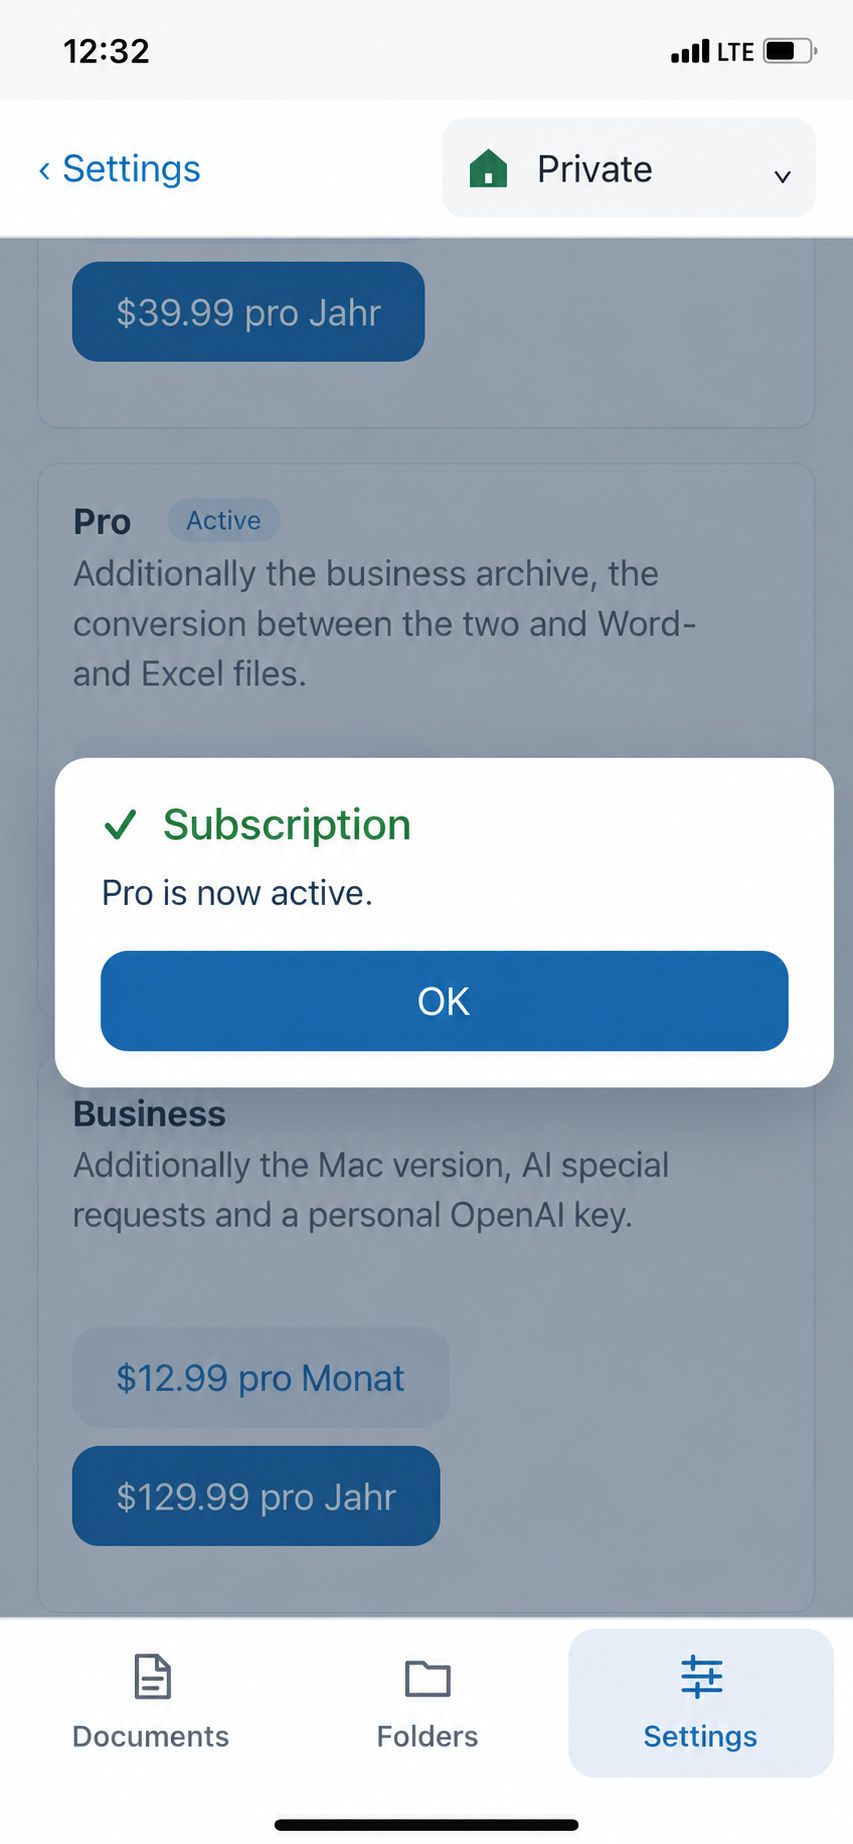
Smart Archive reports, e.g., “Pro is now active.” Tap OK—the new features are available immediately on all devices with the same Apple account.
If you cancel in the purchase sheet, nothing is charged. If a purchase still needs approval (for example with Ask to Buy in Family Sharing), the subscription becomes available as soon as Apple approves it.
3.3Help and introduction
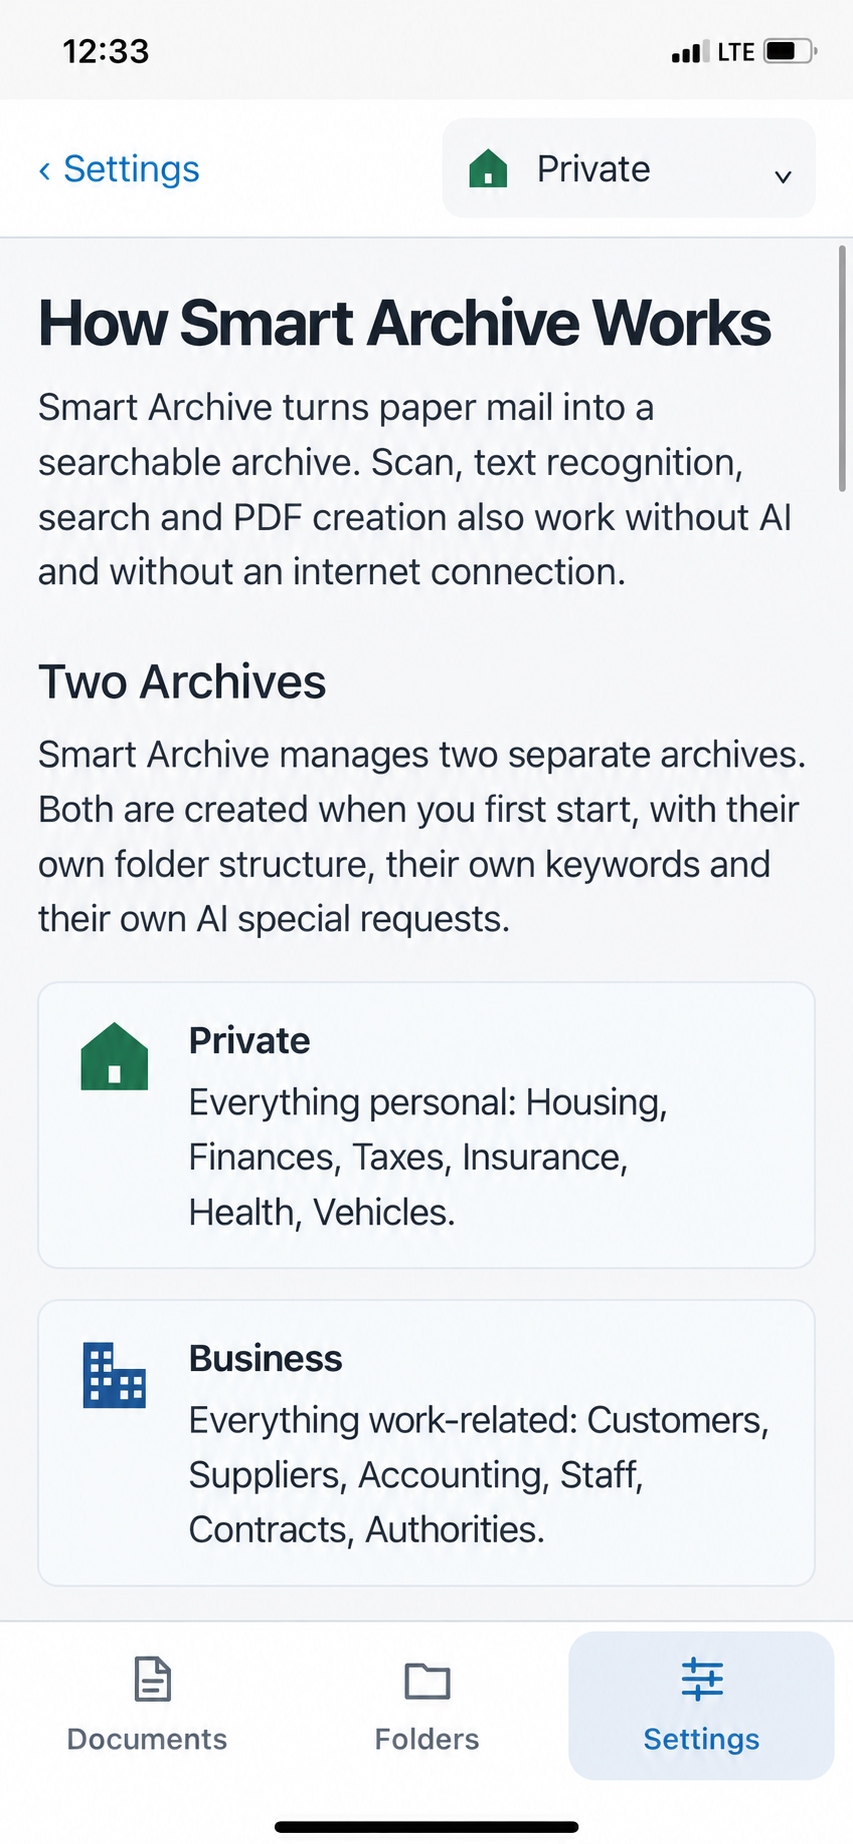
“How Smart Archive works” is the built-in quick guide—ideal when you want to look something up on the go. Right inside the app, it explains:
- the two archives, Private and Business, and how to tell which one is open,
- the three plans and the trial,
- scanning, importing files, AI evaluation and choosing an AI,
- finding, viewing and sharing,
- customising folders and tags,
- how your data is handled and the Mac version.
Available offline
The introduction is part of the app and needs no internet. This guide is here for detailed explanations with pictures.
3.4Archives
Smart Archive keeps two completely separate archives—each with its own folder structure, its own tags and its own AI preferences. Both are created automatically at first start; you don’t have to choose a storage location.
Everything personal: housing, finances, taxes, insurance, health, vehicles. Included in every plan.
Everything commercial: customers, suppliers, accounting, personnel, contracts, authorities. From Pro.
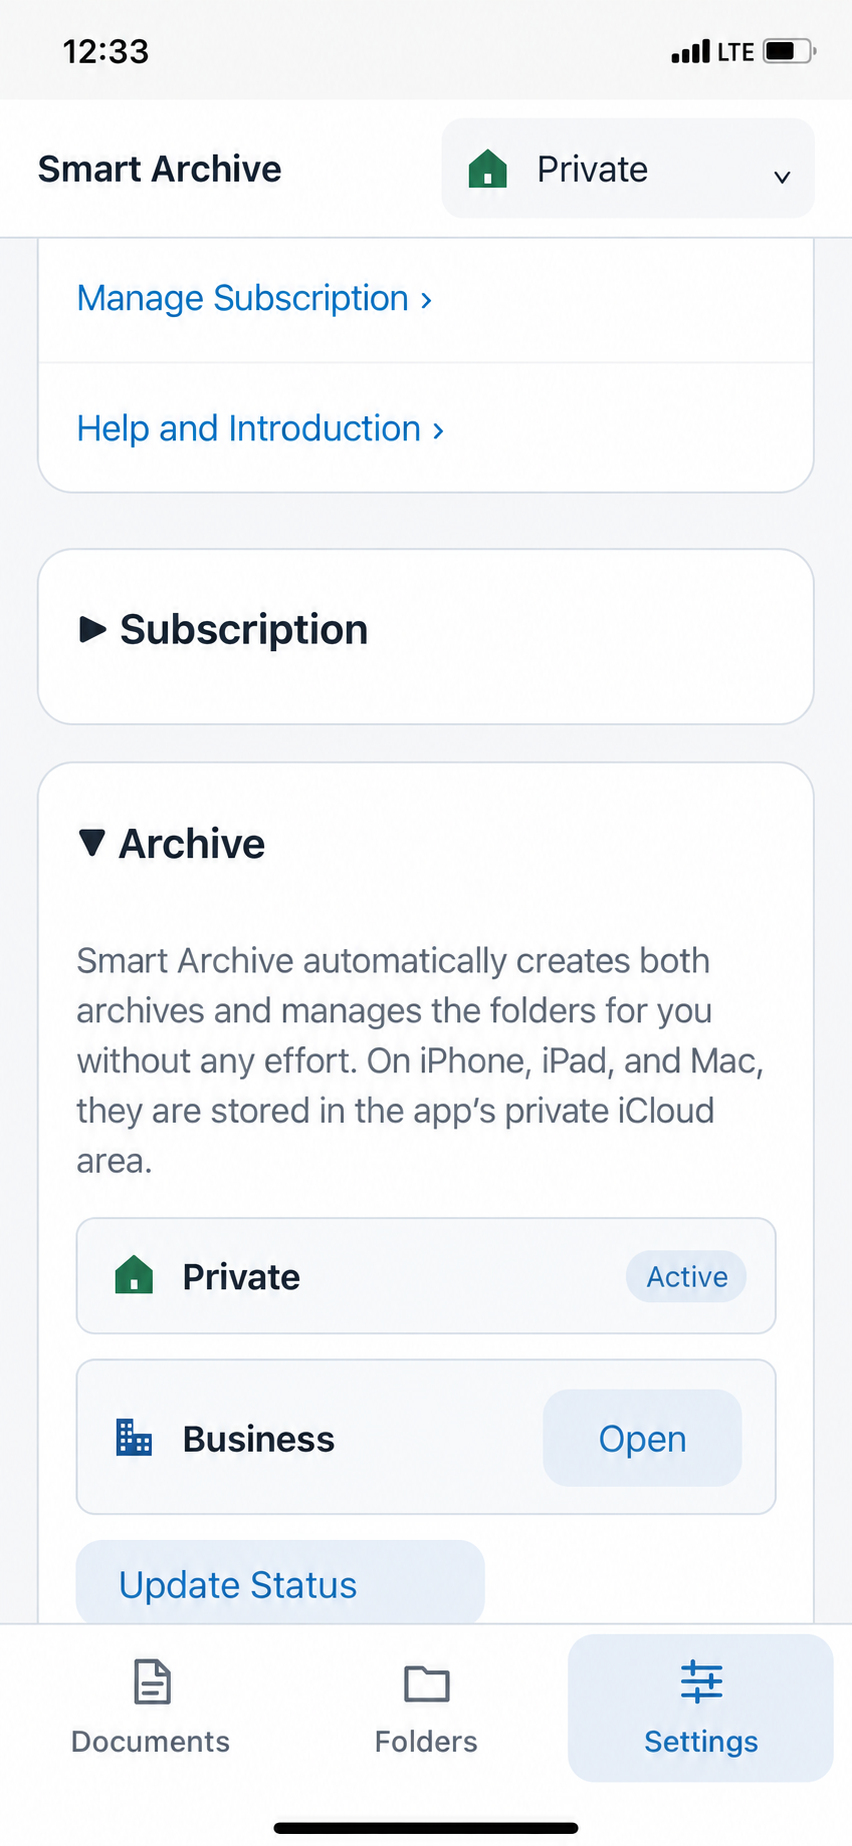
The expandable Archives section shows both archives. The open one says Active, the other has an Open button. The archives live in the app’s private iCloud area and are therefore synced between iPhone, iPad and Mac using the same Apple account. Refresh status checks again whether iCloud is available.
3.4.1Open
Tap “Open”
Tap Open next to the archive you want.
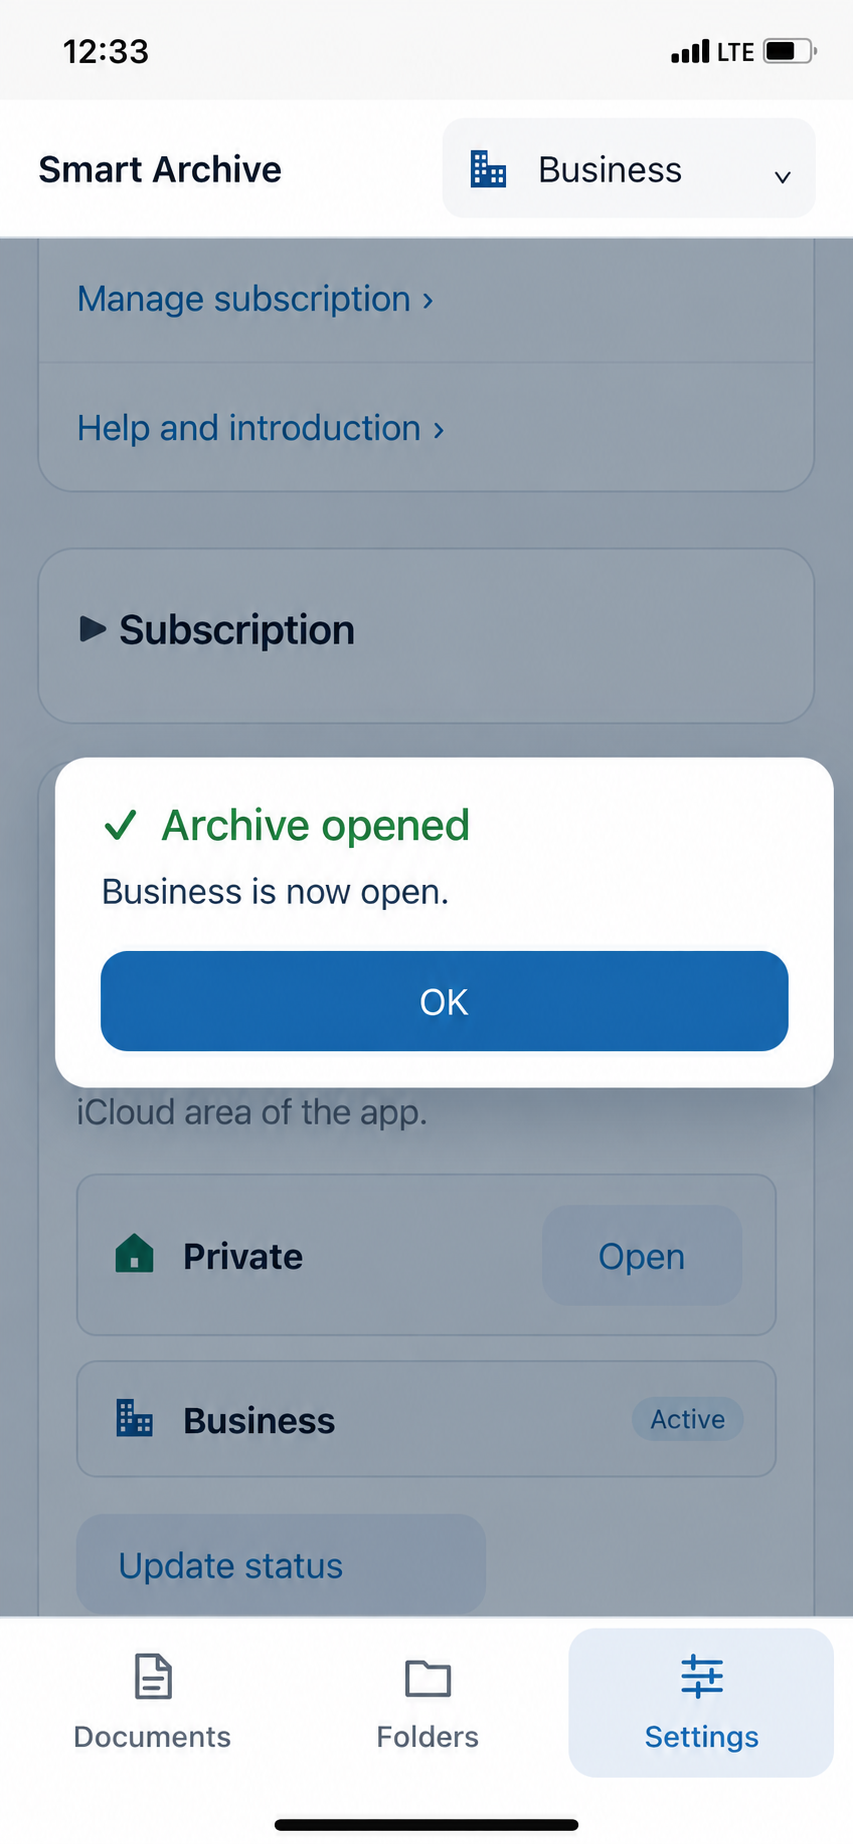
Confirmation
“Archive opened – Business is now open.” Tap OK.
How to tell
The top right now shows Business with the building icon. From now on, documents, folders, tags and AI preferences belong to this archive.
Quick way: the archive button at the top
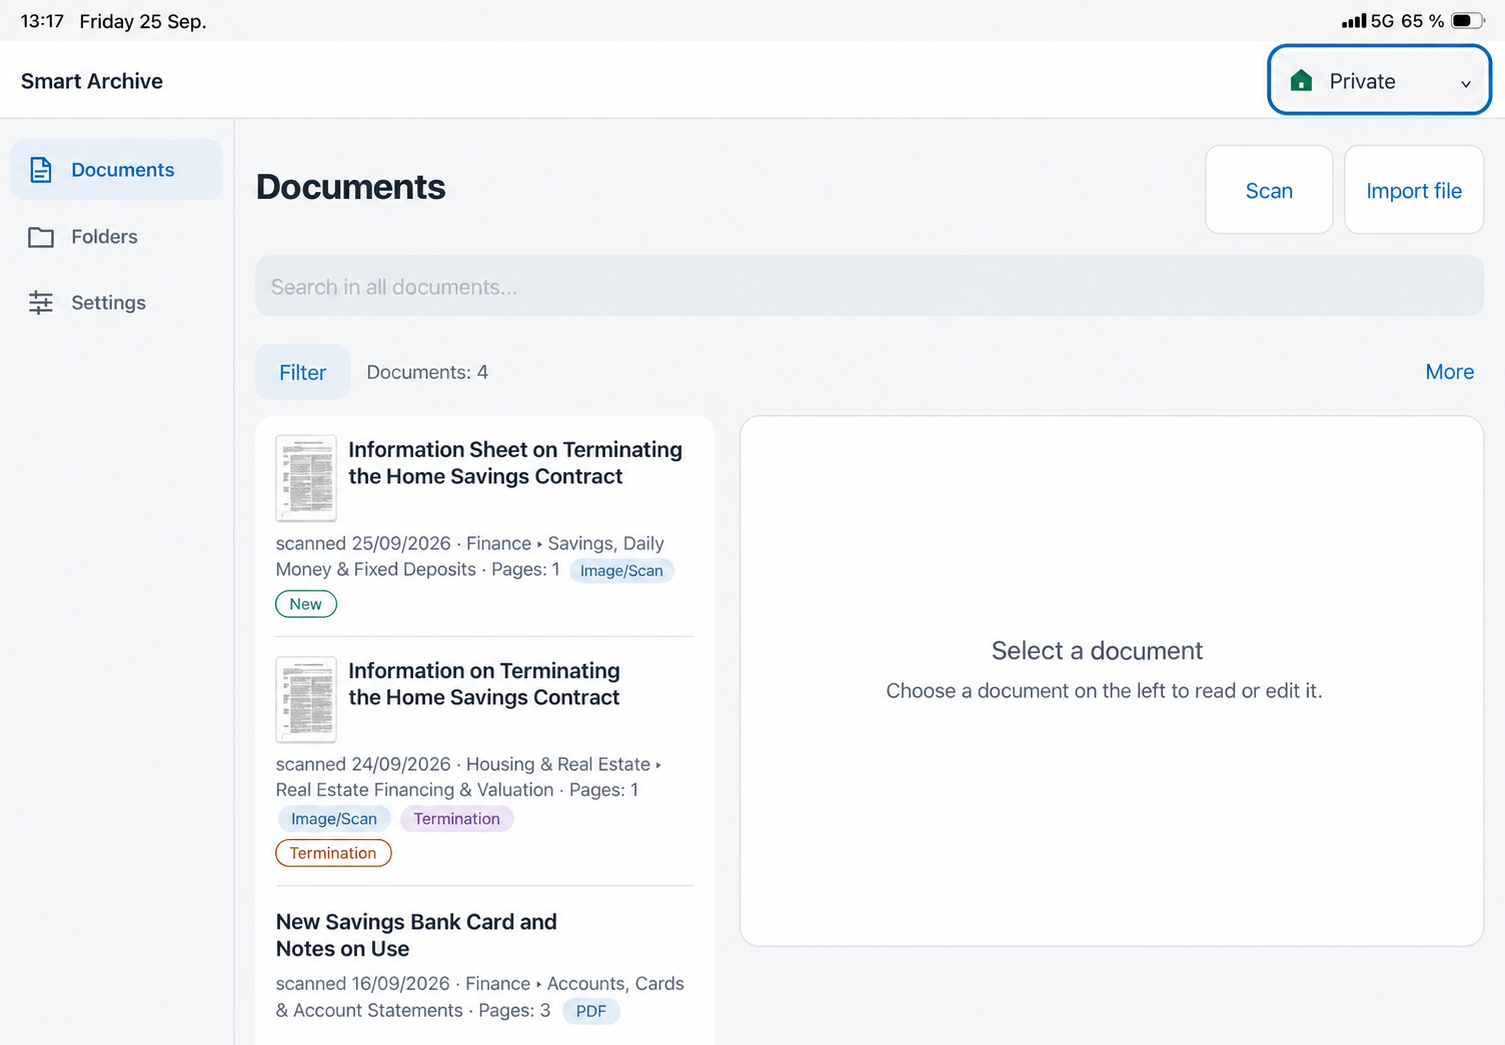
You don’t have to go to Settings every time. On iPhone, tap the archive button at the top right (e.g. “⌂ Private ⌄”) and pick the other archive under Choose archive. On iPad and Mac, the same button is at the top right above the document list. Without Pro, the business archive shows “from Pro”.
3.5AI evaluation
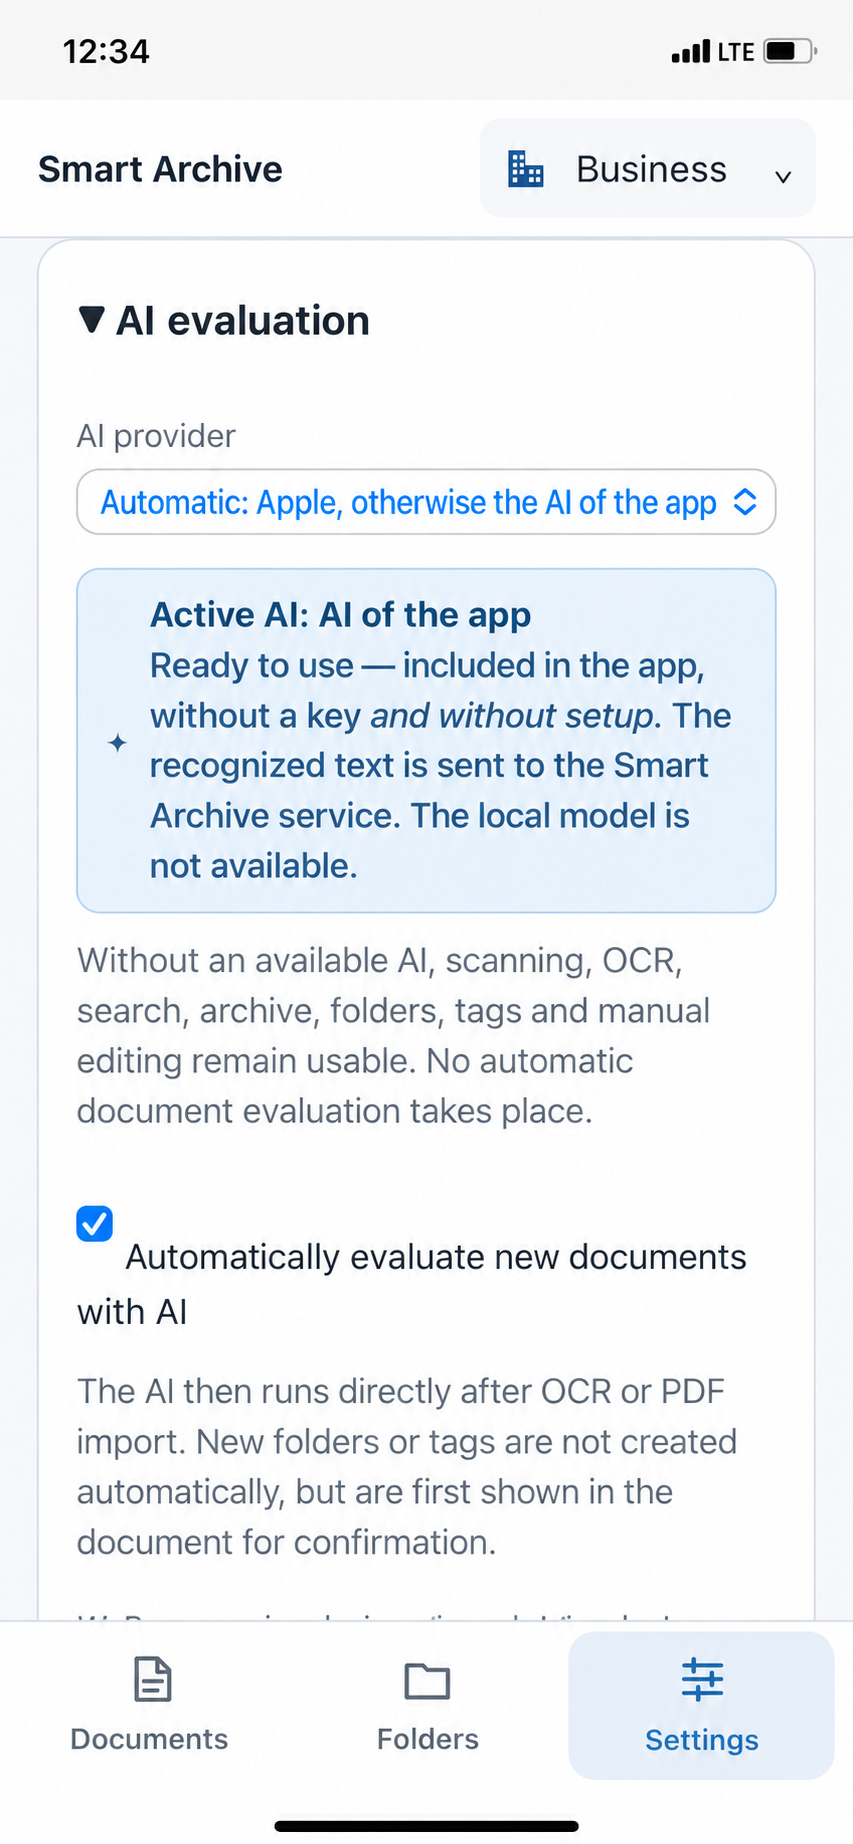
Here you decide which AI evaluates your documents and whether that happens automatically. If you change nothing, Smart Archive chooses the best available AI by itself.
Choose the AI provider
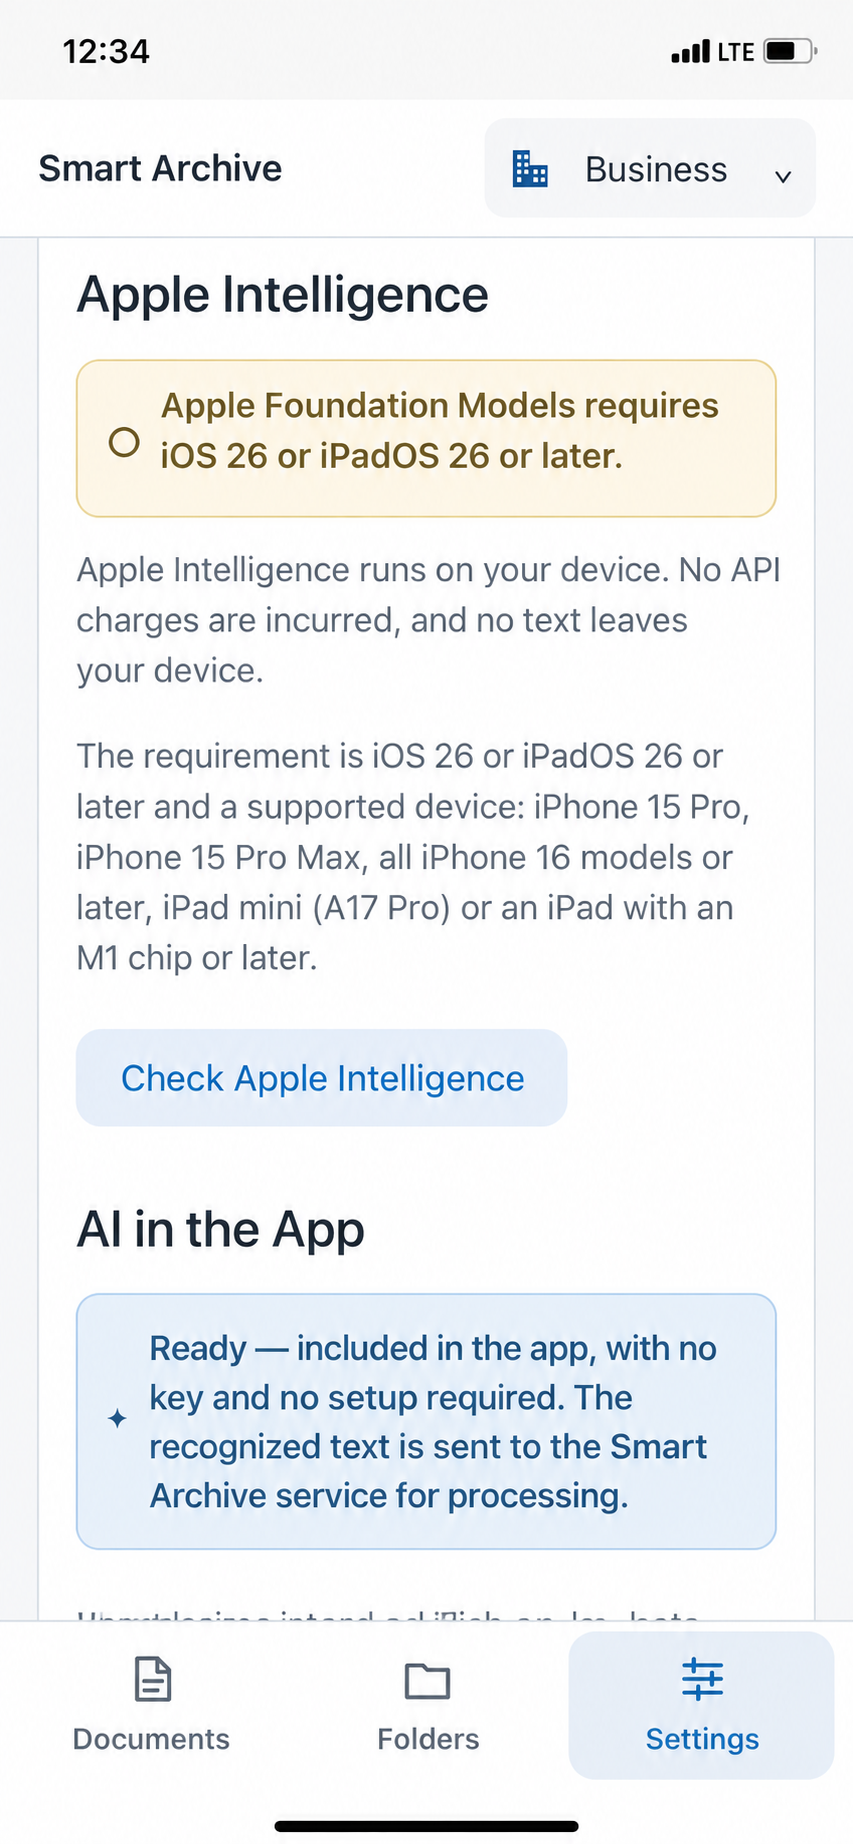
“Automatic: Apple, otherwise the app AI” is recommended: where Apple Intelligence is available, processing is local; otherwise the app AI takes over. Alternatives: Apple Intelligence only (local), App AI only or—with Business—OpenAI API only. “Active AI” below shows which one is currently working.
The “Automatically analyze new documents with AI” checkbox makes sure every new document is analysed straight after text recognition. Without it, you start the analysis yourself in the AI tab.
Apple Intelligence
Runs entirely on the device: no costs, no internet required, no text leaves the iPhone. Requires iOS 26 or iPadOS 26 and an iPhone 15 Pro/Pro Max, iPhone 16 or later, iPad mini (A17 Pro) or an iPad with M1 or later. A yellow note tells you if something is missing. Check Apple Intelligence tests availability again.
App AI
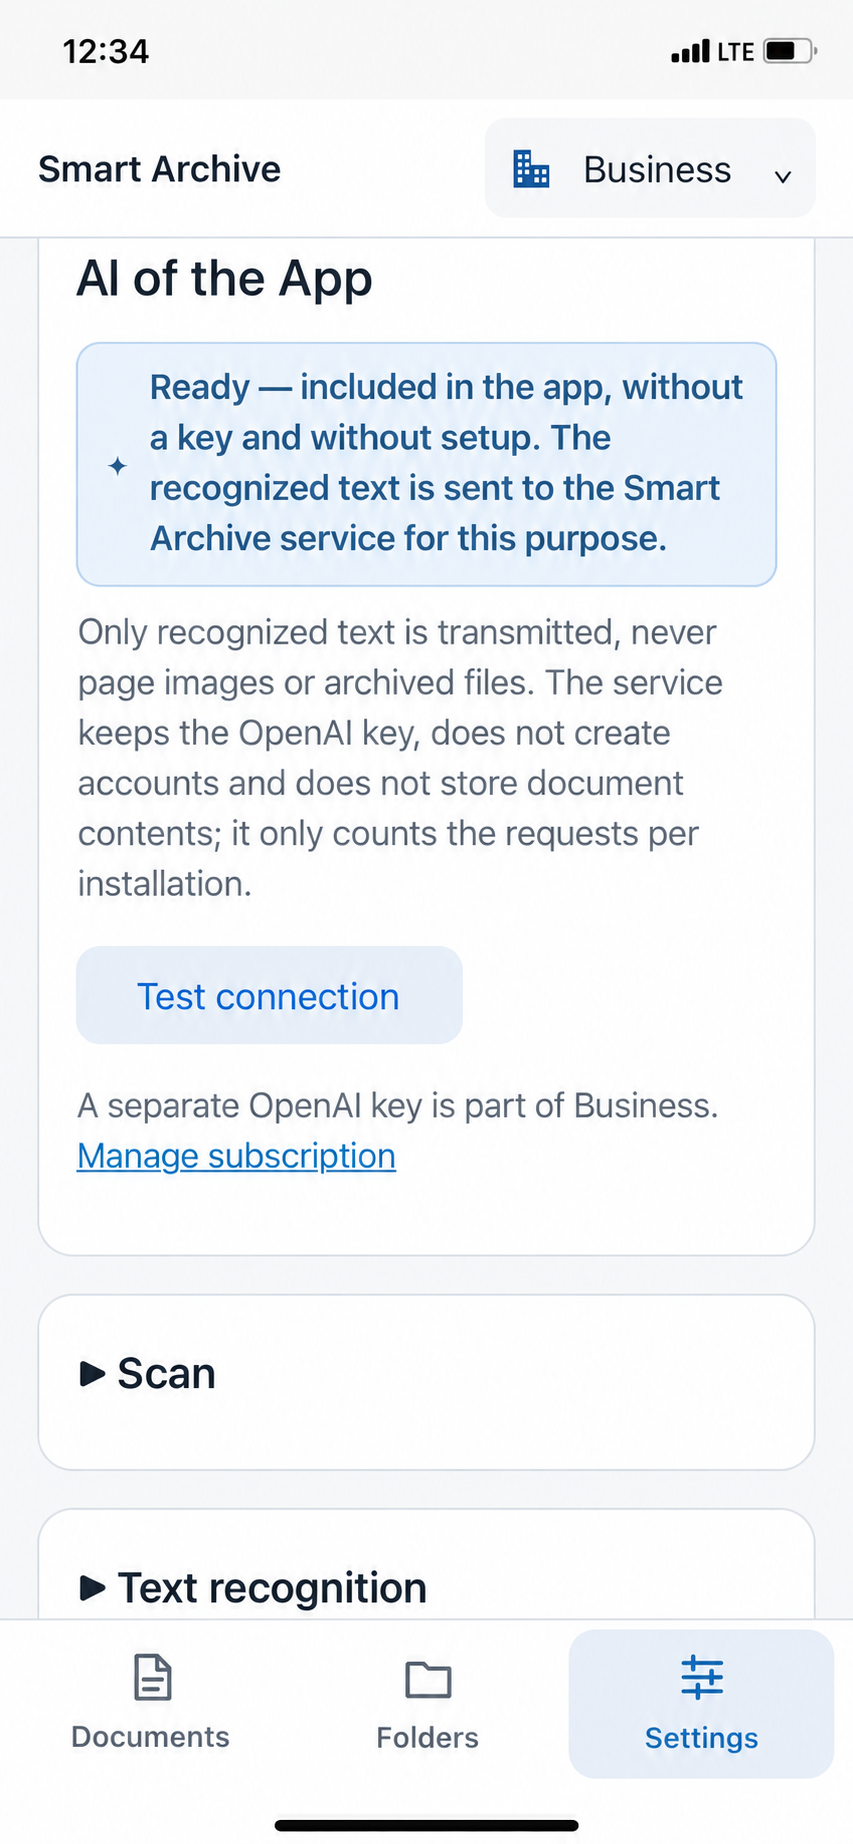
Included in every plan—no key, no setup. It needs internet. Only recognised text is transferred, never page images or files; the service keeps no accounts and stores no document content. Test connection checks whether it is reachable.
Business only: preferences and your own key
Under AI preferences you store your own instructions for every analysis, such as “Omit legal forms from sender names” or “Always include the currency with amounts”. They apply per archive. You can also enter your own OpenAI API key and choose a model; the key is stored securely in the iOS Keychain. OpenAI may charge usage-based API costs.
No AI at all?
Scanning, text recognition, search, archive, folders, tags and manual editing always work. Without AI, only the automatic document analysis does not take place.
3.6Scanning
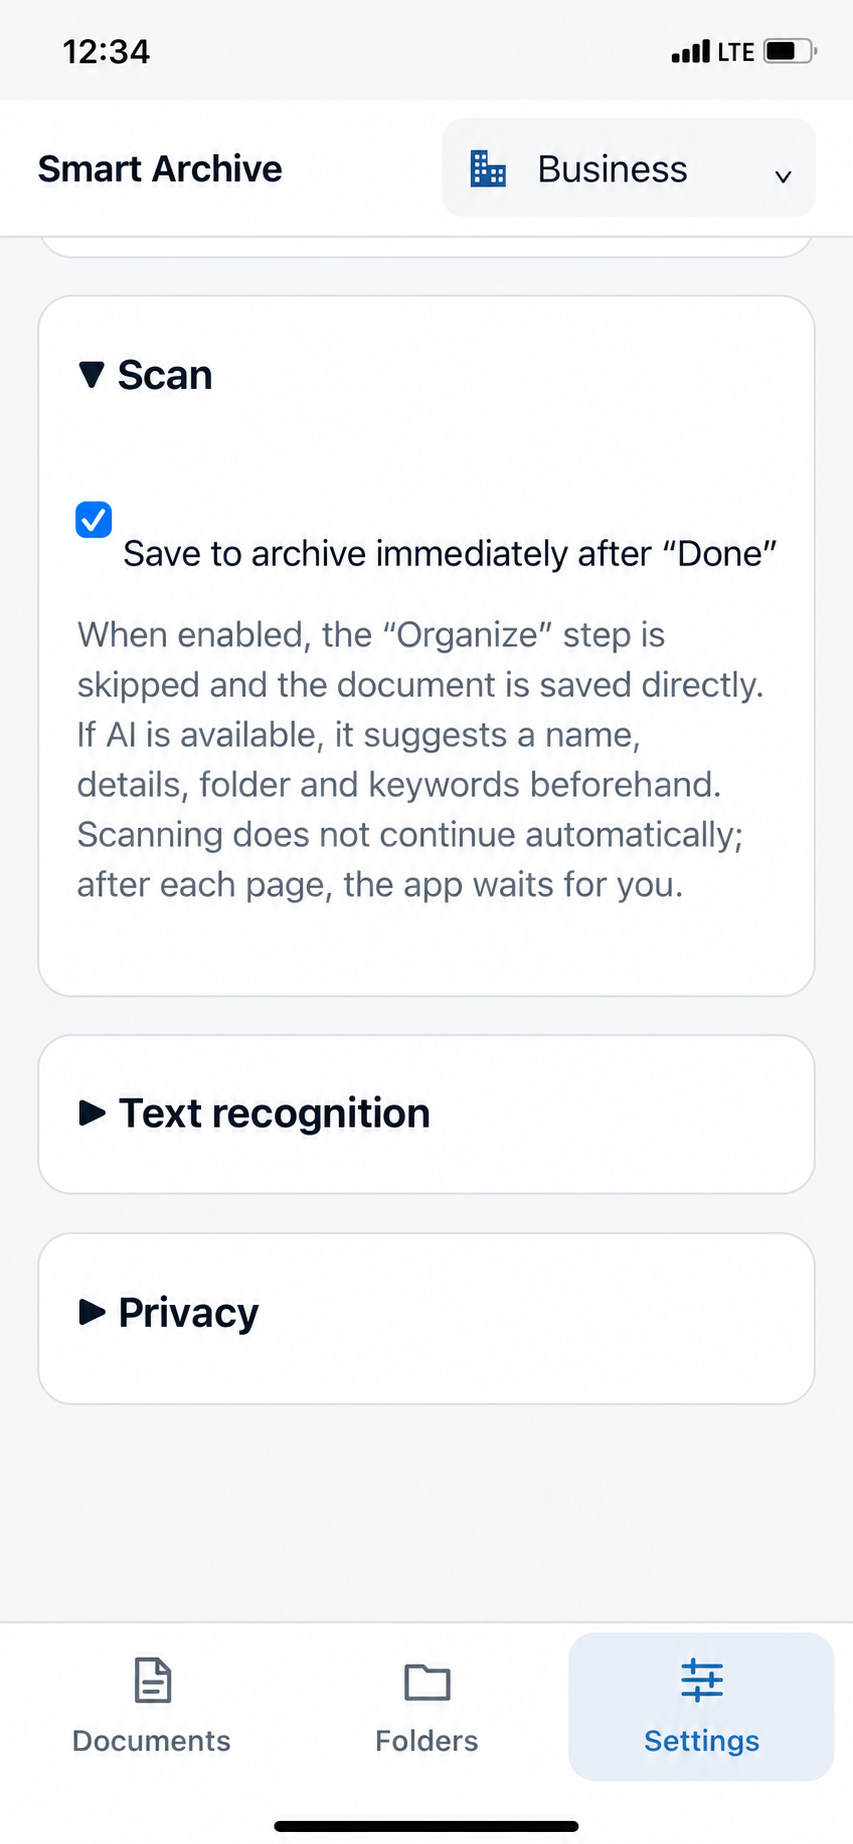
This section has one switch: “Put in the archive immediately after Done”.
The fastest way: after Save in Review scan, the document goes straight into the archive. If an AI is available, it assigns the name, details, folder and tags first. Ideal when capturing many documents in one go.
After scanning, the additional File document step appears. There you check the name, document date, folder and tags before saving and file it with Put in archive. Ideal if you want to check every document yourself.
In both cases scanning never continues by itself: the app waits for you after every page.
3.7Text recognition
Text recognition (OCR) turns the image of a page into readable text. It is the basis for full-text search, for selecting and copying in the PDF and for AI analysis. It always runs entirely on the device.
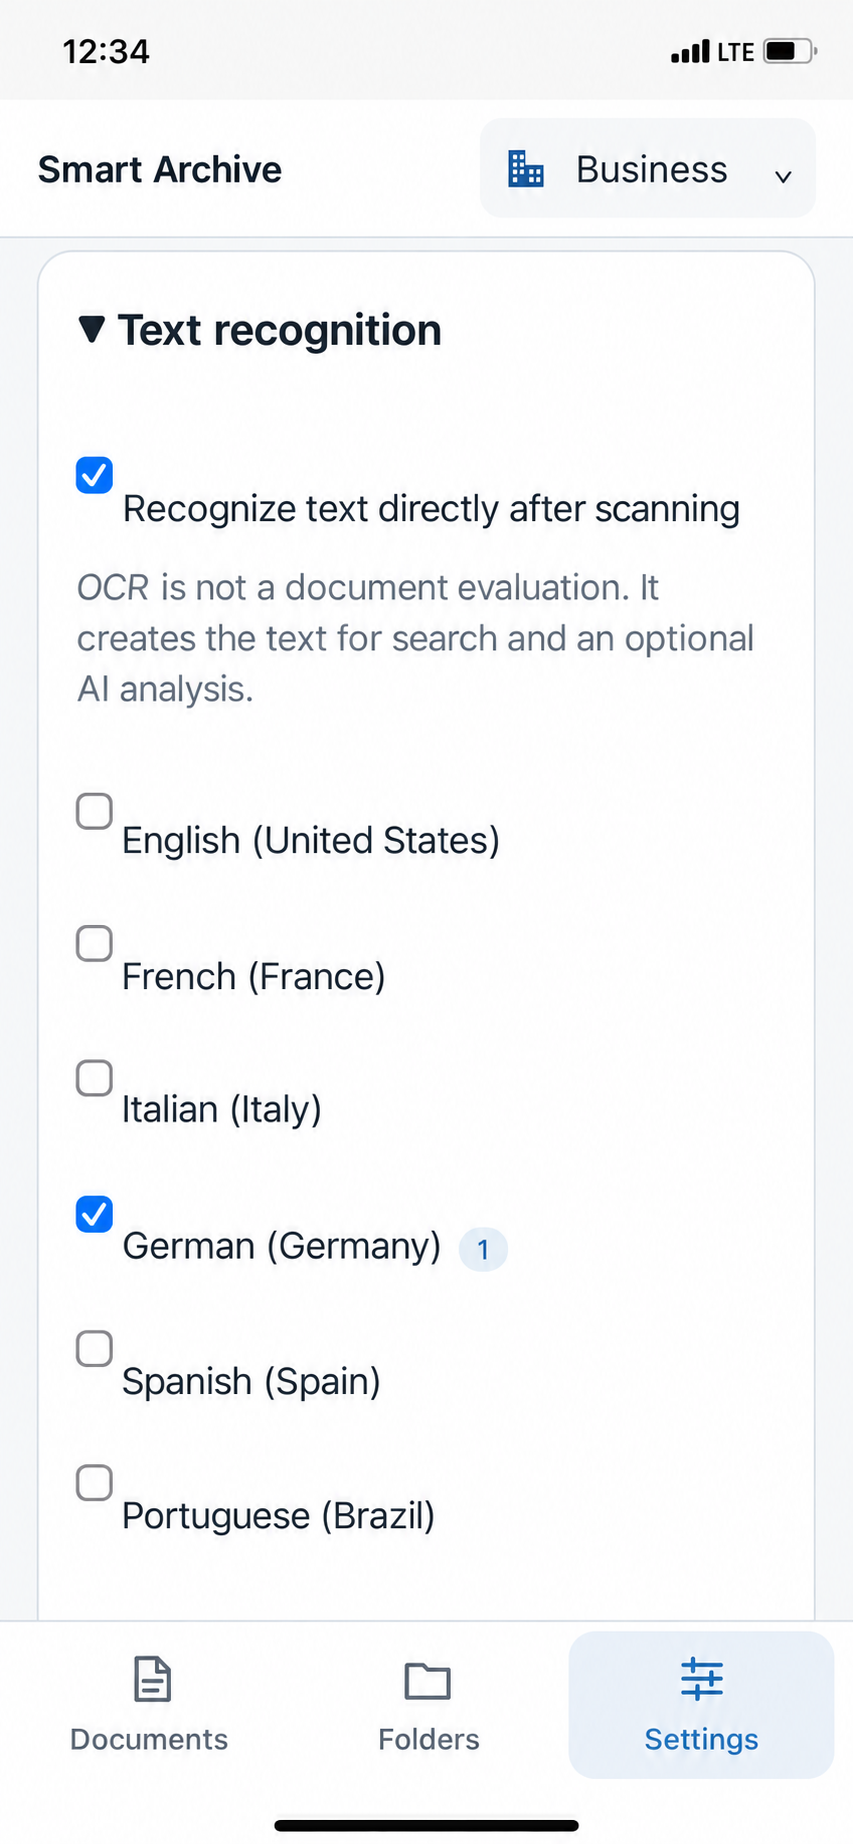
Recognize text directly after scanning
Should stay on. Every new document is then searchable straight away. OCR is not an analysis: it only creates the text; what it means is recognised by AI.
Choose recognition languages
Tick every language in which you receive mail—for example German and English. The list shows the languages your device offers for text recognition, e.g. English, French, Italian, German, Spanish and Portuguese.
Update older documents
If you have added a language, open a document you saved earlier and tap Run OCR again under Edit pages (1.2.4).
Not too many languages
Only select the languages you really need. The more precise the selection, the more reliably accented and special characters are recognised.
3.8Privacy
The Privacy section summarises what happens to your documents:
Your archives are stored in the app’s private iCloud area, which only you can access with your Apple account. All details are in the privacy policy.
CHAPTER 4
iPad and Mac
On iPad and Mac everything works just as on iPhone—only laid out more generously. With an internet connection, all devices with the same Apple account sync through iCloud: scan on iPhone and the document appears on iPad and Mac shortly afterwards.
iPad
Mac
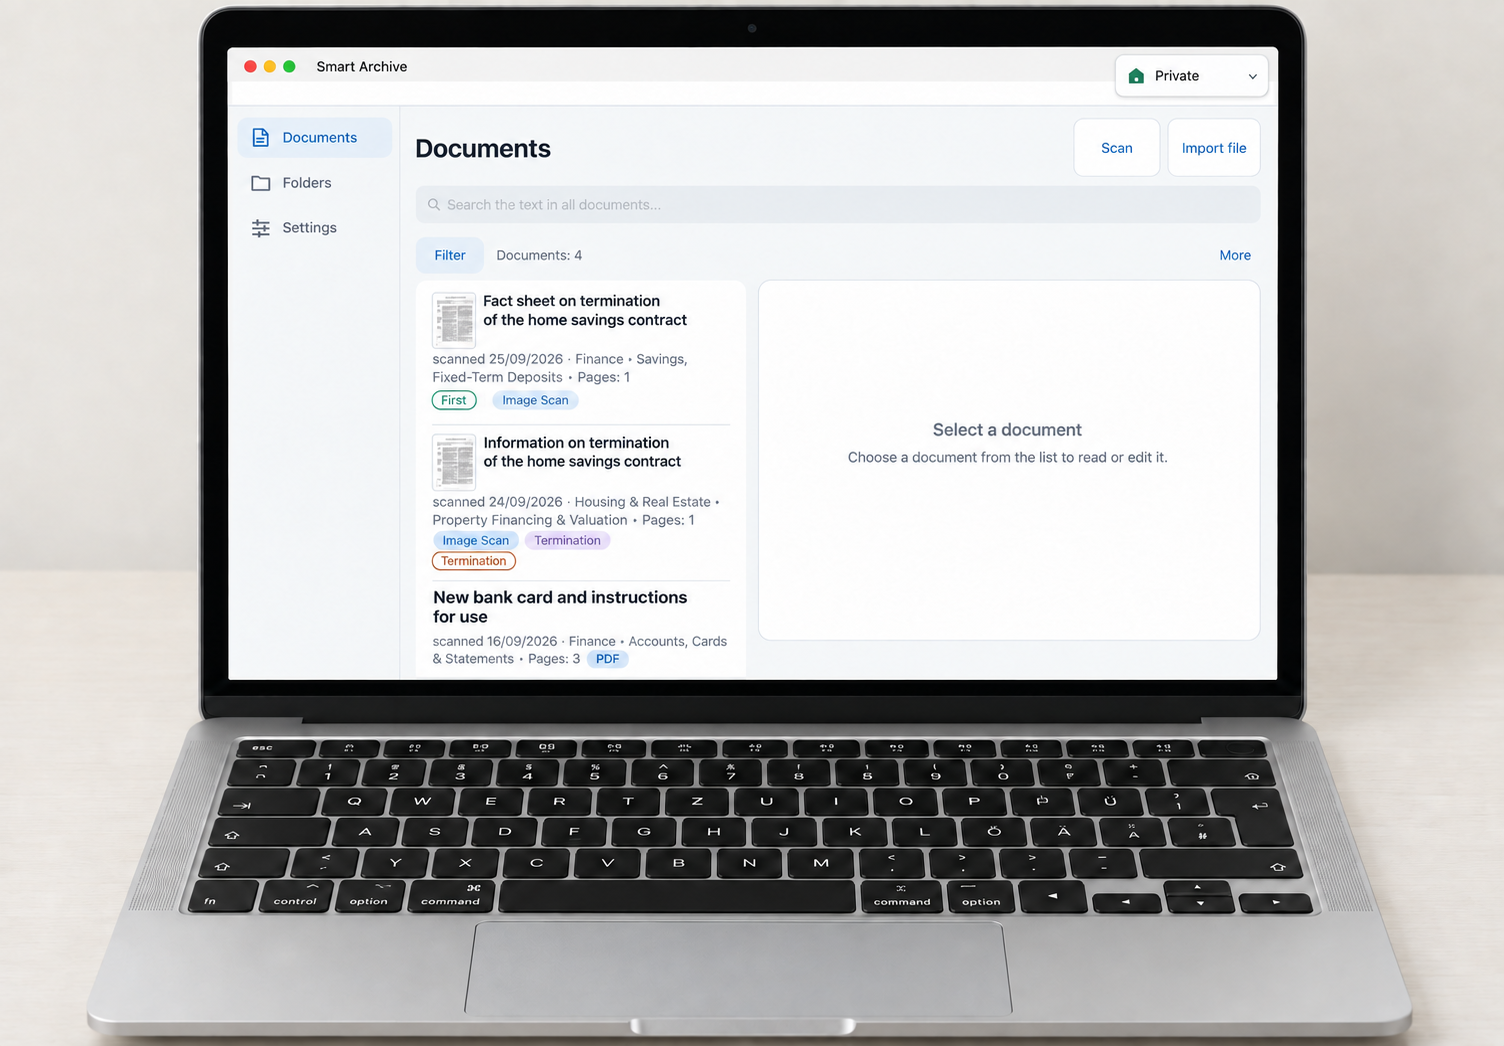
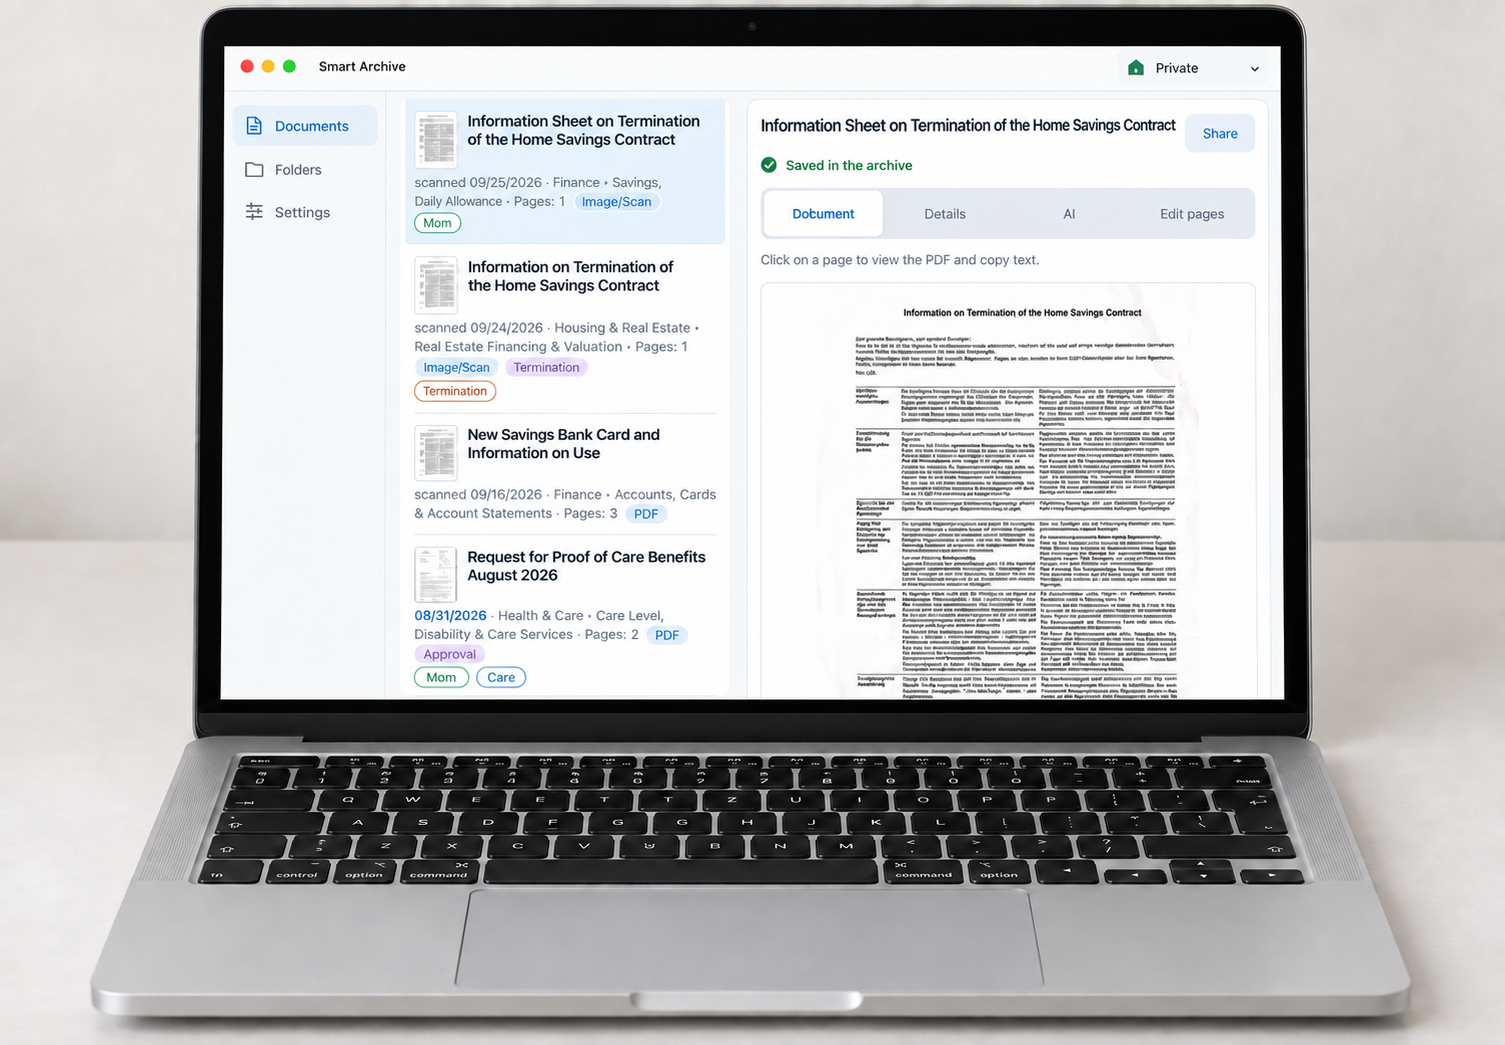
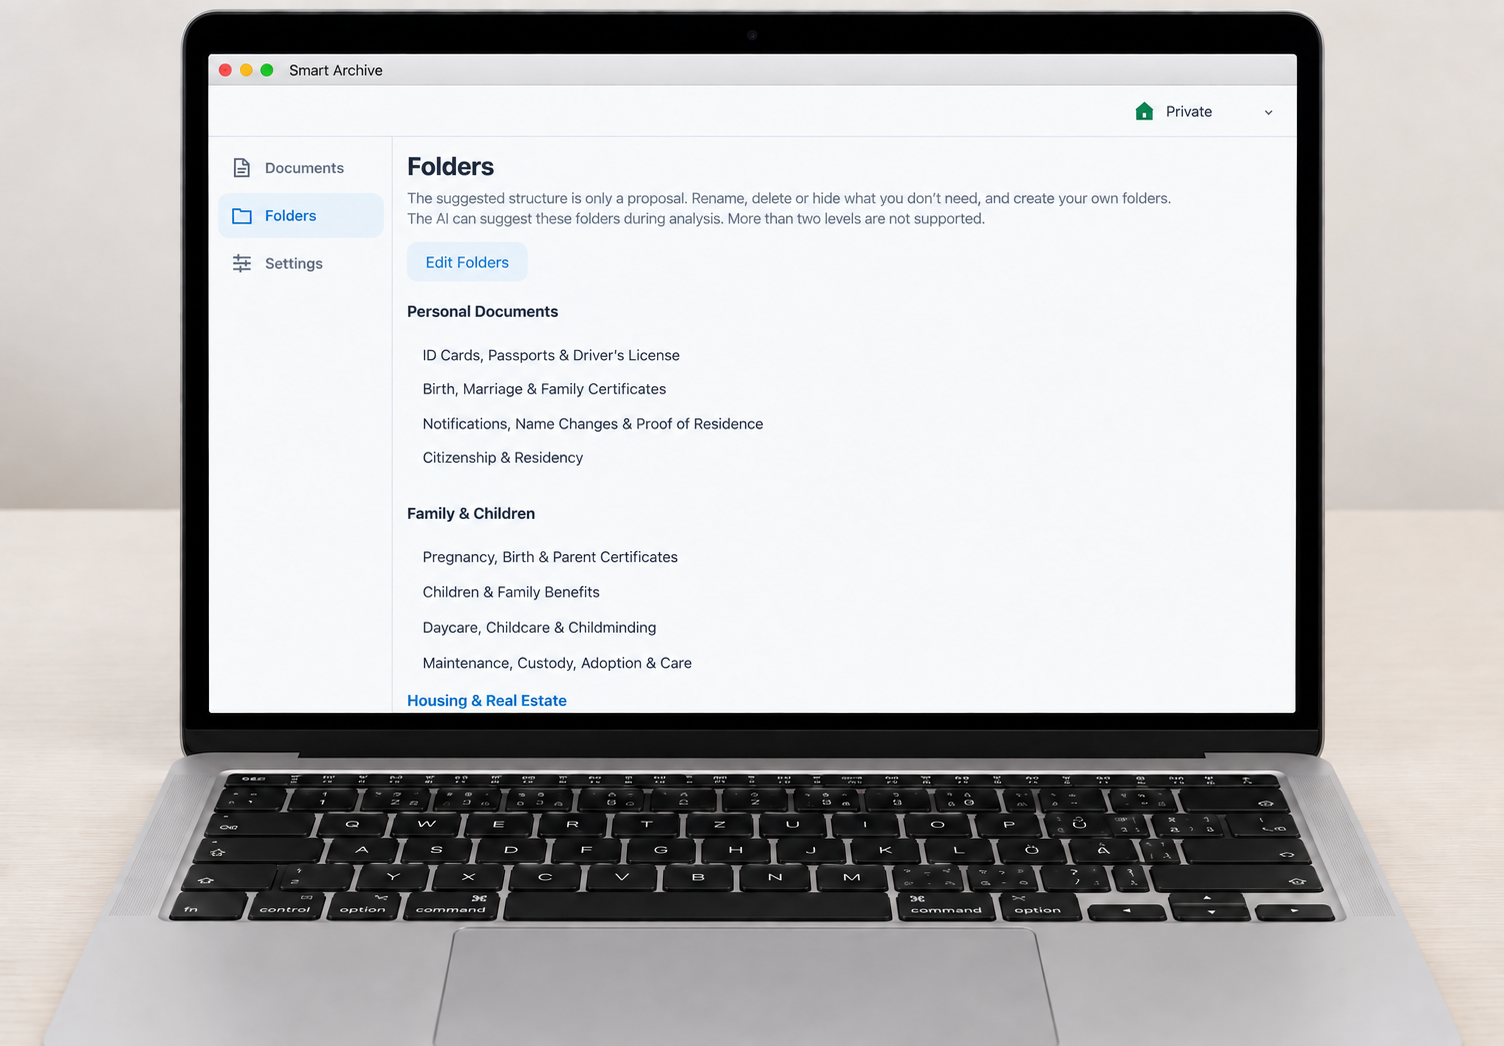
Mac requirements
The Mac version is included in the Business plan. It runs on a Mac with Apple silicon (M1 or later) and macOS 13.3 or later.
Same archives
Sign in with the same Apple account as on your iPhone. Mac and iPad use the same archives in iCloud—there is nothing to copy or export.
Transfer your plan
On the new device, open Manage subscription and tap Restore purchases (3.2.1) if the subscription is not recognised immediately.
iPhone as a scanner
Scan paper conveniently with your iPhone and continue working on the big screen. If a document you just scanned is still missing, use More › Refresh (1.5).
STILL HAVE QUESTIONS?
The quick start in five minutes
The quick start page sums up the essentials compactly—ideal for showing Smart Archive to someone.
Go to quick start